Ii. i – Swiftech H20 120 PREMIUM REV3 User Manual
Page 6
Copyright Swiftech 2007 – All rights reserved – Last revision date: 06-14-07 - Information subject to change without notice – URL:
http://www.swiftech.com
Rouchon Industries, Inc., dba Swiftech – 3400 Industry ave., suite 104, Lakewood, CA 90712 – Tel. 562-595-8009 – Fax 562-595-8769 - E Mail: [email protected]
PAGE 6 of 28
VGA Cooler discharge to chipset cooler inlet
Chipset cooler discharge to radiator (2) inlet
Radiator (2) discharge to CPU cooler inlet
CPU cooler discharge to reservoir inlet
II. I
NSTALLATION OF THE COOLING COMPONENTS
Placement of the cooling components may vary depending on your chassis and motherboard configurations.
The following is the recommended sequence of components installation.
1: Radiator & fan; 2: Water-block(s); 3: Pump; 4: Reservoir; 5: Tubing; 6: Filling-up the system
1
MCR120-F
R
ADIATOR INSTALLATION
Your first choice is to decide whether you will be installing
the radiator INSIDE of the computer, or use the included
“Radbox” to hang the radiator OUTSIDE at the back of the
computer chassis.
There are four considerations that will dictate such choice:
Performance: From a pure performance standpoint, using
the Radbox will always be a superior solution to an
installation inside of the computer because the
temperature of the ambient air outside of the computer –
which is used to cool the radiator, will always be cooler
than that of the inside even in the best ventilated case.
Additional benefits are also discussed in the Radbox
installation section below.
Space constraints: If your PC has no room inside to
install a 120mm radiator, and if you are not inclined to
modify the case to “make it fit”, the Radbox will allow you
to hang the radiator to any standard fan opening at the
back of the chassis, without any modifications; using the
Radbox then also becomes an obvious choice.
Conversely, if you have enough room inside of the PC to
install the radiator, BUT your PC is located in a space
constrained area, then adding the Radbox to the back of
the chassis will lengthen the PC, which could prevent its
use.
Noise: Having the radiator/fan assembly operating outside
of the chassis may slightly increase the audible noise
compared to an internal installation, because the chassis
no longer muffles the noise emitted by the fan. A mitigating
factor to this is the fact that the Radbox assembly is at the
back of the computer, and usually hidden away amidst the
various cables. If the PC is underneath a desk, chances
are that there will be no audible difference between an
internal installation and an external one. However, there
are situations where the PC is located in an open area,
close to the user ears. In such case, users in search of the
lowest possible audible noise will prefer to install the
radiator inside of the computer.
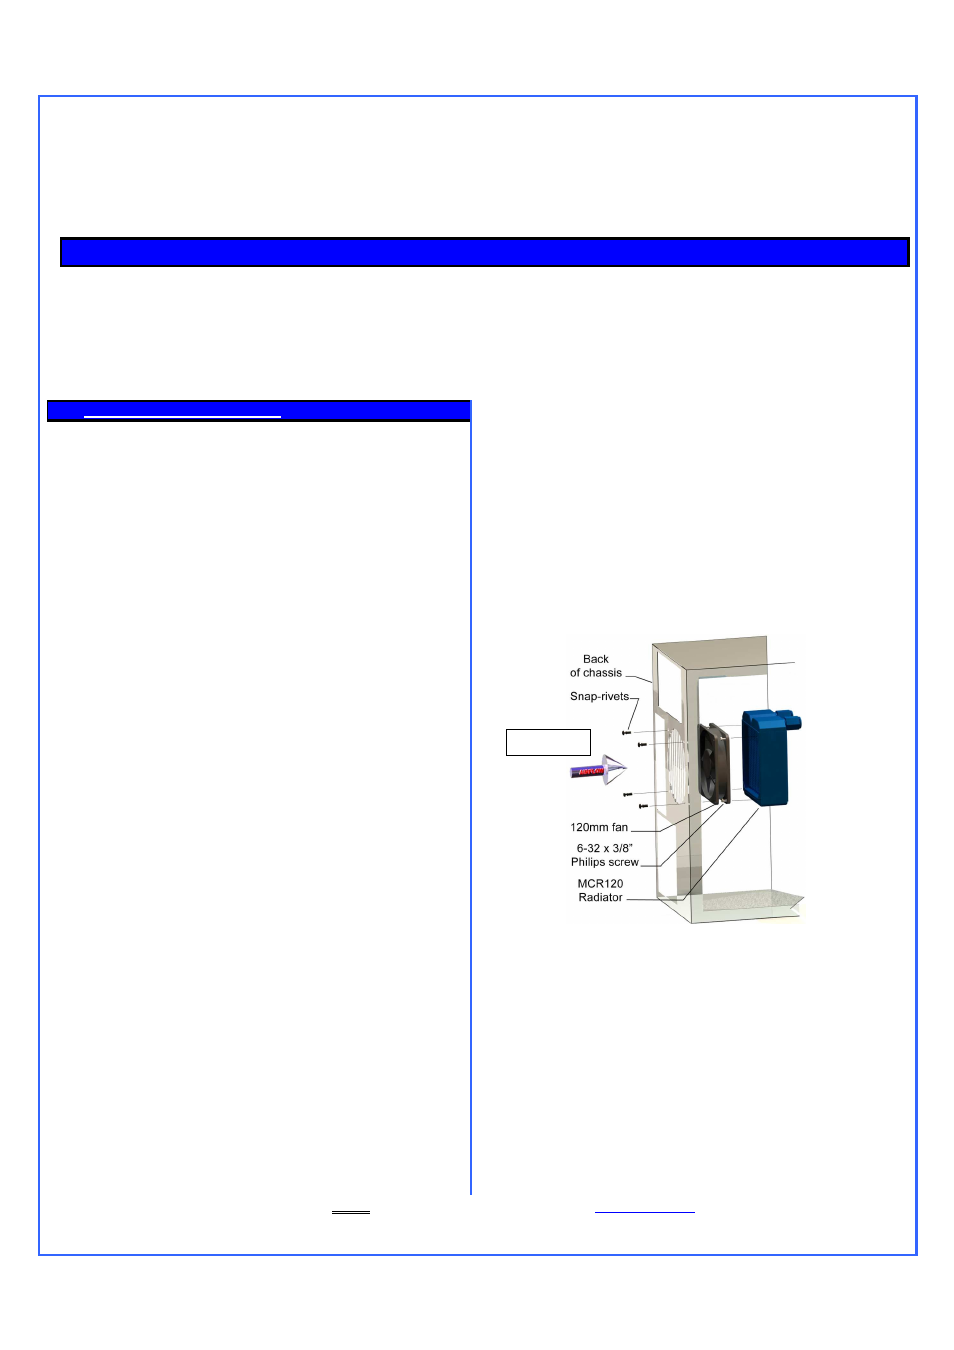
Back of the case radiator installation:
If CPU cooling is a priority, we suggest that the fan be
installed in intake mode in contradiction to the “classic”
airflow scheme, which is intake at the front, and exhaust at
the back. In effect, if the fan flow direction were reversed, it
would use heated air from inside of the chassis, which is
usually 3
°
C (at best) and up to 10
°
C hotter than that of the
ambient air outside of the chassis. Conversely, users with
excellent ventilation in their case may opt to install the fan
in exhaust mode with the understanding of the above
stated temperature handicap.
Figure 1
Front of the case Radiator installation:
This is an ideal location, as the radiator draws fresh air, and
the “classic” airflow scheme is respected.
AIRFLOW