Swiftech MCW6000 2 A User Manual
Page 3
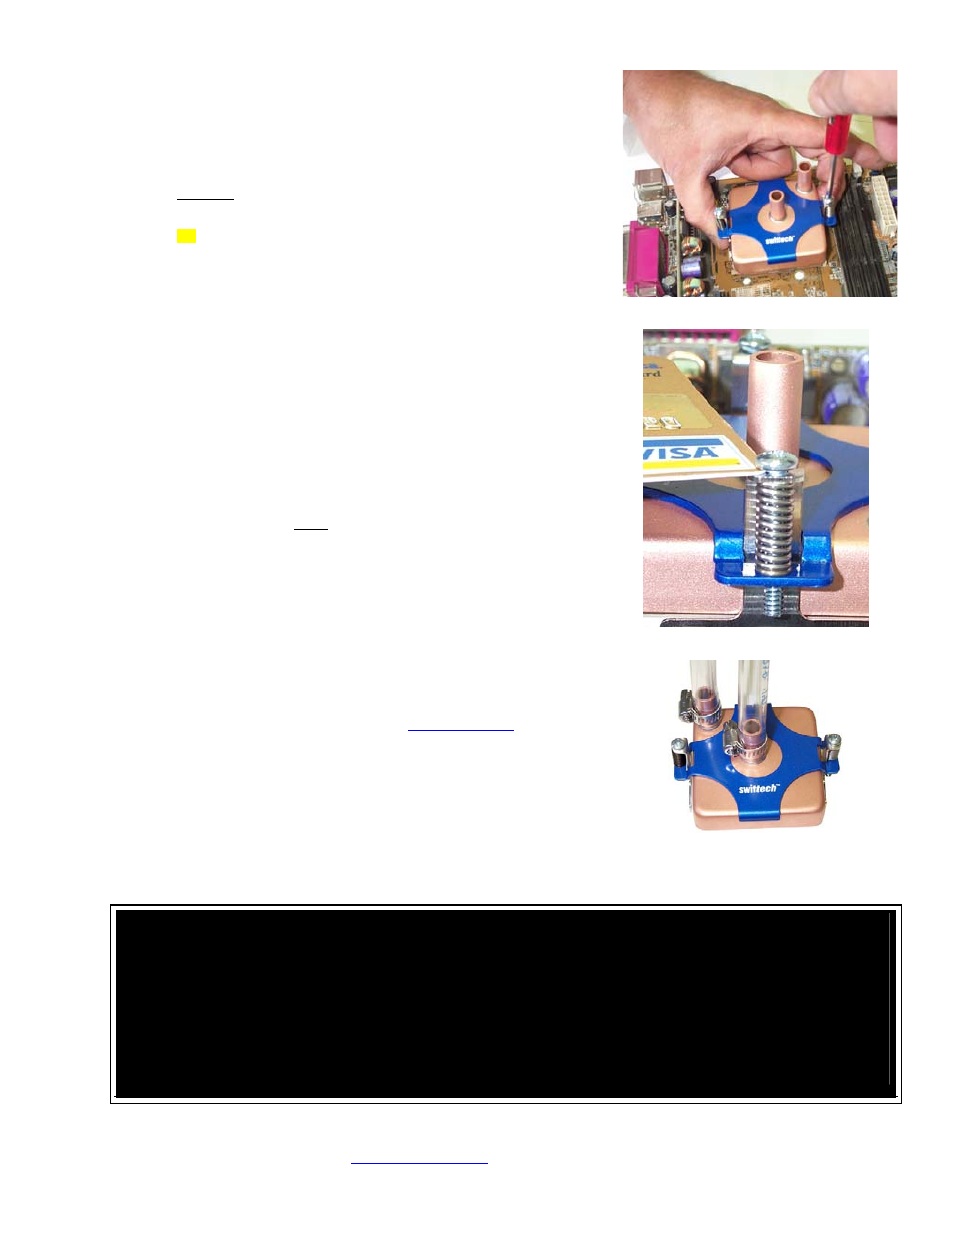
Figure 2
Figure 3
Place the MCW6000 or 6002-A
over the CPU as shown in figure 1 page 1.
The water-block step side MUST be located over the socket cam box. A label affixed to
the base of the water-block clearly identifies which side this is.
The retention clips should snap over each side, and hook onto the socket
tabs. Make sure that the clips are properly aligned to fit snugly underneath
the tabs.
Gradually loosen (counter-clockwise) each spring-loaded screw to release
the spring tension, checking that the clips remain engaged underneath the
tabs.
TIP: if space permits, hold the clips pressed against the socket while
loosening the screws, as shown in figure 2. This will prevent the clips for
disengaging themselves from underneath the tabs at start-up. N all
Continue backing off until the head of the screw completely clears the top
of the bracket, as shown figure 3.
Double-check to ensure that the clips have remained underneath the tabs.
Installation to the CPU is now complete !
4.
Connecting the water-block(s) to the cooling circuit:
Carefully identify the direction of the flow in your circuit. For the MCW6000 to
operate properly, the fitting located at the center of the water-block MUST BE
USED AS THE INLET.
TIP!
In multi-processor environments, connect the two blocks in series:
For example: pump discharge to inlet of processor 1, discharge of processor
1 to inlet of processor 2, and discharge of processor 2 to radiator.
Attaching the tubes:
The MCW6000™ series ship with worm-drive type hose clamps. Secure the
tubes as shown in the picture to the right (shown below with an AMD
bracket), and tighten firmly.
5. Type
of
Coolant:
Being entirely made of copper, the MCW6000™ series may be used with pure water,
and do not necessitate the use of anti-corrosion agents. The use of an algaecide is
nonetheless recommended in any liquid cooling system, and our HydrX™ additive also
performs such function.
6.
Final inspection
Once the installation is completed, it is always a good idea to test the circuit for leaks,
prior to powering up the computer. Do not test the water-block using city water
pressure. This will bow the top of the housing and render the block unusable (and will
void your warranty). Maximum pressure allowable for testing is 25 psi (1.7 bar)
Troubleshooting help is available on our web site at
y calling
customer support at 562-595-8009.
Tubes attached with the included worm-drive
clamps
IMPORTANT DISCLOSURES
While all efforts have been made to provide the most comprehensive tutorial possible, Swiftech assumes no liability expressed or implied
for any damage(s) occurring to your components as a result of using Swiftech cooling products, either due to mistake or omission on our
part in the above instructions, or due to failure or defect in the Swiftech cooling products.
WARRANTY
Our products are guaranteed for 12 months from the date of delivery to the final user against defects in materials or workmanship. During
this period, they will be repaired or have parts replaced provided that: (I) the product is returned to the agent from which it was purchased;
(II) the product has been purchased by the end user and not used for hire purposes; (III) the product has not been misused, handled
carelessly, or other than in accordance with any instructions provided with respect to its use. This guarantee does not confer rights other
than those expressly set out above and does not cover any claims for consequential loss or damage. This guarantee is offered as an extra
benefit and does not affect your statutory rights as a consumer.
Copyright Swiftech 2004 – All rights reserved – Last revision date: 11-23-04
Rouchon Industries, Inc., dba Swiftech – 1703 E. 28
th
Street, Signal Hill, CA 90755 – Tel. 562-595-8009 – Fax 562-595-8769 - E
Mail: [email protected] – URL:
http://www.swiftnets.com
- Information subject to change without notice
Page 3 of 3