Flex-a-Lite 365 Dual Electric Fan User Manual
Scirocco radiator dual electric fan #365, Assembly & mounting instructions, Diagram a
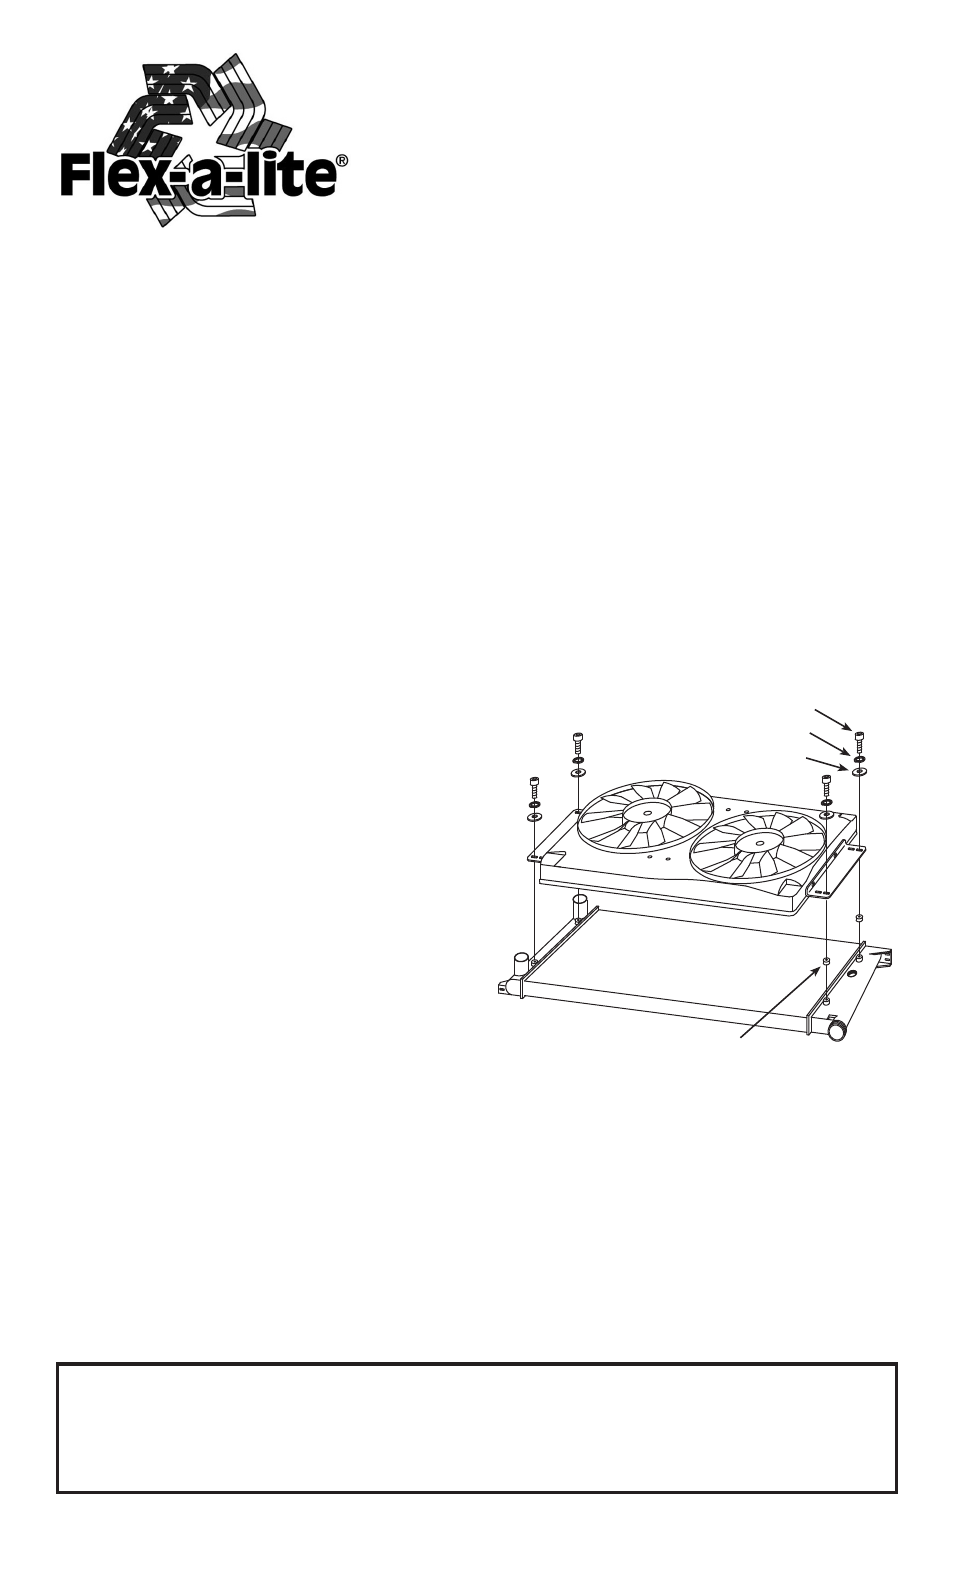
DIAGRAM A
Allen Cap Bolt
Lock Washer
Flat Washer
Spacer
(if needed)
Scirocco Radiator
Dual Electric Fan #365
“Griffin Scirocco Radiator ” Installation:
1. Assemble the Flex-a-lite model 365 Scirocco fan according to the instructions, then
follow
these directions for adding the additional set of holes in the mounting brackets.
2. Center the fan assembly between the two upper fan mounts on the radiator side tanks and
fasten using the bolts provided.
3. Mark lower mounting hole locations on the fan assembly mounting flanges so they line up
with the lower set of fan mounts on the radiator tanks.
4. Remove fan assembly from radiator.
5. Use file or drill to elongate the holes to fit the Griffin radiator holes.
6. Fasten fan assembly to radiator using the bolts, lock washers and flat washers provided.
Assembly & Mounting Instructions
1. Fan blades are factory mounted as pullers.
To use as a pusher simply slide E-clips off the ends of the motor shafts, reverse blades
and slide E-clips back into position on the ends of the motor shafts.
2. For puller mode attach the black wires to
a positive 12 volt power source and the red
wires to ground. For pusher mode attach the
black wires to ground and the red wires to a
positive 12 volt power source.
3. Mount the Flex-a-lite fan/shroud assembly
to the radiator using the spacers*, bolts,
flat washers and lock washers provided
(Diagram A). Always check to make sure
there is sufficient clearance for the bolt
threading into the radiator mounting
bosses so that it does not bottom out
and crack the radiator. If sufficient clearance
does not exist, use a shorter bolt or a
spacer under the head of the bolt.
*Spacers are used between the bracket and mounting bosses on radiators
where the mounting bosses on one side of the radiator are shorter than
the other. The spacers allow the shroud to lay flat on the radiator core
for even support and a good seal.
Scirocco O.E. Fan Replacement Instructions
1. Disconnect the battery ground cable.
2. Disconnect the fan motor wiring connector.
3. Remove the (4) shroud retaining bolts.
4. Remove the shroud and fan assembly from the car.
5. Install Flex-a-lite fan/shroud assembly as described above.
6. Fans can be wired by splicing into existing fan wiring harness. For increased control of fan,
purchase Flex-a-lite illuminated Switch #31148 or Adjustable Temperature Sensor #31147.
“Griffin Scirocco Radiator ” Installation:
1. Assemble the Flex-a-lite model 365 Scirocco fan according to the instructions, then
follow
these directions for adding the additional set of holes in the mounting brackets.
2. Center the fan assembly between the two upper fan mounts on the radiator side tanks and
fasten using the bolts provided.
3. Mark lower mounting hole locations on the fan assembly mounting flanges so they line up
with the lower set of fan mounts on the radiator tanks.
4. Remove fan assembly from radiator.
5. Use file or drill to elongate the holes to fit the Griffin radiator holes.
6. Fasten fan assembly to radiator using the bolts, lock washers and flat washers provided.
Disconnect the battery ground cable.
1.
Disconnect the fan motor wiring connector.
2.
Remove the (4) shroud retaining bolts.
3.
Remove the shroud and fan assembly from
4.
the car.
Install Flex-a-lite fan/shroud assembled as
5.
described above.
Fans can be wires by slicing into existing fan
6.
wiring harness. For increased control of fan
purchase Flex-a-lite illuminated Switch #31148
or Adjustable Temperature Sensor #31147.
Fan blades are factory mounted as pullers. To use as a pusher simply slide E-clips off the ends
1.
of the motor shafts, reverse blades and slide E-clips back into position on the ends of the motor
shafts.
For puller mode attache the black wire to a positive 12 volt power source and the red wires to
2.
ground. For pusher mode attach the black wires to ground and the red wires to a positive 12 volt
power source.
Mount the Flex-a-lite fan/shroud assembly to the radiator using the spacers*, bolts, washers and
3.
lock washer provided (Diagram A). Always check to make sure there is sufficient clearance for
the bolt threading into the radiator mounting b bosses so that it does not bottom out and crack the
radiator. If sufficient clearance does not exist use a shorter bolt or a spacer under the head of the
bolt.
*Spacers are used between the bracket and mounting bosses on radiators where the mounting
bosses on one side of the radiator are shorter than the other. The spacers allow the shroud to lay flat
on the radiator core for even support and a good seal.
Assembly & Mounting
Instructions:
Center the fan assembly between the two upper fan mounts on the radiator side tanks and fasten
1.
using the bolts provided.
Mark lower mounting hole locations on the fan assembly mounting flanges so they line up with the
2.
lower set of fan mounts on the radiator tanks.
Remove fan assembly from radiator.
3.
Use file or drill to elongate the holes to fit the Griffin radiator holes.
4.
Fasten fan assembly to radiator using the bolts, lock washers, and flat washers provided.
5.
Scirocco O.E. Fan Replacement
Instructions:
“Griffin Scirocco Radiator ”
Installation:
The Flex-a-lite Limited Warranty
Flex-a-lite Consolidated, 7009-45th St. Ct. E. Fife, WA 98424, Telephone No. 253-922-2700, warrants to the original purchasing user, that all Flex-a-lite
products to be free of defects in material and workmanship for a period of 365 days
(1 year) from date of purchase. Flex-a-lite products failing within
365 days
(1 year) from date of purchase may be returned to the factory through the point of purchase, transportation charges prepaid. If, on inspection,
cause of failure is determined to be defective material or workmanship and not by misuse, accidental or improper installation, Flex-a-lite will replace the
product free of charge, transportation prepaid.
Flex-a-lite will not be liable for incidental, progressive or consequential damages. Some states do
not allow the exclusion or limitation of incidental or consequential damages, so the above limitation or exclusion may not apply to you. This warranty gives
you specific legal rights and you may have other rights, which vary from state to state. The Flex-a-lite warranty is in compliance with the Magnuson-Moss
Warranty Act of 1975.
Rev. 11-08-12 #99966 Page 1 of 1