Flex-a-Lite 55 Auxiliary Electra-Fan User Manual
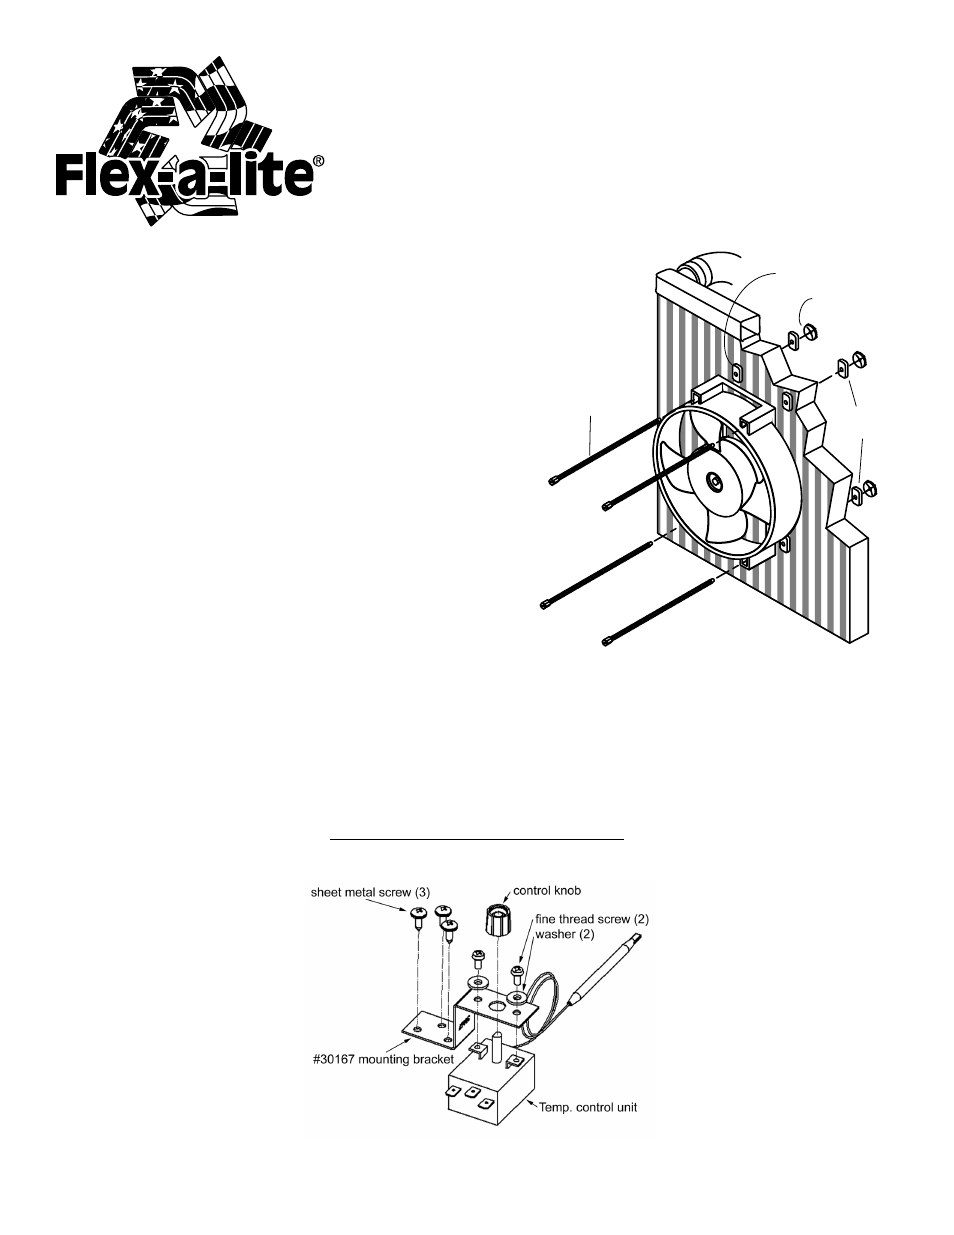
55 auxiliary electra-fan installation instructions, Adjustable temperature control kit, Figure 1 pusher mode (in front of radiator)
50-55 Auxiliary Electra-Fan
Installation Instructions
(55 with out TEMP Control)
The Auxiliary Electra-Fan should be installed in accordance with
the following instructions.
Improper installation may result in premature failure and void the
Limited One-Year Warranty.
MOUNT FAN TO RADIATOR OR A/C CONDENSER-All
Installations:
INSTALLING THESE FANS IN FRONT OF THE RADIATOR
WILL RESULT IN A PUSHER FAN;
INSTALLING IT BEHIND THE RADIATOR WILL RESULT
IN A PULLER FAN. REGARDLESS, IN ALL INSTALLA-
TIONS, THE SIDE OF THE UNIT WITH THE FAN BLADES
EXPOSED SHOULD ALWAYS FACE THE FRONT OF THE
VEHICLE.
1) Determine whether the fan will be installed in FRONT of
the radiator or condenser (pusher) or BEHIND radiator or
condenser (puller).
2) Position fan on the radiator or A/C condenser where it
will have at least 3/4” clearance to any other object. Using a
small Phillips screwdriver, carefully spread the radiator fins
to allow the mounting bolts to pass through the radiator. Be
careful not to damage the radiator tubes.
3) Fit 4 nylon bolts through the fan, and slip a rubber washer
over each bolt. See FIG. 1.
4) Fit the fan to the radiator, feeding all four screws through the radiator, and add a plastic washer to each bolt.
5) Push a nylon push-nut up each nylon bolt until snug.
6) Turn push nut clockwise until tight, then trim off excess bolt, leaving 1/4” exposed.
Adjustable Temperature Control Kit
Assembly & Installation Instructions
FIGURE 1
Pusher Mode (in FRONT of radiator)
RUBBER WASHER
PUSH NUT
NYLON BOLT
FIGURE 2
Auxiliary Fan Wiring Diagram
FAN
MOTOR
TO
GROUND (-)
Manual Switch
(not included)
20A
FUSE HOLDER
BUTT
CONNECTOR
BLUE
BLACK
RING
CONNECTOR
POWER SOURCE (+)
(BATTERY*, STARTER
SOLENOID, ETC.)
* only when fan is wired with a manual switch or thermostatic controls
PLASTIC
WASHER