CMP SS2K/TA User Manual
Page 2
INSTALLATION INSTRUCTIONS FOR CMP CABLE GLAND TYPES SS2K, SS2K/PB & SS2K/TA
DUBAI
• HOUSTON • NEWCASTLE • SINGAPORE • SHANGHAI • PUSAN • PERTH
DUBAI
• HOUSTON • NEWCASTLE • SINGAPORE • SHANGHAI • PUSAN • PERTH
www.cmp-products.com
www.cmp-products.com
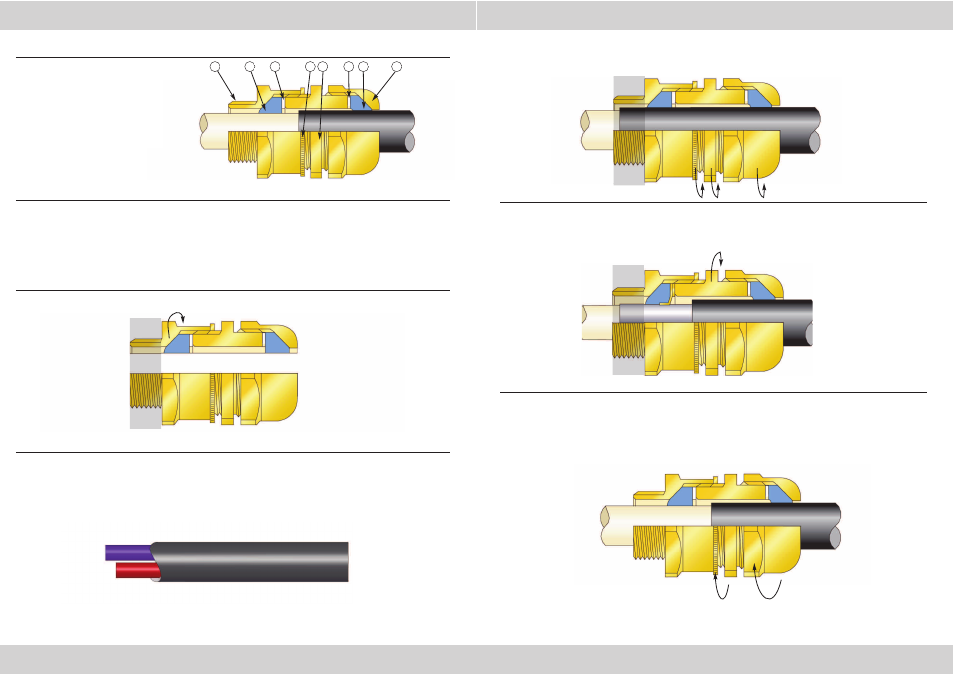
CABLE GLAND COMPONENTS
PLEASE READ ALL INSTRUCTIONS CAREFULLY BEFORE BEGINNING THE INSTALLATION
The SS2K / SS2K/PB cable gland can be used with all types of unarmoured cable and braid armoured
cable where the braid is terminated inside the enclosure. The inner seal is used to provide a flameproof
seal and cable anchor and the outer seal provides further anchoring and an additional environmental
seal. An electrical earth connection is automatically made to the cable lead sheath through the star
washer when “PB” versions are used, or to the tape when “TA” versions are used.
NOTE: There is no need to dismantle the cable gland prior to installation
1. Fit the gland into the equipment and fully tighten the entry item (1).
If installed in a clearance hole, fit a locknut and tighten.
2. Determine the conductor length required to suit the geometry of the equipment and prepare the
cable accordingly. Remove the outer sheath where required to reveal the insulated conductors, lead
sheath, or tape where applicable.
3. Ensure the seals (2) and (7) are in a relaxed state by slackening the locking ring (4), main item
(5) and outer seal nut (8) if necessary.
4. Pass the cable through the gland to the desired position. Tighten the main item (5) into the
entry item (1) until the seal is felt to make contact with the cable and then tighten one further turn
using a spanner. An electrical earth will automatically be made against lead sheath, or tape armour
cable through the star washer (3).
5. Tighten the outer seal nut (8) until the outer seal (7) contacts the cable and then tighten one full
turn further using a spanner. Tighten the lock ring (4) against the entry item. This completes the
installation.
8
4
3
2
1
1.
Entry Item
2.
Seal
3.
Skid Washer (Star Washer in PB versions)
4.
Lock Ring
5.
Main Item
6.
Skid Washer
7.
Outer Seal
8.
Outer Seal Nut
6
5
7
N.B. “PB” version shown