GE ZV800SJSS User Manual
Page 3
INSTALLATION OPTIONS
WALL-MOUNTED INSTALLATIONS
This hood may be installed onto a wall and vented to the
outdoors, or it can be installed for recirculating operation.
All necessary parts for a recirculating operation are shipped
with the hood. No kits required.
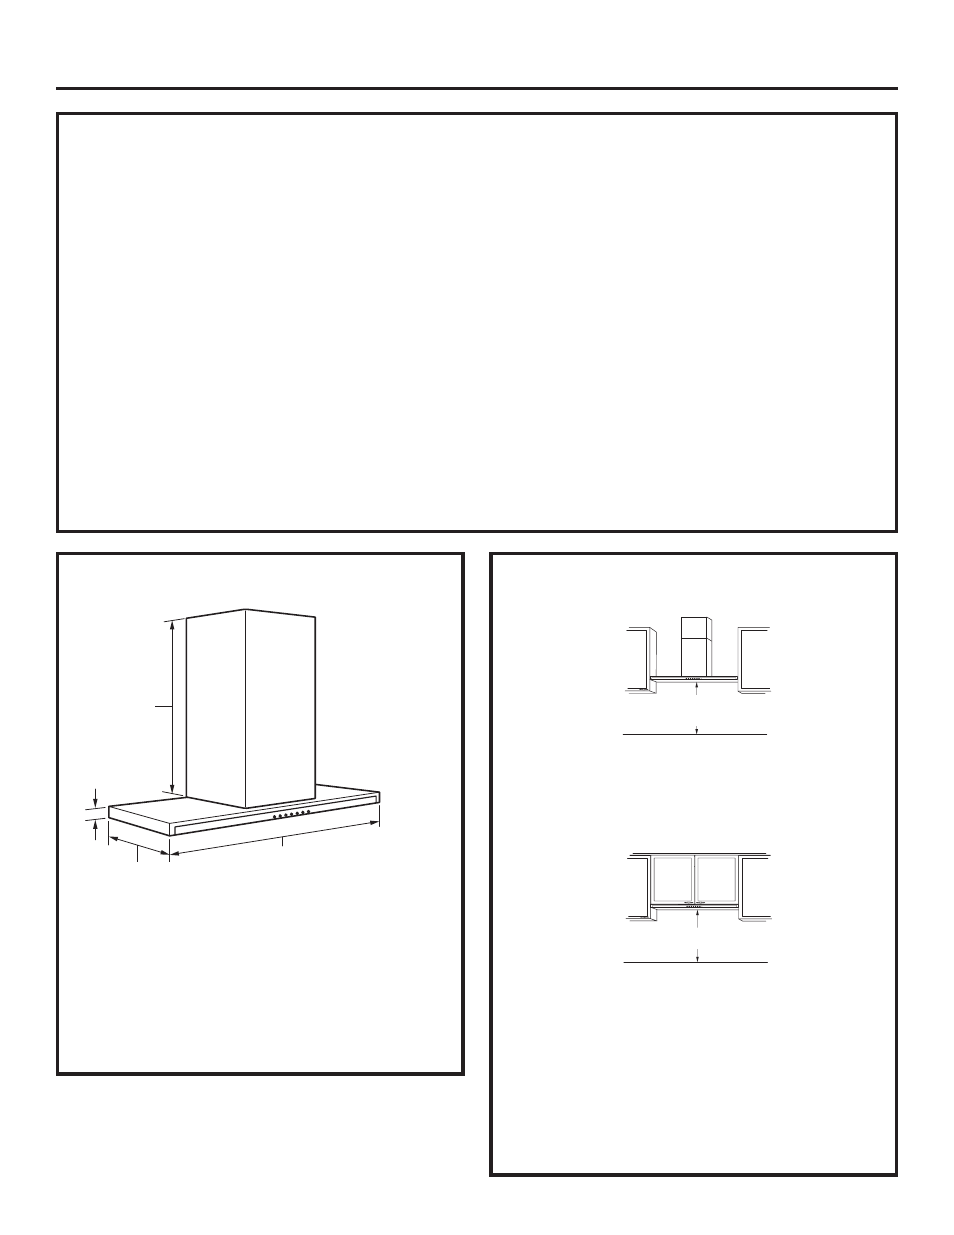
UNDER-CABINET INSTALLATIONS
The hood may be installed beneath a cabinet. The cabinet
must measure at least 20” from the bottom frame to the inside
top.
See page 19.
Both vented and recirculating operation can be
accomplished in an under-cabinet installation. (Custom
cabinet modification is required for recirculating operation.)
Design Information
3
CONTENTS
Design Information
Product Dimensions and Clearances ....................................................3
Installation Options ........................................................................................3
Advance Planning, Ductwork, Framing ................................................4
Power Supply .....................................................................................................4
Duct Fittings .......................................................................................................5
Installation Preparation
Tools and Materials Required ....................................................................6
Remove the Packaging.................................................................................6
Wall Mount Installations ..............................................................................7
Installation Below a Wall Cabinet ...........................................................7
Check Installation Hardware .....................................................................8
Ductwork, Wiring Locations .......................................................................9
Wall-Mounted Installation – Vented to the Outside
Step 1, Install Framing for Hood Support ............................................9
Step 2, Install Mounting Bracket ........................................................... 10
Step 3, Install Duct Bracket ..................................................................... 10
Step 4, Prepare the Hood ......................................................................... 11
Step 5, Mount the Hood ............................................................................ 11
Step 6, Connect Ductwork ....................................................................... 12
Step 7, Connect Electrical ......................................................................... 12
Step 8, Install Duct Covers ....................................................................... 13
Step 9, Install Filters .................................................................................... 13
Step 10, Finalize Installation ................................................................... 13
Wall-Mounted Installation – Recirculating
Ductwork, Wiring Locations .................................................................... 14
Step 1, Install Framing for Hood Support .........................................14
Step 2, Install Mounting Bracket ........................................................... 15
Step 3, Prepare the Hood ......................................................................... 15
Step 4, Mount the Hood ............................................................................ 16
Step 5, Size and Cut Duct Piece ............................................................ 16
Step 6, Connect Electrical ......................................................................... 17
Step 7, Install Duct Covers ....................................................................... 17
Step 8, Install Filters .................................................................................... 18
Step 9, Finalize Installation ...................................................................... 18
Under-Cabinet Installation
Cabinet Requirements ............................................................................... 19
Ductwork, Wiring .......................................................................................... 19
Step 1, Install Framing for Hood Support .........................................20
Step 2, Prepare the Hood ......................................................................... 20
Step 3, Cut the Opening ............................................................................ 21
Step 4, Install Side “L” Brackets ............................................................. 21
Step 5, Remove Side Screw ..................................................................... 21
Step 6, Mount the Hood ............................................................................ 22
Step 7, Complete Installation and Connect Ductwork ...............22
Step 8, Connect Electrical ......................................................................... 23
Step 9, Install Rear Mounting Screws ................................................. 23
Step 10, Install Filters.................................................................................. 23
PRODUCT DIMENSION AND CLEARANCE
The vent hood must be installed 24” min., and 30” max. above
the cooking surface. The telescopic duct cover conceals the
ductwork running from the top of the hood to the ceiling.
The duct cover is sized to reach 8 ft. to 10 ft. ceiling heights.
The hood installation height, from the cooking surface to the
bottom of the hood, depends upon ceiling height.
12" at Sides,
12-7/8" at
Center
1-1/2"
*Height to
Ceiling
35-7/8"
*The Supplied Duct Cover Fits
8 ft. to 10 ft. Ceiling Heights
24” Min.
30” Max.
* Height to
Ceiling
1-1/2”
12-15/16” at
Sides, 13-11/16” at
Center
35-7/8”
* The Supplied Duct Cover Fits 8 ft. to 10 ft.
Ceiling Heights
*24” Min.
*Depending on Cabinet Height
NOTE: The vent hood
canopy extends
forward 5-7/8”.