Do’s and don't’s for installing a unit, Pump performance curve drainmaker – Star Water Systems S1104 User Manual
Page 2
2
© Copyright 2004. All rights reserved.
1. Read all instructions before beginning in stal la tion.
2. Be certain that basin is on a fi rm level surface.
3. Do not use an automatic plumbing vent device.
4. Do not over-torque lid attachment screws.
5. Always use a check valve on the discharge line.
6. Test operation of pump per STEP 6.
Ten Helpful Hints For Easy Installation
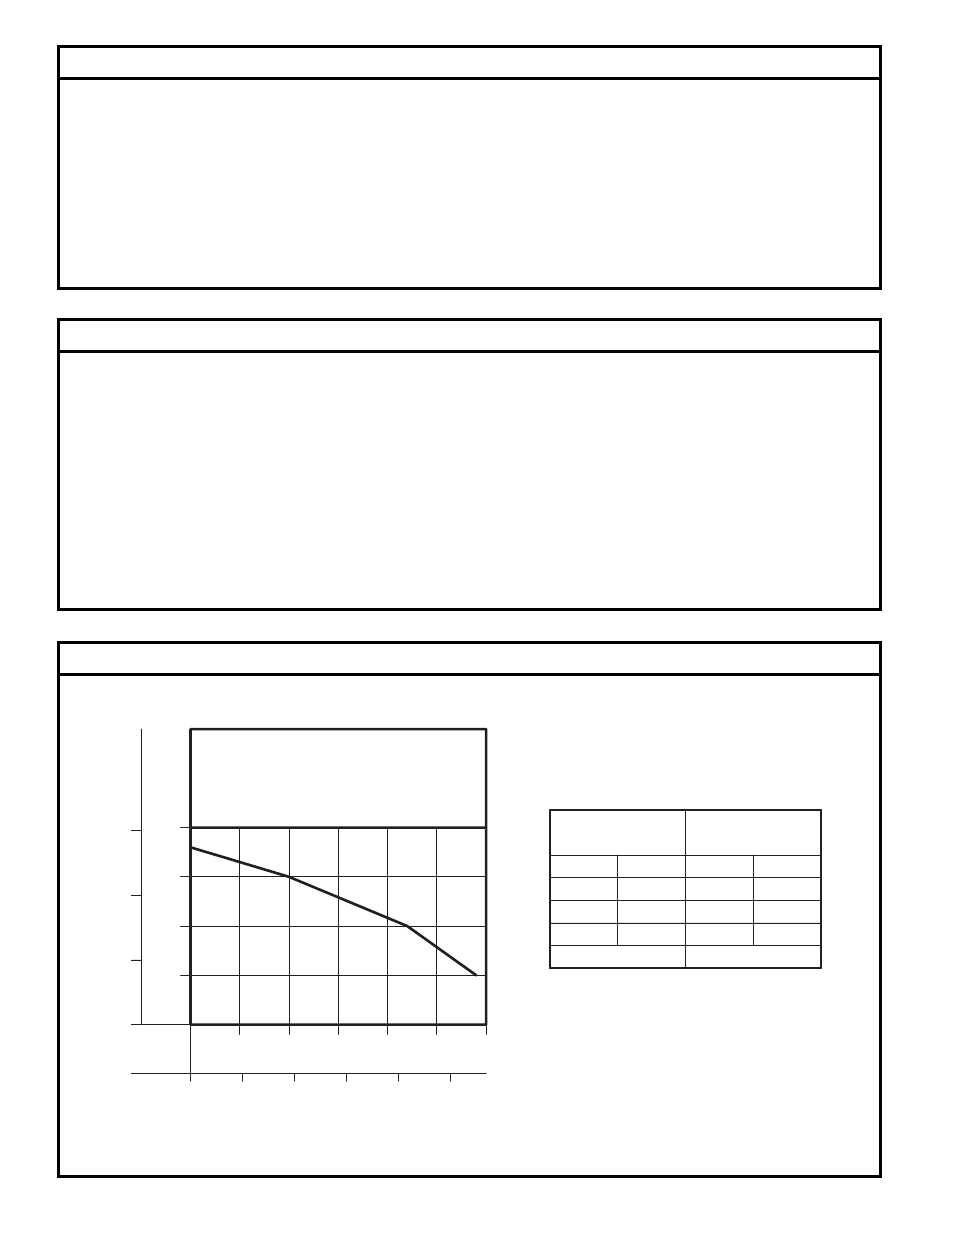
Performance Characteristics for the Pump in the DrainMaker System
7. Always provide some means to disconnect basin from
plumb ing for maintenance purposes.
8. Run unit at least once a month to verify proper op-
er a tion.
9. The model number and date code can be found on
the lid warning label.
10. Plug pump into a properly grounded GFCI recep-
tacle.
009961AFW
TOTAL DYNAMIC HEAD
FLOW PER MINUTE
15
LITERS
0
GALLONS
20
40
5
10
0
2
5
25
100
80
60
20
30
PUMP PERFORMANCE CURVE
DRAINMAKER
FEET
METERS
4
10
15
6
20
009961BFW
TOTAL DYNAMIC HEAD/FLOW
PER MINUTE
DEWATERING ONLY
Shut-off Head:
15
4.6
Feet
Meters
5
10
1.5
3.0
MODEL
18 ft. (5.5m)
10
38
Gal.
Liters
29
22
110
83
1048
1. DO read all installation material included with the
pump.
2. DO inspect unit for any visible damage caused by ship-
ping. Contact dealer if unit appears to be damaged.
3. DO clean all debris from the basin and pump.
4. DO always disconnect pump from power source before
han dling. DO always connect to a separately protected
and prop er ly grounded ground fault protected circuit.
DO NOT ever cut, splice or damage power cord. DO
NOT carry or lift pump by its power cord. DO NOT use
an extension cord.
Do’s And Don't’s For Installing A Unit
5. DO NOT use a discharge pipe smaller than the pump
discharge size.
6. DO test pump immediately after installation to be sure
that the system is working properly.
7. DO review all applicable local and national codes and
verify that the installation conforms to each of them.
8. DO NOT install unit in the ground.