LT Security LTD2516HE User Manual
Page 9
Digital Video Recorder User Manual version 1.0
9
If it still doesn't work, Please change a new remote controller to try, or contact your dealers
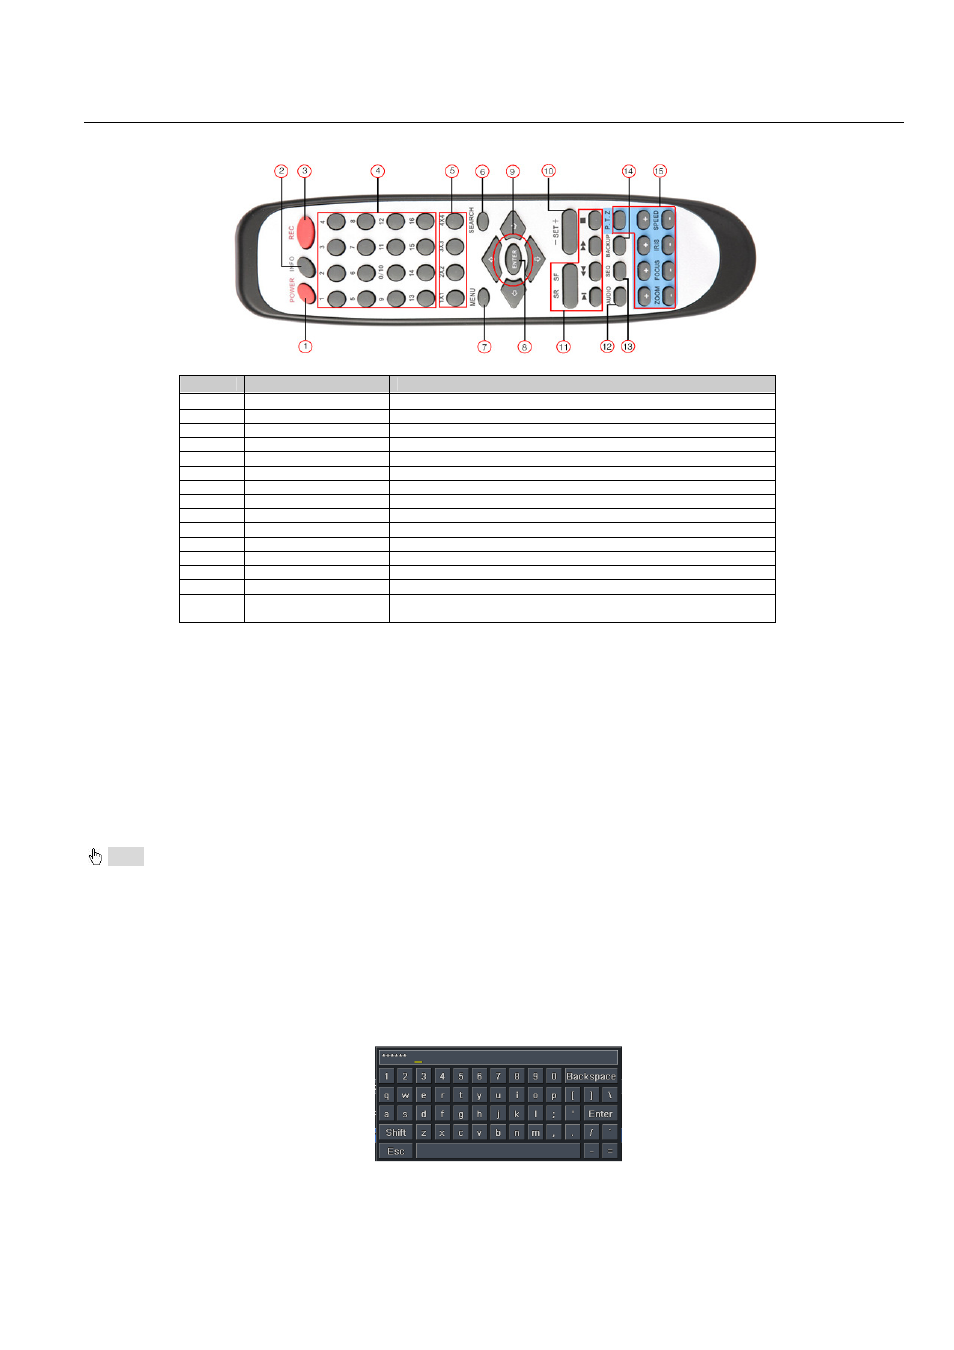
The interface of remote controller is shown in Fig2.8 Remote Controller.
Fig 2.8 Remote Controller
Item
Name
Function
1
Power Button
Soft switch off to stop firmware running. Do it before power off.
2
INFOR Button
Get information about the DVR like firmware version, HDD information
3
REC Button
To record manually
4
Digital Button
Input digital or choose camera
5
Multi Screen Button
To choose multi screen display mode
6
SEARCH Button
To enter search mode
7
MENU Button
To enter menu
8
ENTER Button
To confirm the choice or setup
9
Direction Button
Move cursor in setup or pan/title PTZ
10
+/- Button
To increase or decrease the value in setup
11
Playback Control Button
To control playback, Fast forward/rewind/stop/single frame play
12
AUDIO Button
To enable audio output in live mode
13
Auto Dwell Button
To enter auto dwell mode
14
BACKUP Button
To enter backup mode
15
PTZ Control Button
To control PTZ camera:
Move camera/ZOOM/FOCUS/IRIS/SPEED control
Operation processes with remote controller to control multi-DVR
The device ID of the DVR is 0. When use of remote controller to control single DVR, it’s not necessarily to reset the device ID, user can do operation directly;
when control multiple DVR with remote controller, please refer to below steps:
Step1: Activate remote controller to control DVR: enable DVR: turn the IR sensor of the remote controller to the IR receiver that on the front panel, press the
number key 8 twice, then input device ID (Range from: 0-65535; the default device ID is 0.) with other digital number: 0-9, after that, press ENTER button to
confirm.
Step2: User can check the device ID by enter into System configuration
Basic configuration
device ID. User also can set other DVR with the same device ID.
For more convenient to operate, we don’t recommend user to set the device ID too long.
Step3: Cancel controller to control DVR: turn the IR sensor of the remote controller to the IR receiver that on the front panel, press the number key 8 twice, then
input the device ID that needs to be cancelled from controlling, press ENTER button to confirm. After that, the DVR will not be controlled by remote controller.
2.5 Control with Mouse
2.5.1 Connect Mouse
It supports USB mouse through the ports on the rear panel, please refer to Fig 2.8 Remote Controller.
Notice: If mouse is not detected or doesn't work, check below steps:
1. Make sure the mouse plugs in the USB mouse port not the USB port.
2. Change a mouse to try
2.5.2 Use Mouse
The structure of the main menu is shown in Fig 2.8 Remote Controller.
In live:
Double-click left button on one camera to be full screen display. Double-click again to return to the previous screen display.
Click right button to show the control bar at the bottom of the screen as Fig 2.8 Remote Controller. Here are all control and setup. Click right mouse again to
hide the control bar.
In setup:
Click left button to enter. Click right button to cancel setup, or return to the previous.
If want to input the value, move cursor to the blank and click. An input window will appear as Fig2.9. It supports digitals, letters and symbols input.
Fig 2.9 Digital Numbers and Letters Input Window
Users can change some value by the wheel, such as time. Move cursor onto the value, and roll the wheel when the value blinks.
It supports mouse drag. I.e. Set motion detection area: click customized, hold left button and drag to set motion detection area. Set schedule: hold left button