LT Security LTD2516HE User Manual
Page 7
Digital Video Recorder User Manual version 1.0
7
Item
Type
Name
Description
1
Work state
indicator
Power
Power indicator, when connection , the light is blue
HDD
When HDD is writing and reading , the light is blue
Net
When access to network , the light is blue
Backup
When backup files and data, the light is blue
Play
When playing video, the light is blue
REC
When recording, the light is blue
2
Compound button
MENU/+
1. Enter menu in live
2. Increase the value in setup
BACKUP/-
1. Decrease the value in setup
2. Enter backup mode in live
RECORD/FOCUS
1. Record manually
2. FOCUS function enables at PTZ mode
REW/SPEED
1. Rewind key
2. SPEED function enables at PTZ mode
SEARCH/ZOOM
1. Enter search mode
2.ZOOM function enables at PTZ mode
PLAY /IRIS
1. Enter play interface
2. IRIS function enables at PTZ mode
FF/ P.T.Z.
1. Fast forward
2. Enter PTZ mode in live
STOP/ESC
1. Quit play mode
2. Exit the current interface or status
3
Digital button
1-9
Input number 1-9 or choose camera
0/10+
Input number0, 10 and the above number together with other digital keys
4
Input button
Direction button
Change direction to select items
Multi-screen
Change screen display mode like1/4/9/16 channel
Enter button
Confirm selection
5
IR receiver
IR
For remote controller
6
USB
USB port
To connect external USB devices like USB flash, USB HDD for backup or
update firmware; or connect to USB mouse
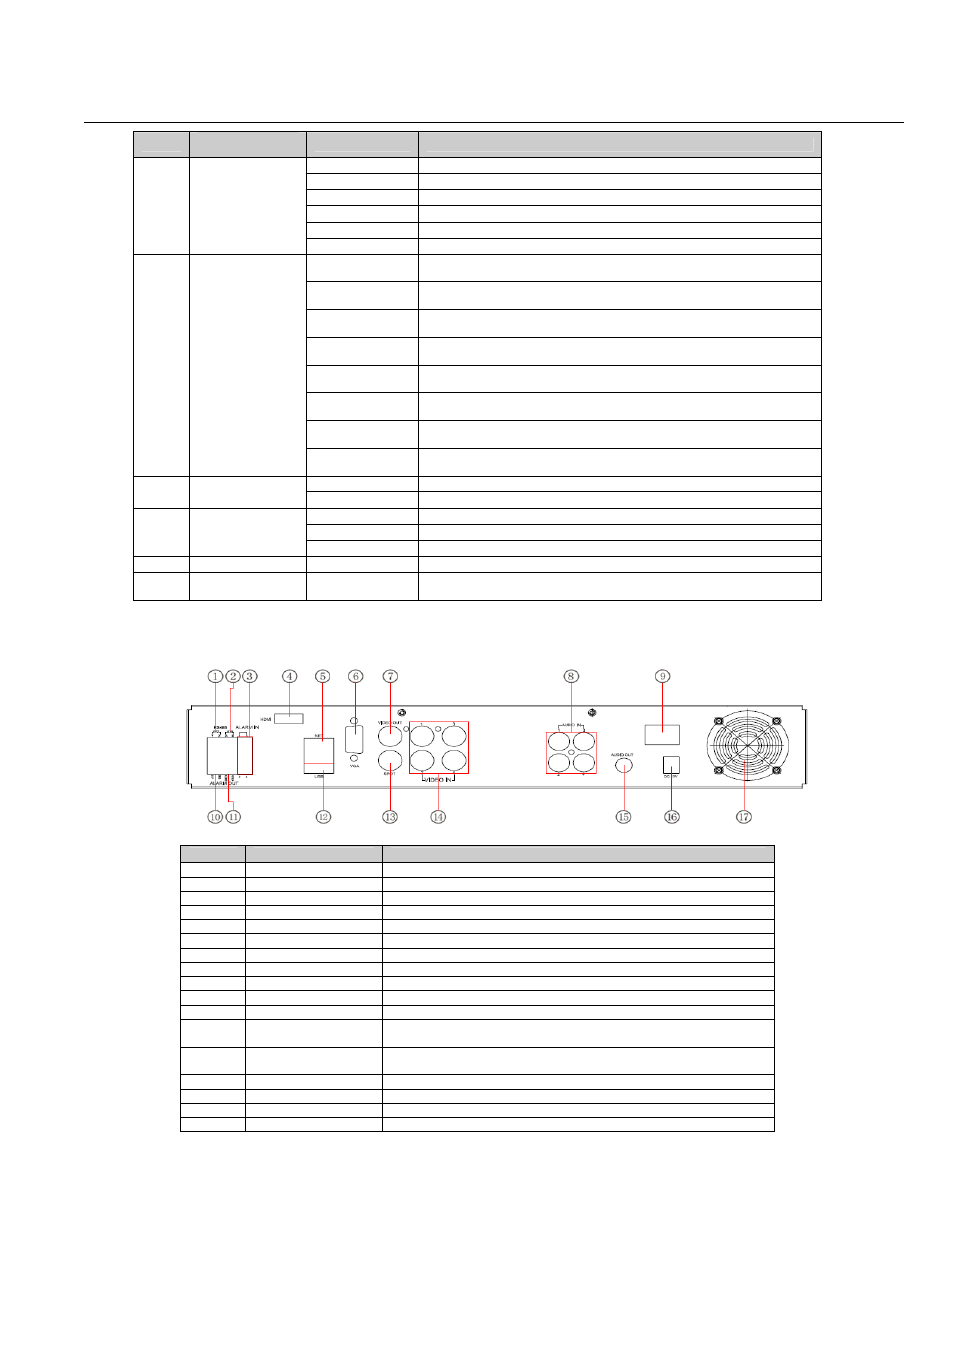
2.3 Rear Panel Instructions
2.3.1 Rear Panel Interface
The rear Panel interface for 4-ch is shown as Fig 2.5:
Fig 2.5 Rear Panel for 4-ch
Item
Name
Description
1
P/Z
Connect to speed dome
2
K/B
Connect to keyboard
3
ALARM IN
Connect to external sensor1-4
4
HDMI port
Connect to high-definition display device (optional)
5
NET
Network port
6
VGA port
VGA output, connect to monitor
7
Video out
Connect to monitor
8
Audio in
4 CH Audio input
9
POWER SWITCH
Power on/off
10
+ 5V and GND
+5 V and Grounding
11
ALARM OUT
1-ch relay output. Connect to external alarm.
12
USB port
To connect external USB devices like USB flash, USB HDD for backup
or update firmware; or connect to USB mouse
13
Spot out
Connect to monitor as an AUX output channel by channel. Only video
display, no menu show
14
Video in
Video input channels from 1-4
15
Audio out
Audio output, connect to the sound box
16
POWER INPUT
DC12V
17
FAN
For cooling the device
Tab 2.1 Definitions of Front Panel Buttons
The rear Panel interface for 8-ch is shown as Fig 2.6: