Step 13, Step 14 – Anthro eNook Standard II Assembly Instructions User Manual
Page 7
eNook
®
Assembly Instructions
7
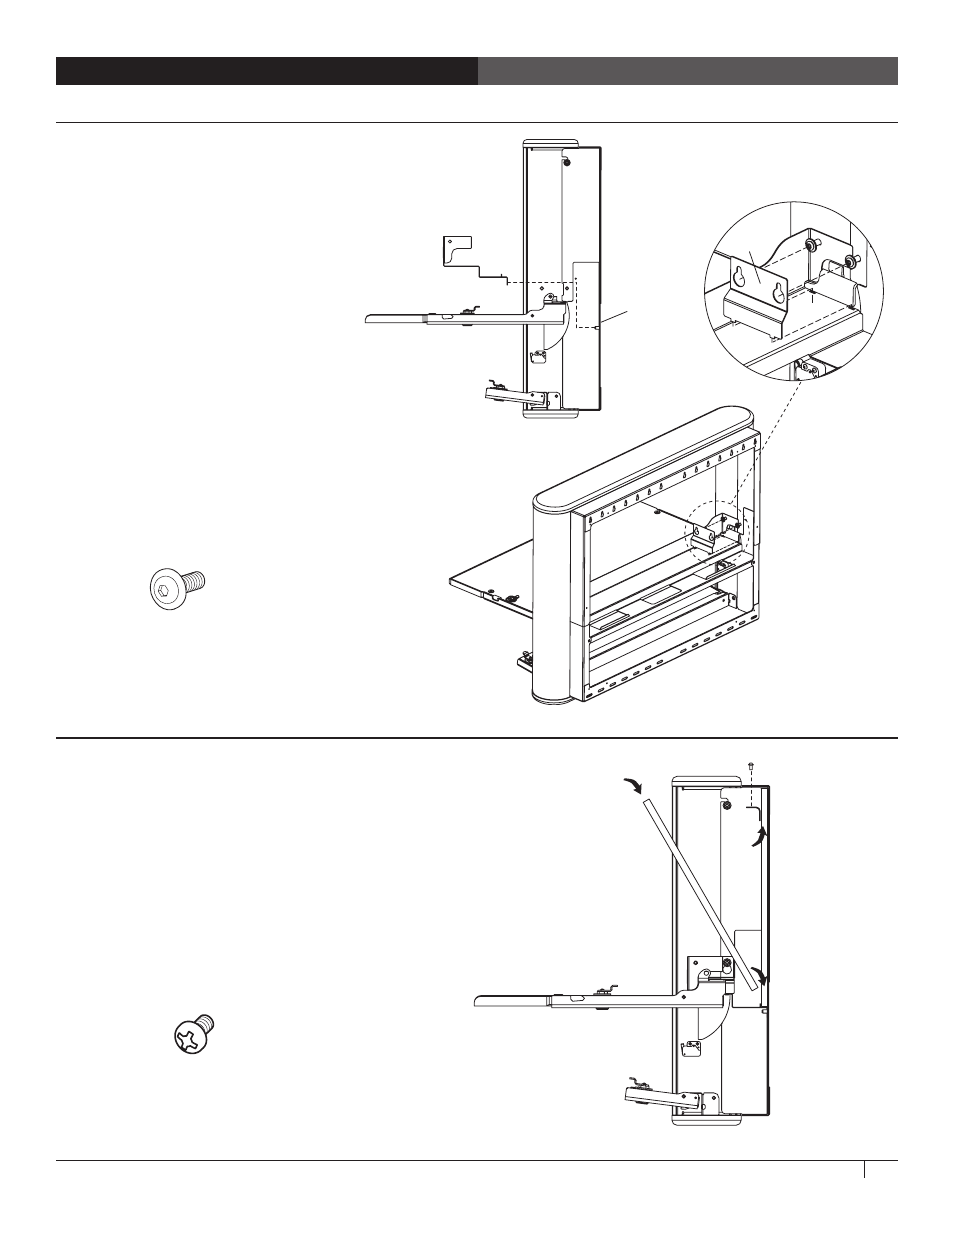
steP 13
insert the bottom tray
¡
Place the Bottom Tray on the eNook shelf
so that the logo on the tray faces out.
¡
Align the 2 holes on the back of the
Tray with the pins on the Frame.
¡
Slide the Tray into place. Attach the tray
to the left and right of the frame using 4
workstation screws. Do not tighten these
screws all the way.
¡
Install the cover plates, one on the left
and one on the right of the Tray. Slide
each Plate over the two workstation
screws, then down to insert the tabs on
the Plate into the notches on the Tray.
Tighten the workstation screws.
steP 14
insert the back Panel
¡
Hold the Back Panel so that the fabric-covered
side is facing you, long side up.
¡
Place the Panel into the eNook so that the bottom
edge is resting on the bottom of the frame.
¡
Tip the top of the Panel into place and secure with
the Tack Board Clip and a 3/8" Phillips head screw
inserted through the top of the Frame.
Pins
workstation screw
325-5092-00
3/8" Phillips Head screw
325-5172-00
tab
notch
- Adjustable Laptop Cart 2 Spec Guide (2 pages)
- Adjustable Laptop Cart 2 Assembly Instructions (4 pages)
- AnthroBench II Spec Guide (7 pages)
- AnthroBench II 48 Assembly Instructions (2 pages)
- AnthroBench II 60 Assembly Instructions (2 pages)
- AnthroBench II 72 Assembly Instructions (2 pages)
- Utility Bench II Assembly Instructions (7 pages)
- Small AnthroCarts Spec Guide (11 pages)
- Small AnthroCarts 24W Assembly Instructions (2 pages)
- Small AnthroCarts 30W Assembly Instructions (2 pages)
- Small AnthroCarts 36W Assembly Instructions (2 pages)
- Large AnthroCarts 60W Assembly Instructions (2 pages)
- Large AnthroCarts 48W Assembly Instructions (2 pages)
- UltraCompact Cart Assembly Instructions (2 pages)
- MiniCart Assembly Instructions (2 pages)
- PrinterCart 20H & 28H Assembly Instructions (2 pages)
- Carl's Table CT12 Spec Guide (6 pages)
- Carl's Table CT12 Owners Manual (8 pages)
- Carl's Table CT03 Basic User Guide (2 pages)
- Carl's Table CT03 Assembly Instructions (6 pages)
- Tablet Charging Carts Spec Guide (8 pages)
- Tablet Charging Carts Owners Manual (4 pages)
- Tablet Charging Carts USB Sync Kit Assembly Instructions (2 pages)
- Tablet Charging Cabinets Owners Manual (8 pages)
- Standard Laptop Charging Cart LTSC20xx/xx, LTSC30xx/xx Owners Manual (4 pages)
- Advanced Netbook Charging NCC10 Owners Manual (8 pages)
- Deluxe Laptop Charging Cart Owners Manual (8 pages)
- Chromebook Charging Cart for Samsung Series 3 Owners Manual (8 pages)
- Convoi Spec Guide (5 pages)
- Convoi Base Unit Assembly Instructions (4 pages)
- eNook Pro for Flat Screen Spec Guide (2 pages)
- eNook Pro for Flat Screen Assembly Instructions (8 pages)
- Fit Utility Unit Spec Guide (11 pages)
- Fit Utility Unit Assembly Instructions (2 pages)
- Fit Standard Unit 60/72 Assembly Instructions (2 pages)
- Fit Standard Unit 24/30/36/48 Assembly Instructions (2 pages)
- Fit Console Unit Assembly Instructions (4 pages)
- Fit Adjusta Unit 30/36/48 Assembly Instructions (4 pages)
- Fit Adjusta Unit 60 Assembly Instructions (4 pages)
- POC Cart Spec Guide (4 pages)
- POC Cart 2 Assembly Instructions (4 pages)
- POC Cart Assembly Instructions (2 pages)
- Elevate II Single Surface Spec Guide (5 pages)
- Elevate II Single Surface Assembly Instructions (8 pages)