3 setting parameters, 1) tag no. setup, 2) calibration range setup – Yokogawa EJA440E User Manual
Page 14: 1) tag no. setup (c10: tag no), Example: set a tag no. to fic-1a, O, mmaq, mmwg, inh, O, and fth
<3. Operation>
3-6
IM 01C25T03-01E
3.2.3 Setting Parameters
Set or change the parameters as necessary. After
completing these, do not fail to use the “DIAG” key
to confirm that “GOOD” is displayed for the self-
diagnostic result at
_60: SELF CHECK.
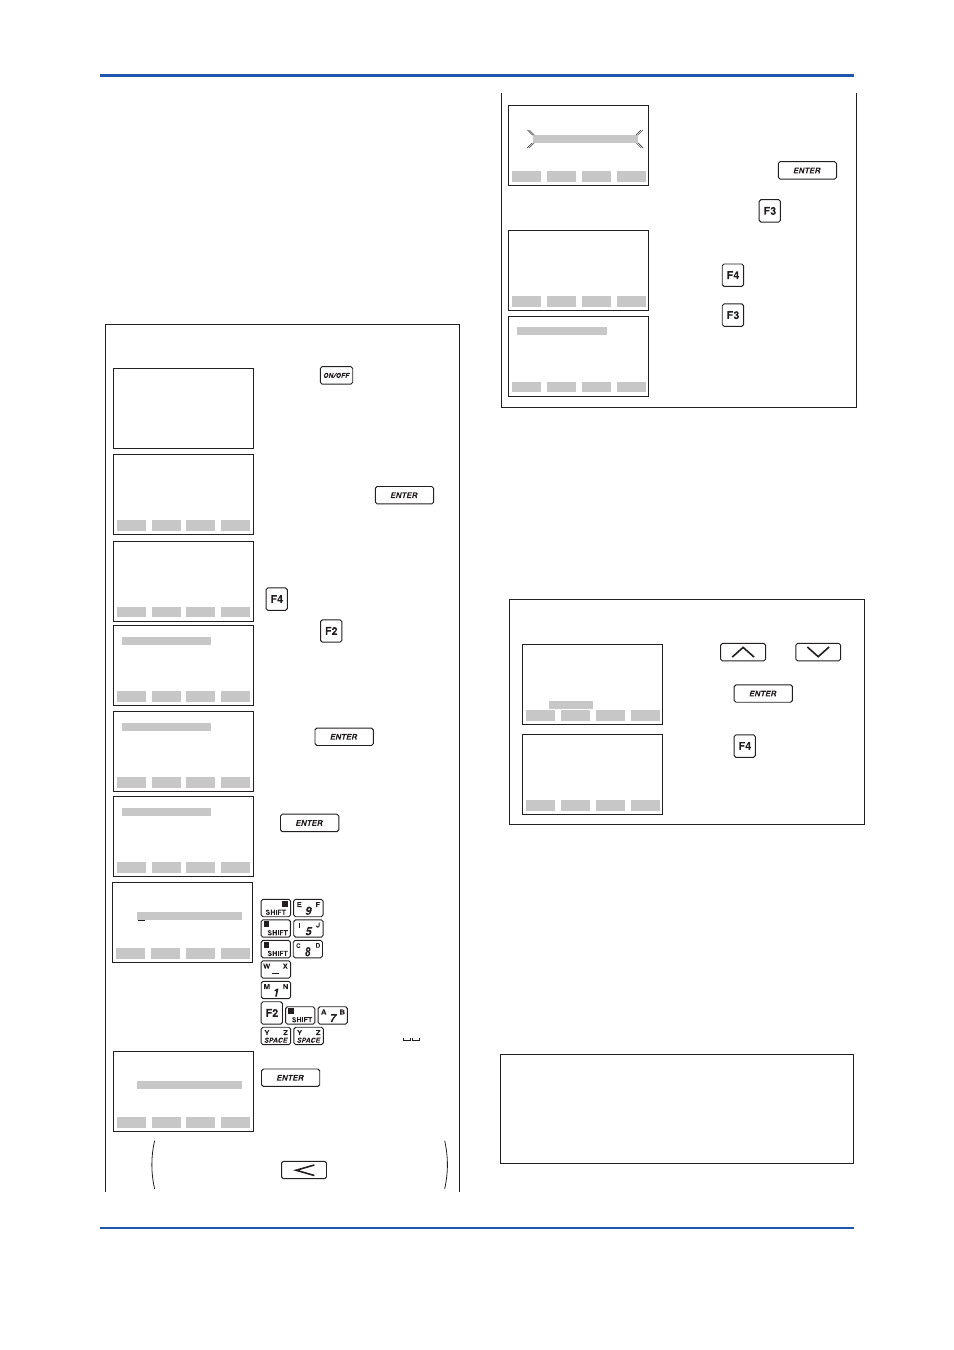
(1) Tag No. Setup
(C10: TAG NO)
Use the procedure below to change the Tag No. Up
to 16 alphanumeric characters can be entered.
Press the key to turn on
the BT200.
Connect the transmitter and
BT200 using a communication
cable and press the
key.
PARAM
01:MODEL
EJX110 M
02:TAG NO.
YOKOGAWA
03:SELF CHECK
GOOD
OK
MENU
A:DISPLAY
B:SENSOR TYPE
C:BASIC SETUP
D:AUX SET1
E:AUX SET2
G:ALARM SET
HOME
SET
ADJ
ESC
MENU
C:BASIC SETUP
D:AUX SET 1
E:AUX SET 2
G:ALARM SET
H:AUTO SET
I:DISP SET
HOME
SET
ADJ
ESC
MENU
C10:TAG NO.
YOKOGAWA
C20:PRES UNIT
kPa
C21:PRES LRV
0.00000 kPa
DATA
DIAG
PRNT
ESC
Select C: BASIC SETUP and
press the key.
Select C10: TAG NO. and press
the key.
Displays the model name of
connected transmitter, TAG NO. and
diagnostics information. Press the
(OK) key after confirmation.
Press the (SET) key to
display the SET menu panel.
--WELCOME--
BRAIN TERMINAL
ID: BT200
check connection
push ENTER key
UTIL
FEED
F0311_1.ai
SET
C10:TAG NO.
YOKOGAWA
YOKOGAWA
CODE
CAPS
CLR
ESC
When you have made an entry mistake, return
the cursor using the key, then reenter.
Set the new TAG NO. (FIC-1a).
FOKOGAWA
FIKOGAWA
FICOGAWA
FIC-GAWA
FIC-1AWA
FIC-1aWA
FIC-1a
Set TAG NO. and press the
key.
SET
C10:TAG NO.
YOKOGAWA
FIC-1a _
CODE
caps
CLR
ESC
• Example: Set a Tag No. to FIC-1a
SET
C10:TAG NO.
FIC-1a
FEED
NO
OK
DATA
DIAG
PRNT
ESC
This is the panel for confirming
set data. The set data items flash.
When all items have been
confirmed, press the
again. (To go back to the setting
panel, press the (NO) key.
SET
C10:TAG NO.
YOKOGAWA
FIC-1a
print off
F2:printer on
PARAM
C10:TAG NO.
FIC-1a
C20:PRES UNIT
kPa
C21:PRES LRV
0.00000 kPa
FEED
POFF
NO
The DPharp TAG NO. was
overwritten.
Press the (OK) key to
return to the parameter panel.
Press the (NO) key to
return to the setting panel.
F0311_2.ai
(2) Calibration Range Setup
a. Setting Calibration Range Unit
(C20: PRES UNIT)
The unit parameter is set at the factory before
shipment if specified at the time of order. Follow the
procedure below to change the unit parameter.
• Example: Change the unit from
mmH2O to kPa.
ESC
SET
C20:PRES UNIT
kPa
FEED
NO
OK
SET
C20:PRES UNIT
mmH2O
< mmWG >
< mmHg >
< Torr >
< kPa >
Use the or
key to select
kPa.
Press the key twice
to enter the setting.
Press the (OK) key.
F0312.ai
Note that the Yokogawa default setting for the
standard temperature is 4°C (39.2°F). For the
units of mmH
2
O, mmAq, mmWG, inH
2
O, and
ftH
2
O, the pressure varies according to the
standard temperature definition. When a standard
temperature of 20°C (68°F) is required, select
@20degC (68.0F) at the parameter D16:H2O UNIT
SEL.
Available pressure units are shown below.
mmH2O
mmAq
mmWG
mmHg
Torr
kPa
MPa
mbar
bar
gf/cm2
kgf/cm2
inH2O
inHg
ftH2O
psi
atm
Pa
hPa