Compressor connections – Kasco Marine Robust-Aire User Manual
Page 4
4
off at shore before connecting to the compressor lead.
10. Tie off shore end of the SureSink™ Tubing by the com-
pressor cabinet. Make sure you have a few extra feet
of tubing to work with so that the tube will reach the
cabinet after trenching the tube between the shore and
the compressor.
11. Assembled Diffuser(s) can be loaded onto the boat.
Possible additional tubing kits and assembly tools
should be loaded on the boat if not already connected.
12. Make sure the boat is in reverse to avoid damaging the
boat prop and slowly make your way to the marking
buoy pulling the tubing as you go.
13. Once you reach the marked buoy, thread a rope through
the two slots of the diffuser base. Pull through until the
rope is at the midway point by the diffuser base.
14. While holding the two ends of the rope, gently lower
the diffuser assembly into the water. Submerge the
assembly and allow the air to escape from the vent plug
as the base fills with water.
15. When the air has been removed from the base, con-
tinue lowering the assembly slowly until it reaches the
bottom of the pond. Using this method, the diffuser
should not invert while lowering.
16. Pull up on only one side of the rope to bring it back.
The Robust-Aire
®
Diffuser should now be seated
properly on the bottom of the pond. (Optional: For
ease of future maintenance, it is recommended to leave
rope looped through diffuser base and tie both ends to
marker-buoy or duck decoy. This will allow diffusers to
be located easily and pulled up for maintenance.)
17. Repeat the process for additional Robust-Aire
®
Diffuser
locations.
Compressor Connections
18. When back on shore, finish connecting the tubing
to the lead hose from the compressor with the
supplied barb fitting from the tubing kit. Secure
and tighten clamps to both supply tubing and
compressor hose.
decrease if the tube is not properly uncoiled.
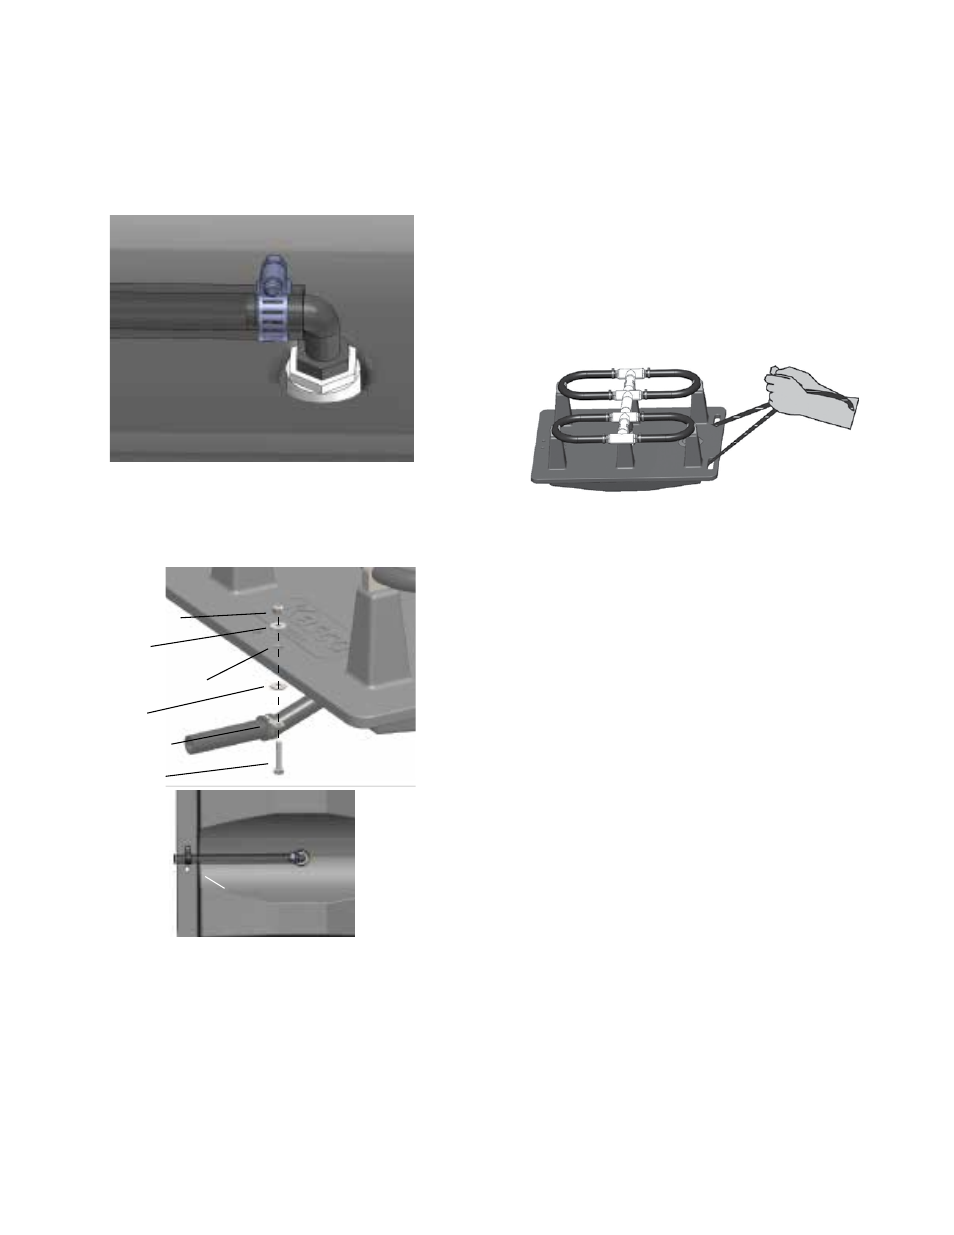
7. On the end of the SureSink™ Tube that will be con-
nected to the diffuser assembly, slide a clamp over the
tubing and connect the end of the tubing to the barbed
fitting on the diffuser assembly. Position clamp over
tubing and barbed fitting and tighten using a 5/16”
socket driver or screwdriver. Do not over tighten
clamp.
Bottom of Diffuser Assembly
SureSink
™
tubing
Clamp
1/2” NPT X
3/8” or 5/8”
Elbow
8. Install strain relief over tubing and secure to diffuser
base as shown using 7/16” socket and wrench. A prop-
erly installed strain relief will prevent any damage to
the diffuser assembly when it is lowered in the water or
pulled up at a later date for maintenance.
1/4” lock nut
washer
Diffuser Base hole
washer
strain relief
1/4” screw
Strain relief
9. If you anticipate running out of tubing (each tube is
100’) before reaching the buoy, connect any additional
tubes according to the SureSink™ Tube instructions.
Make sure to unroll these tubes as you did with the first
tube. If you are unsure how many rolls of tubes will be
needed to reach the diffuser location, you can load the
unconnected diffuser assemblies and tubing kits into
the boat and connect as needed while making your way
to the marked buoy. You can also connect an ample
number of 100’ lengths together and have someone as-
sist feeding it from shore. The excess tubing can be cut