Legacy functions, Using the legacy functions – CognitiveTPG A776 User Manual
Page 8
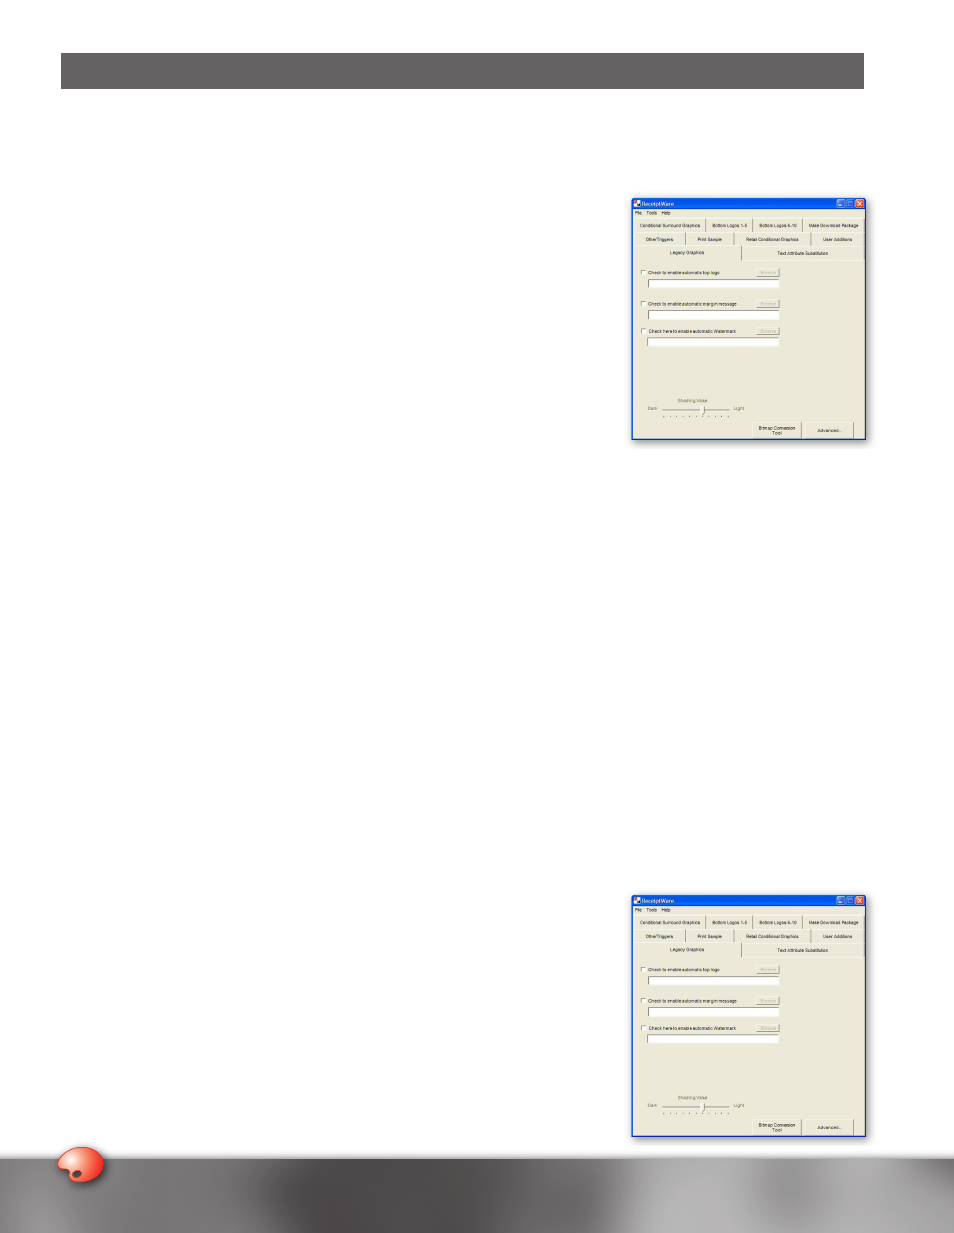
Legacy Functions
Many existing POS applications cannot support Top Logos, Watermarks, Margin Messages, or color graphics. With TPG’s
ReceiptWare software, you can configure your printer to print these graphics automatically without any change to the data
stream from the point of sale application. These capabilities are referred to as Legacy Functions. Before we discuss these
functions, it is important to define and explain the different types of Legacy Graphics. Legacy graphics include:
1. Top Logo – A Top Logo is a user-defined graphic that prints at the top of the
receipt before any other data.
2. Bottom Logo – A Bottom Logo is a user-defined graphic that prints at the end of all
of the receipt data. ReceiptWare allows you to specify up to 10 Bottom Logos
3. Margin Messages – Margin Messages are user-defined graphics that print
periodically on the right and left margins of the receipt.
4. Watermarks – Watermarks are user-defined graphics that print down the center
of the receipt. They reside in the background of the receipt data in a shaded
(dithered) mode so that it appears behind the text of the receipt.
Using the Legacy Functions
As with every other ReceiptWare tool, we recommend having a sample receipt present with you when creating
Receipt Formats.
1. Open the ReceiptWare software application.
2. Click on the Legacy Graphics tab.
3. If you wish for every receipt to contain a specific Top Logo, Bottom Logo, Watermark, and /or Margin Message, click on
the radio button next to the Legacy Graphic that you wish to include.
4. Once you click on the radio button, a text box and button appear to let you specify a logo or LGO file. You can either
enter the full pathname of the LGO file, or click on the Browse button to the right of the text box to specify it through
Windows
®
Explorer.
5. Once you have selected the LGO file, a smaller version of it appears on the screen that looks different than when it is
actually printed.
6. If you have a graphic that you want to include on your receipt but do not have it saved as a LGO file, then ReceiptWare’s
Bitmap Conversion Tool can be used to translate the file. To open this tool, select the button called Bitmap Conversion
Tool located on the bottom right-hand side of the screen. Or, click on Tools>Bitmap Conversion Tool to launch the
tool. Please see the previous section called ReceiptWare Bitmap Conversion Tool for detailed instructions on how
to use it.
7. If you include a Watermark on your receipt, you can change its shading to make it either lighter or darker. To do this,
adjust the shading scale located at the bottom of the screen. Move the slider to the right of the scale to make the
Watermark lighter or to the left to make it darker.
8. If you wish to adjust the spacing, logo print speed and justification of any of the
Legacy Graphics, click on the Advanced button located on the bottom right-hand
side of your screen. Detailed instructions on using the advanced features are
provided in the section below.
Legacy Function Guidelines:
• Any Legacy Graphic you choose to include will be printed on every receipt that is
generated. You may wish to print these graphics on every transaction receipt, but
not on the Credit Authorization Slips that are sometimes subsequently printed.
To suppress the legacy functionality on certain receipts, please refer to the Logo
Suppression section of this guide.