CognitiveTPG A776 User Manual
Page 7
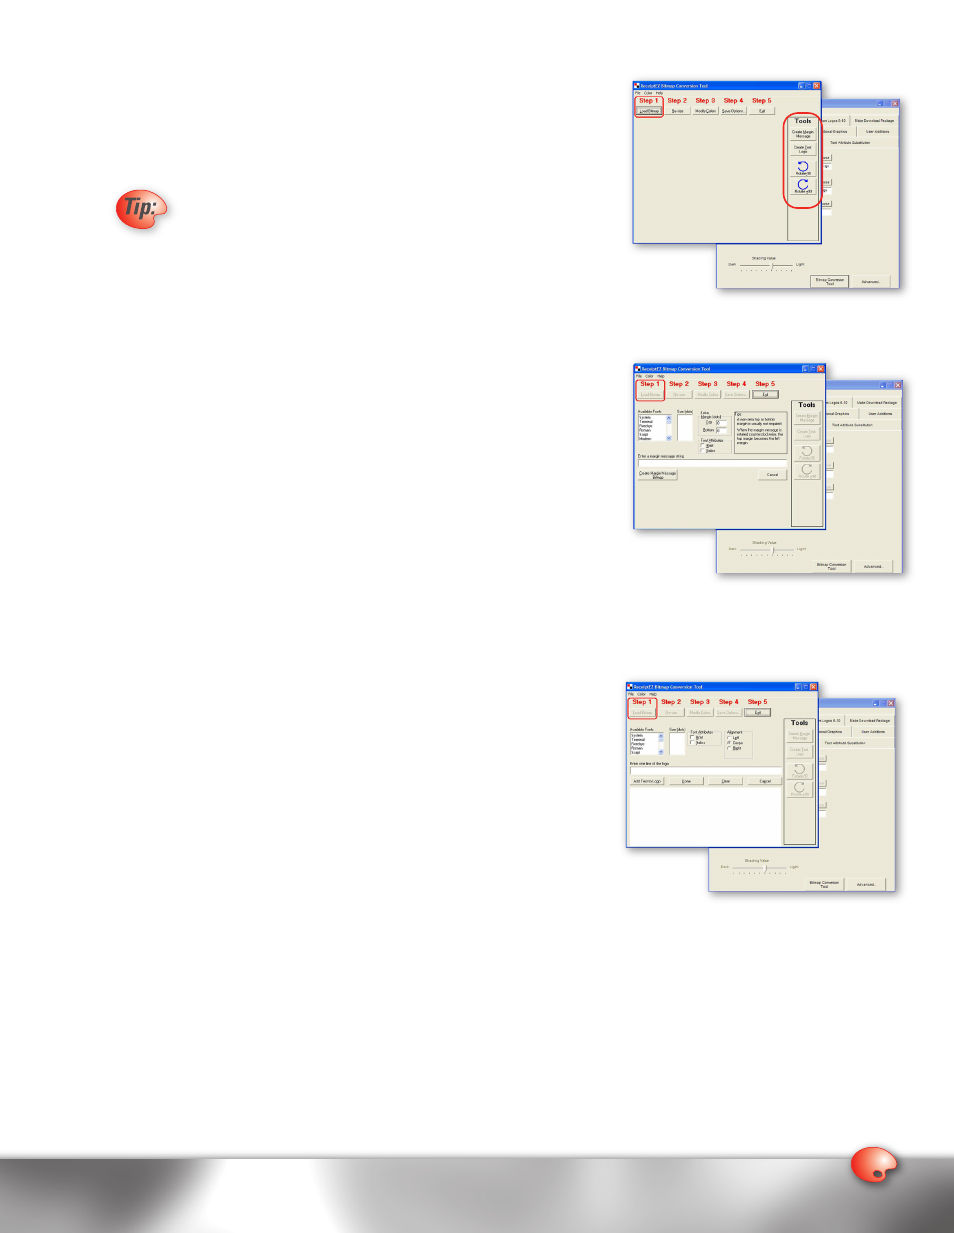
Other Features of the ReceiptWare Bitmap Conversion Tool
Aside from the ability to convert bitmaps to logo files, the bitmap conversion tool
also allows you to create Margin Messages and text logos. Margin Messages are
printed on the vertical right and left margins of the receipt and are generally made
up of text strings, (i.e., website addresses). Text logos are useful in the absence of
logos with graphical elements.
When converting bitmap files to LGO files please make sure that
the bitmaps are not saved as read only. To find out if they are read
only files, right click on the bitmap file and choose properties from
the menu. Uncheck the box next to the “Read Only” field within the
Attributes area. We also recommend that all files be located on
a local hard drive.
1. Creating Margin Messages – To create a Margin Message, click on the
Create Margin Message button located under the Tools column, which
is located on the right-hand side of the screen. In the box labeled Enter a
Margin Message string, enter the text (i.e., website address) that you wish
to have for your Margin Message. After entering the text string, choose its
font, font size, and font attributes (bold, italics) from the menu. You can also
adjust the spacing above and below the Margin Message by changing the top
and bottom values within the Extra Margin section. When all of your changes
have been made, click on the Create Margin Message button located at the
bottom of the screen. You will then be prompted to name the BMP file that
you created and to choose a directory to which it will be saved. After clicking
on the Save button, a window will appear asking if you wish to rotate the
Margin Message by -90, +90 or 0 (NO ROT) degrees. Once you have made
your selection, the BMP Margin Message will be loaded automatically into the
ReceiptWare Bitmap Conversion Tool. Next, follow the directions in the previous section entitled Converting BMP
(Bitmap) Files to LGO (Logo) Files.
2. Creating Text Logos – To create a Text Logo, click on the Create Text Logo
button located under the Tools column on the right-hand side of the screen.
In the box labeled Enter one line of the logo, enter the first line text (i.e.,
company name) that you wish to have incorporated. After entering the text
string, choose its font, font size, and font attributes (bold, italics) from the
menu. You can also choose the justification of the text line, be it left, center,
or right. Once you have chosen how you wish the text line to appear, click
on the Add Text to Logo button located in the middle part of the screen.
Continue to add as many lines as you wish to have within your Text Logo.
When completed click on the Done button located in the middle of the
screen, and you will be prompted to save and name the Text Logo bitmap.
Once saved, the Text Logo bitmap will be loaded into the ReceiptWare
Bitmap Conversion Tool. Next, follow the directions in the previous
section entitled Converting BMP (Bitmap) Files to LGO (Logo) Files.