If the ipeps does not respond on the network, Then please see the – Adder Technology AdderLink iPEPS User Manual
Page 18
To reset the iPEPS to its default network settings
If the iPEPS network address has been previously changed from its factory
default, then it won’t respond when you try to make initial contact. You can
reset it to its default address (192.168.1.42) and other settings by performing
the following:
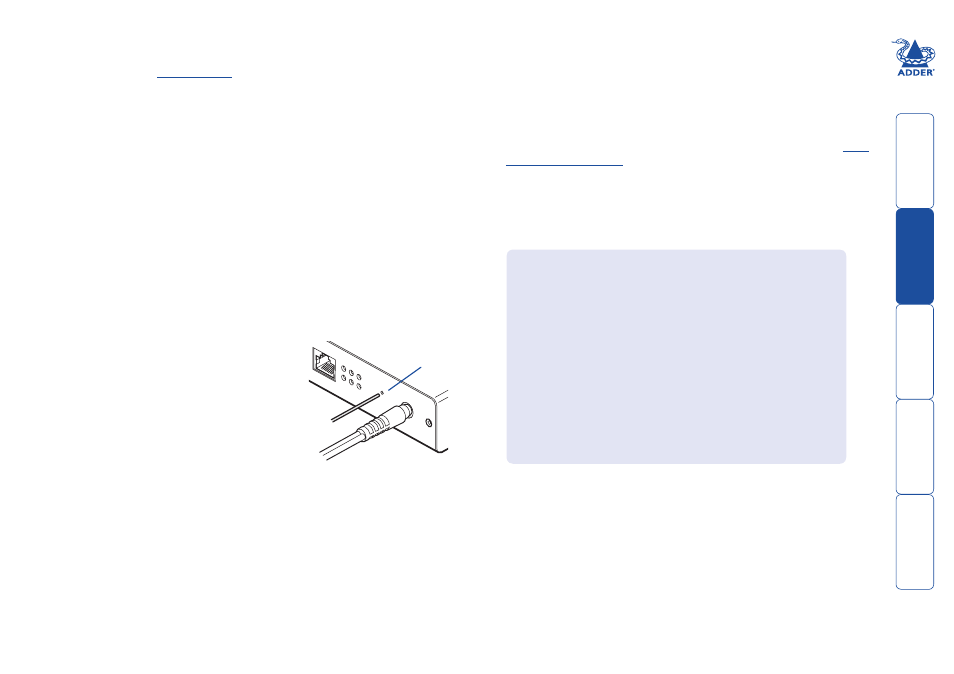
1 Remove all power to the device.
2 Set switch 2 on the side of the unit to its ON position.
3 Apply power to the device. After about two
seconds the VNC indicator will light. Before the
indicator extinguishes, insert a thin object (such
as a straightened paperclip) into the small hole
adjacent to the power socket to depress the
concealed reset switch and then remove it.
4 Shortly after, the VNC light should flash five
times. This indicates that the reset operation
has been successful.
5 Remove power and return switch 2 on the
side of the unit to its OFF position.
LNK
100
LOC
PWR
POW
ER
REM
VNC
Reset
button
hole
If the iPEPS does not respond on the network
If the iPEPS fails to respond when you attempt to access it on a local network
(as discussed on the
previous page
), the most likely cause (presuming that it is
correctly connected) is that it has been re-assigned to use network settings other
than the default values.
In such cases, you can remedy the situation in either of two ways, either:
• Reset the iPEPS back to its default network settings using the reset
procedure (shown below),
or
• Set the iPEPS to any required network settings using a USB link
(shown right)
Ü
.
To alter the iPEPS network settings via USB connection
This method allows you to configure the basic iPEPS network settings before it
has been connected to any network. To achieve this task, you need to connect
the iPEPS to a computer that uses Windows 2000, XP or Vista.
1 Remove all power to the device and set switch 2 on the iPEPS unit to ‘ON’.
2 Connect the iPEPS mouse port to a vacant USB socket on your computer using
the supplied KVM cable and green USB converter plug as shown in the
section. Note: If you also connect the keyboard cable
and purple converter then the iPEPS can derive power from the computer.
3 Power up the iPEPS unit and the computer (if not already switched on).
4 The Windows computer should report that a ‘New Disk’ has been inserted.
Use Windows Explorer to browse to the new disk and locate the file ‘config.
txt’. Edit this file using an editor such as Notepad or Wordpad:
5 Edit the parameters in this file as required, then save the file.
6
IMPORTANT: In the Windows Explorer ‘File’ menu, choose the ‘Eject’ option
in order to prompt the iPEPS to use the new information. Wait a couple of
seconds to ensure that this action has been completed.
7 Disconnect the USB cable from the computer.
8 Wait for ten seconds and then power down the unit.
9 Return Switch 2 to its ‘OFF’ position.
10 The iPEPS unit configuration should have been set with the new
information that you provided in the config.txt file. If necessary, you can
confirm that this has happened by repeating these steps to check the
contents of the “config.txt” file.
# Configuration File
# =================
#Edit and save this file. Close editor before safely removing USB mass storage device.
#Wait 10 seconds after disconnecting USB lead for configuration to happen.
#Lines beginning with a ‘#’ are comments
#All other lines should be of the form: Parameter=Value
#DO NOT USE SPACE OR TABS
#IP Address for device
IpAddress=192.168.1.42
#IP sub-network mask
IpNetMask=255.255.0.0
#Gateway for subnet
IpGateway=
#Whether to use DHCP on device 1=true, 0=false
UseDHCP=0
#Set to ‘1’ to reset password
resetAdminPasswd=0