Caution – Cashco 988-MB User Manual
Page 8
8
IOM-988/989-BODY
6. Remove all bonnet stud nuts (17).
7. Lift bonnet (2), plug/stem assembly (3), cage (10),
and all pack ing zone parts up and out of the body
(1) - grasp stem to prevent from falling. Lay these
parts down horizontally on a workbench. NOTE:
Seat ring (11) (and seat retainer (23) and soft seat
insert (24) for composition/soft seated de signs)
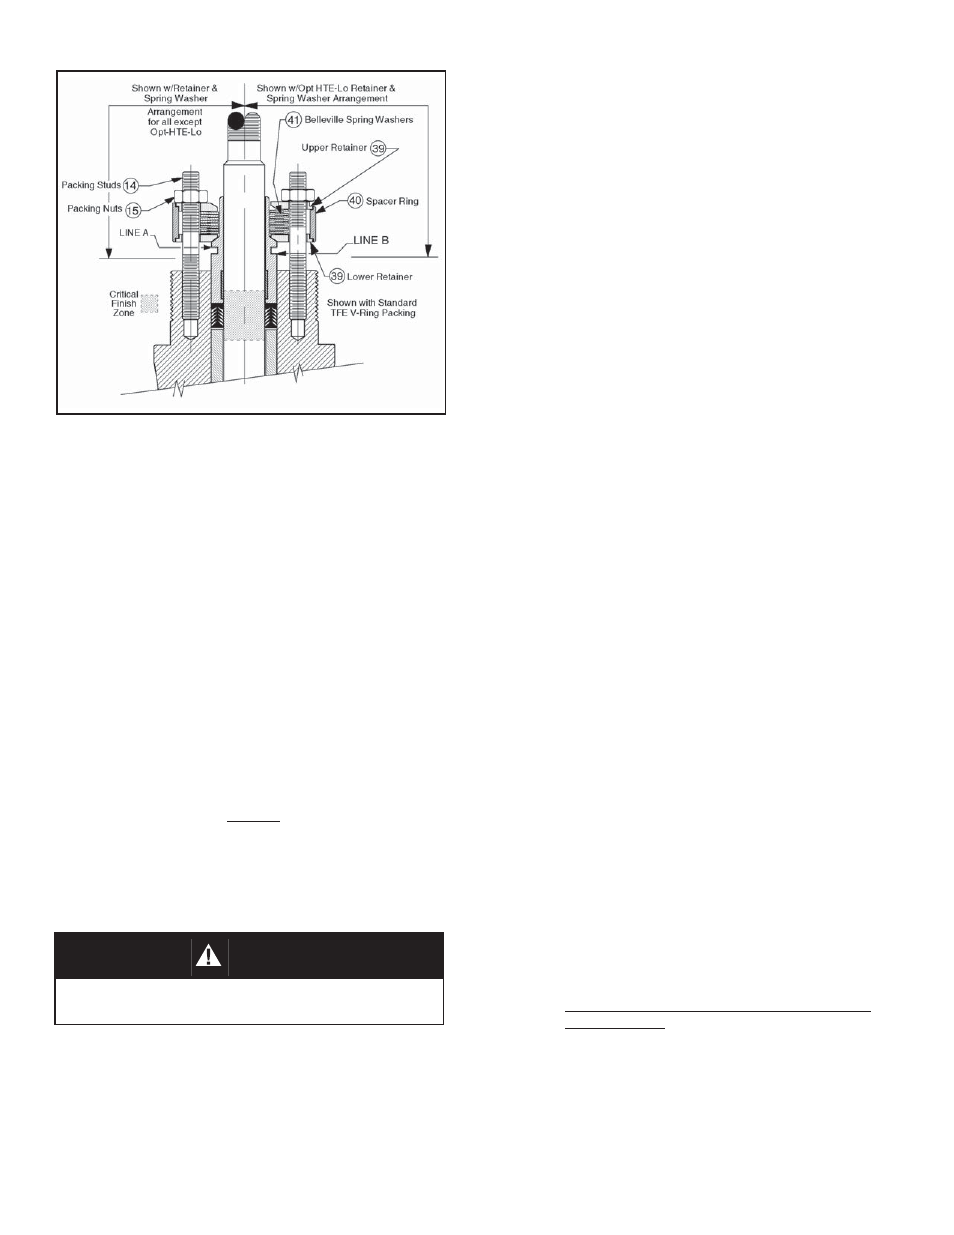
may also pull out with above parts assembly.
8. Remove both stem nuts (52).
9. Withdraw plug/stem assembly (3) from within the
bon net (2) and packing (6). Hold cage (10) to
pre vent from dropping. Set parts (3,10) aside.
10. Place the bonnet (2) into a second vise with the
pack ing zone on top. Remove packing nuts (15).
11. Grasp the lower retainers (39) from its underneath
side and lift the lower retainers, spacer rings (40),
Belleville spring wash er stacks (41), and upper
re tain ers(39) together up and over the packing
studs (14). Set these parts (39,40,41) aside without
disturbing the orientation.
12. Remove packing follower (5) together with fol low er
bush ing (26 or 5.2). Discard Rulon tape bushing
(26) if supplied.
15. Solvent clean all parts to be reused including bon-
net (2). Examine all parts for wear and corrosion.
Re place any cor rod ed or worn parts. Belleville
spring wash ers (41), studs (14,16), nuts (15,17)
and retainers (39) should be replaced in sets.
16. Examine plug/stem (3) at lower guide bushing area
(8) for wear. If there are signs of excess wear, guide
bushing should be replaced:
a. Place the bonnet (2) on a bench press. Press
the guide bush ing (8) out of the bonnet and
dis card.
b. Rotate bonnet (2) end-for-end. Place a new
guide bush ing (8) into position and press fully
into the bonnet.
c. Reclean bonnet with suitable solvent.
17. Examine plug/stem (3) in critical fi nish zone where
con tact is made with the packing (6). It is desirable
to re store the surface of the stem to a #4 Ra μ-in
surface fi nish; metal removal should not exceed
0.001 inch material. A deeply scratched or pitted
stem should be replaced.
18. Examine plug/stem (3) for wear around the seating
area. Ex am ine seat ring (11).
a. Plug head of stem assembly (3) of metal
seat ed design may be hand lapped using
suit able lap ping compound. If hand lapping will
not re store sur fac es to an acceptable de gree,
then re place ment of plug/stem assembly is
rec om mend ed.
b. For composition seated design, if plug/stem
as sem bly (3) is wear damaged, the stem (3)
should be re placed.
19. Examine inner surface of the bonnet’s (2) stuffi ng
box. It is desirable to restore the surface of stuffi ng
box to a #8 Ra μ-in surface fi nish; metal re mov al
should not exceed 0.001 inch ma te ri al. A deeply
scratched or pitted bonnet (2) should be re placed.
20. Examine packing follower (5) for corrosion. Re-
place if sig nifi cant ly corroded:
a. Place new follower bushing tape (26) into fol-
low er’s (5) interior groove.
b. If packing Opt-HTE-Hi or Opt-HTE-Lo is sup-
plied, the pack ing follower (5) contains carbon
bushing (5.2) that is pressed into the fol low er
(5.1). This bushing (5.2) is not fi eld re place-
able and must be supplied as a packing fol-
low er sub-assembly (5). Ex am ine the car bon
bush ing (5.2) for wear or cor ro sion. Re place
follower sub-as sem bly when nec es sary.
21. Turn attention to the body (1) and the remaining
parts yet therein. Remove seat ring (11) (and seat
retainer (23) and soft seat insert (24) for com po si-
tion/soft seated design). Discard used soft seat
in sert (24); always use a new soft seat insert upon
reassembly, If seat ring(11) or seat retainer (23)
are dam aged, replace.
Figure 4: External Live Loaded Packing Orientation
CAUTION
Take extreme care to not mar internal wall surface of the
bonnet (2).
13. Using a sharp, hooked-end, pick-type tool, hook
and pull the packing rings (6) up and out of the
bonnet’s (2) stuffi ng box individually. Examine for
excessive wear. Discard pack ing.
14. Remove bonnet (2) from the vise and invert to al-
low packing spacer (9) to slide out of the bonnet’s
stuffi ng box.