Warning – Cashco 988-MB User Manual
Page 7
7
IOM-988/989-BODY
26. With the cage (10) oriented correctly on the stem
assembly (3), set plug head down into the seat
ring (11). Keep fi rm hold of the plug/stem with
one hand; use other hand to push cage down into
proper alignment.
27. Lift bonnet (2) over threaded end of plug/stem
(3) and care ful ly lower bonnet down over stem,
en sur ing that the crit i cal fi nish zone of the bonnet’s
stuffi ng box is not scratched by the stem’s threads.
Align body (1)-to-bonnet (2) fl anges to matchmarks
as bonnet comes down over bon net studs (16).
Carefully release plug/stem (3) only when bonnet
is completely resting on the body.
28. Install bonnet nuts (17) onto bonnet studs (16) and
fi n ger-tighten.
29. Place packing spacer (9) over end of plug/stem (3)
and care ful ly lower into stuffi ng box.
30. Place packing spring (21) over end of plug/stem
(3) and care ful ly lower down into stuffi ng box.
37. Install packing stud nuts (15), fi nger-tight, on top
of the pack ing fl ange (4).
38. Continue tightening nuts (15) evenly in 1/2 revo-
lution in cre ments, until the shoulder of packing
fol low er (5) is resting evenly on the upper edge of
the bonnet (2) at the stuffi ng box.
39. Thread the two stem jam nuts (52) onto the stem (3)
and rotate as far down the plug/stem as possible.
40. Push valve stem (3) down into the seat ring (11).
Wig gle the loose assembly to ensure initial align-
ment/stack ing.
41. Tighten bonnet bolting (16,17) in an alternating
cross-pat tern in 1/4 revolution increments to the
following torque lev els:
Size
Torque
3/4”, 1”, 1-1/2”
70-75 ft-lbs (95-102 N-M)
2”
50-55 ft-lbs (68-75 N-M)
WARNING
Failure to ensure proper release of forces from Belleville
spring washers can cause fl ying parts that might cause
bodi ly injury.
42. Reinstall the (AA) as recorded in Sub-Section V.C.
43. Position suitable end closures – plugs, blind fl ang es,
etc., – and leak test with 100 psig air pres sure
min i mum. No packing (6) adjustment should be
re quired to get a tight seal.
44. Recalibrate per Section VI.
E. Trim and Packing Removal and Replacement for
Units With External Live-Loaded Packing; Opt-EXT,
Opt-KRE, Opt-HTE-Hi, or Opt-HTE-Lo: (See pg. 20
for Item # identifi cation.)
1. Remove (AA) as described in Sub-Sec tion V.B.
Leave (BA) in vise with plug/stem (3) upwards.
2. Place thread penetrating lubricant on bonnet bolt-
ing (16,17) and packing bolting (14,15).
3. Loosen both packing stud nuts (15) until clearance
ex ists be tween the bottom of the nuts (15) and the
upper retainers (39). See Fig ure 4.
4. Spacer rings (40) should “spin freely”. If stacked
mech a nism (39,40,41) is not “loose” due to cor ro-
sion, de bris, packed dirt, etc., tap the spacer rings
lightly with a hammer while at tempt ing to pry up
the spacer ring /lower retainer with a fl at tool. DO
NOT REMOVE PACK ING NUTS (15).
5. Continue to loosen pack ing stud nuts (15) to just
short of dis en gage ment from packing studs (14).
DO NOT RE MOVE PACKING NUTS.
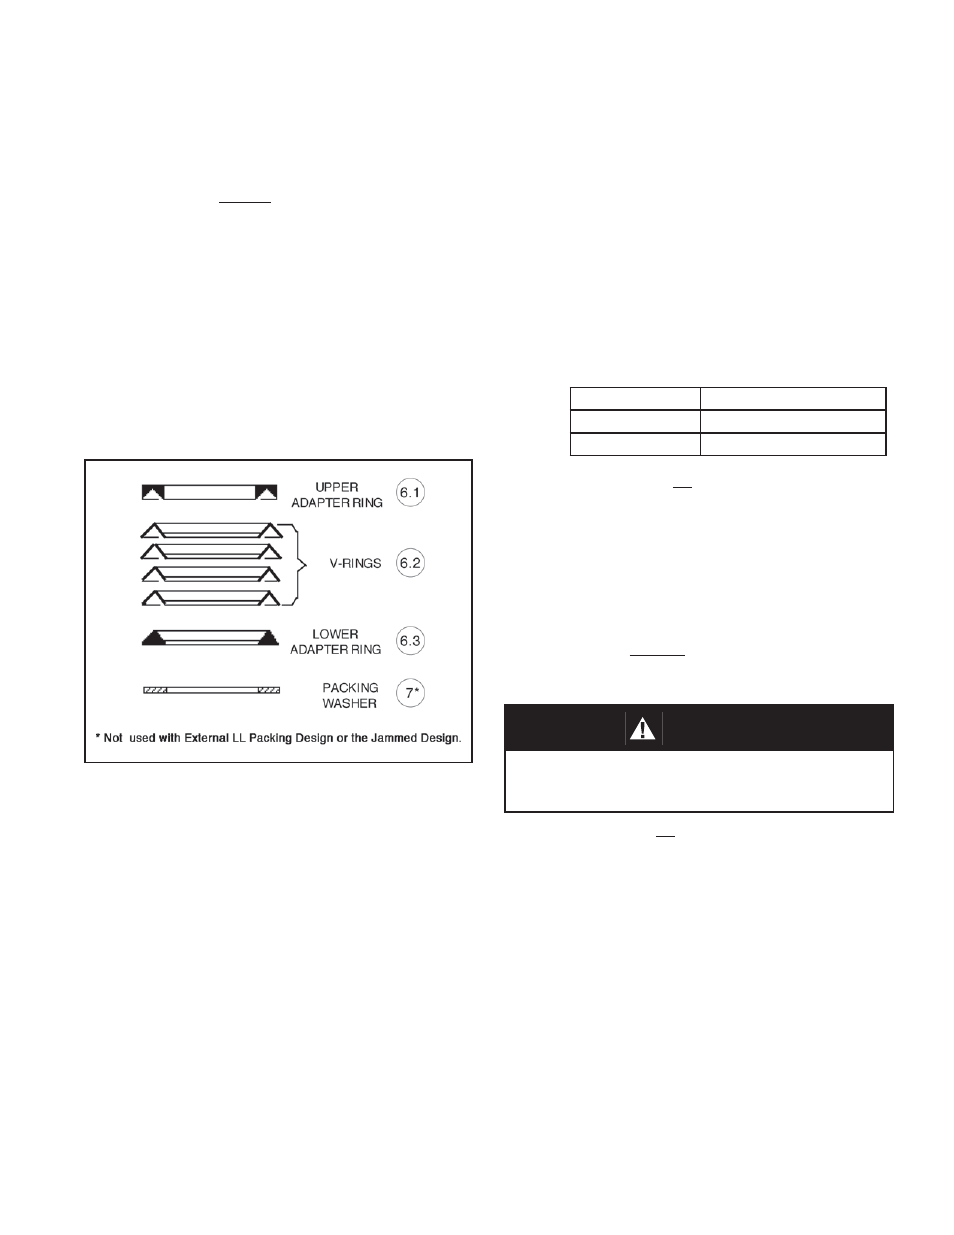
Figure 3: “STD” and “KRI” Packing Orientation
31. Place
packing washer (7) over end of plug/stem (3)
and care ful ly lower into stuffi ng box. See Figure 3
for proper packing ori en ta tion.
32. Carefully place lower adapter (6.3) of packing ring
set (6) over plug/stem’s (3) end, properly oriented.
Us ing the packing follower (5), push the lower
adapt er into the bonnet’s (2) stuffi ng box.
33. Carefully place a packing ring (6.2) properly ori-
ent ed over the plug/stem’s (3) end and push into
the stuffi ng box similar to the adapter (6.3). Re peat
for each of the four rings (6.2).
34. Place upper adapter (6.1) over the stem 3)
35. Place packing follower (5) with new wiper ring (22)
and new follower bushing (26) tape over the end
of the plug/stem (3).
36. Place
packing
fl ange (4) over end of plug/stem (3)
and over pack ing studs (14).