C.E. Niehoff & Co. N1235: N7074 ADE Housing Replacement Instructions User Manual
Page 2
Page 2 of 2
II0087A
Assembly:
Anti-Drive End:
1. Install O-rings in grooves in inner bore of ADE
housing. Lubricate O-rings with DuPont™ Krytox®
GPL 225 or equivalent.
2. Lubricate inner ring carrier (on shaft land) with
DuPont™ Krytox® GPL 225 or equivalent.
3. Align scribe marks, then set ADE housing in
position, pulling phase leads and field coil leads
through vent holes in housing. Rotate shaft to
make sure phase leads or field coil leads do not
interfere with rotor.
4. Install locknuts on through-studs and use suitable
adhesive, such as Loctite® 222. Follow manufac-
turer's instructions. Torque screws to 5.1 Nm/
45 lb. in. Before Loctite® sets, tap around face of
housing with plastic-headed hammer to set hous-
ing against shell. Re-torque all screws.
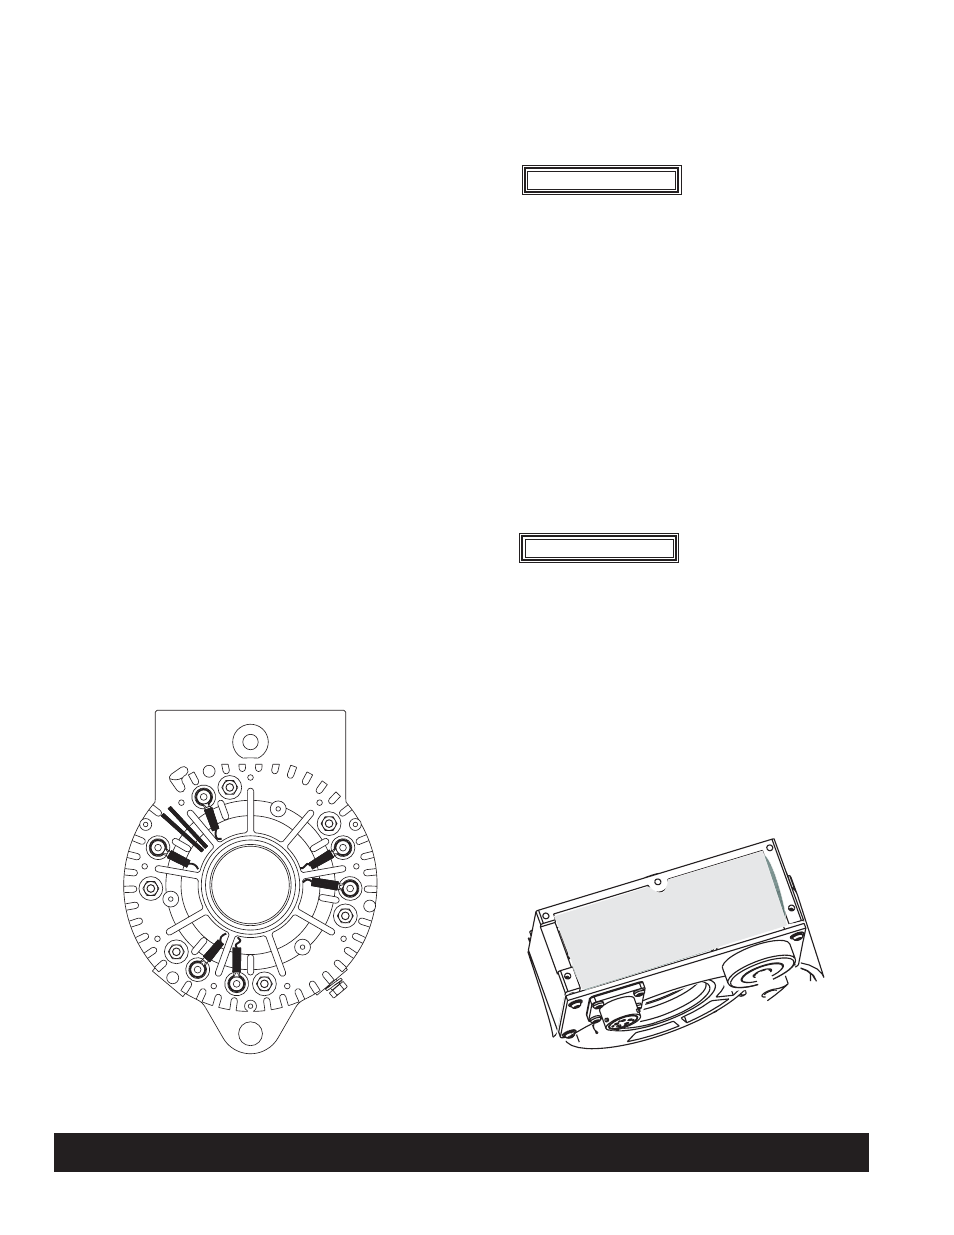
5. Attach phase leads to diode studs as marked in
Disassembly step 8. Torque nuts to 3.4 Nm/
30 lb. in. Coat all diode studs with Dow Corning®
3140 RTV or equivalent. See Figure 3.
6. Press new ADE bearing into bearing bore at
bearing inner race. Wind cleaned spiral ring
around groove in outer ADE ring carrier. Lubricate
spiral ring with DuPont™ Krytox® GPL 225 or
equivalent. Set ring carrier into ADE bearing bore.
7. Fasten with hardened washer and locknut. Torque
to 65 Nm/50 lb. ft.
8. Feed field coil leads up through tube and into
control unit in housing. Fill inside of tube with
Dow Corning® 3140 RTV or equivalent until
silicone appears at bottom of tube. Smooth away
the excess silicone at bottom of tube, forming a
seal.
C. E. Niehoff & Co. • 2021 Lee Street • Evanston, IL 60202 Tech Services Hotline 800-643-4633
Figure 3 – Phase Lead Connections
Figure 4 – Control Unit Filled with New Potting
9. Attach field coil leads to terminals as shown in
Figure 1 on page 1. Make sure all wires are
pressed inside cavity so that they will not be
exposed after cavity is filled with replacement
potting.
10. Fill the cavity inside the control housing with GE
Silicones® RTV11® silicone 2-part system (see
Figure 4):
a. Mix 37 drops of cure into 1/4 cup of RTV. Mix
well to prevent incomplete deep-set. At this
point, there is a half hour before mixture
thickens and two hours until mixture deep-
sets.
b. Pour mixture into cavity until it reaches the top
of the old potting. Do not block opening on
side of control housing. Make sure all wiring is
covered with new potting material.
Product warranty will be void if
tube is not sealed as indicated
in step 8.
WARNING
11. Install ADE top cover plate. Torque screws to 4.5 -
5 Nm/40-45 lb. in.
12. When RTV has hardened, install ADE cover plate.
Torque screws to 4.5 - 5 Nm/40-45 lb. in.
Product warranty will be void if
cavity is not filled as indicated
in step 10.
WARNING