Manage logged data, Real time data collection, Configure instruments – YSI ProODO User Manual
Page 19
28
29
A PC will recognize the Communications Saddle (saddle) as a YSI water quality
instrument with or without the handheld installed in the saddle.
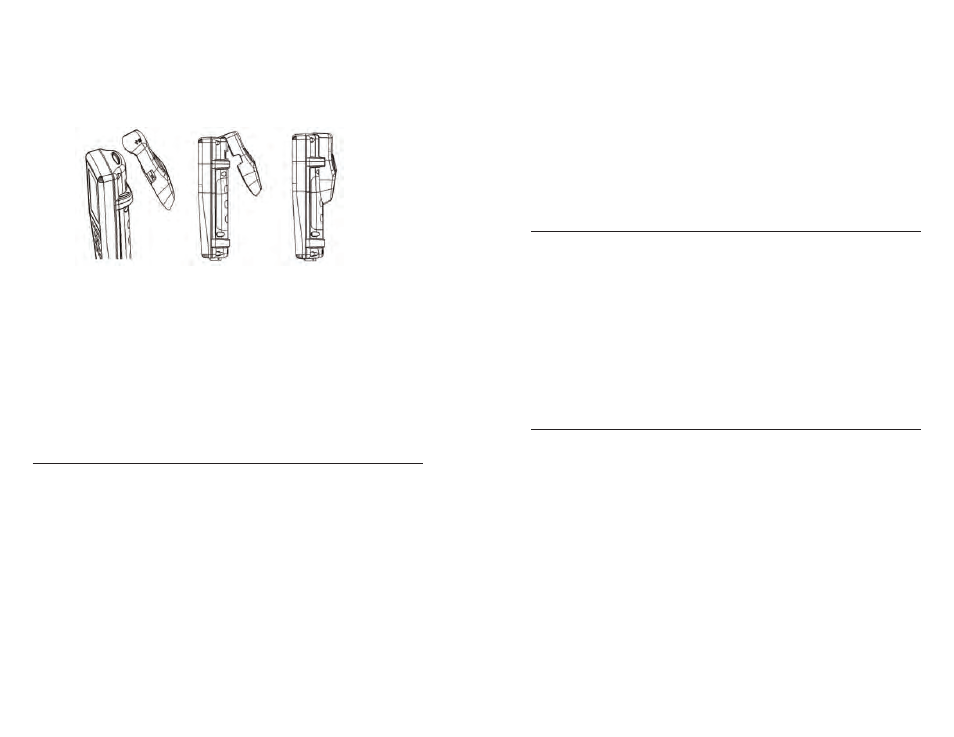
To connect to a ProODO, simply align the saddle to the oval section on top of
the instrument and push it down to snap it in place (Figure 7).
Figure 7. Locate the oval alignment groove at the top of the instrument
and inside the saddle. Insert the saddle into this oval groove. Press the
saddle towards the back of the instrument until it snaps into place.
Connect the USB cable to the top of the saddle and to a USB port on the PC.
Once Data Manager is launched, the program will recognize all saddles with
instruments connected to the PC.
The instrument will be powered through the saddle and USB connection when
connected to the PC.
ManaGe loGGed data
Data that has been logged to the ProODO can be uploaded to the PC via the
provided USB saddle. You can upload sensor data, GLP files, site lists, and
instrument configuration files individually or all at once. After connecting the
instrument to the PC via the USB saddle and cable and launching Data Manager,
click the Retrieve Instrument Data tab. Click on the Instrument’s Unit ID you
would like to retrieve data from, then select the files you would like to retrieve
and click Start.
Once the sensor data is uploaded to the PC, you can graph and view tabular data
by instrument Unit ID, date/time, site name, and/or folder name. This allows
you to configure the report according to your needs. You can select to view
all data from all instruments, or select a certain date/time range for only a few
specific instruments, there are multiple ways to view the data. Once the report
has been defined, you will be able to print the graph and/or export the table.
Data Manager takes information management one step further and allows
you to delete specific points instead of entire files. This allows you to clean up
data that is no longer needed or that may have been collected erroneously, for
example, when the sensor was out of the water. If you can not delete data due
to regulation and compliance purposes, Data Manager has the solution. While
viewing logged data or real time data, you have the ability to ‘tag’ individual data
points with comments.
In addition to sensor data, you will be able to view GLP files, site lists, and
configuration files that have been uploaded from the instrument. These can be
printed and exported as well.
real tIMe data collectIon
Data Manager allows you to view real time data on the PC.
After selecting your instrument, click the Real Time Instrument Data tab. Next,
input your sample interval, site/folder name, select the parameters you wish to
view and click OK. You must click Start on the next screen to begin your real
time study. Choose to hide the table or graph by unchecking the box next to
these options. Click Stop, then Edit Setup to change the Y-scale min/max of
the graph, to select different colors, or to name your graph. Add a comment
to a data point, by clicking in the comment field of the table next to the data
point. You may also Print the graph and Export the data for viewing in another
program.
confIGure InstruMents
Data Manager allows for easy and quick configuration of single or multiple
instruments. Once you have uploaded a site list or configuration file, you can edit
it as needed, save it, and download it to other instruments. You no longer need
to configure each instrument individually. By using the same configuration file
for all instruments, you can rest assured that all instruments will have identical
settings.
New site lists and configuration files can be created in Data Manager. These
lists and files can be downloaded to one or multiple instruments. Save time
by creating these files on your PC and downloading them to the instrument as
opposed to creating them on the instrument.
Minimum system requirements for Data Manager are a system with Windows®
2000 with SP4 (minimum) or Windows® XP with SP2 (minimum), 300 MHz or
higher Pentium®-compatible CPU, 128 MB of RAM or higher, 80 MB or more of
free hard-disk space, USB 2.0, and Microsoft® .NET.