Calibration - dissolved oxygen – YSI ProODO User Manual
Page 14
18
19
The instrument is programmed to determine the minimum and maximum
data value over the previous 5 samples, and to compute the percent difference
between those values. In this example, that gives a percent change of:
% Change = 100 * ((96.1 – 95.3 ) / 95.3)
% Change = 0.83%
In this example, if the Sensitivity Bar is set to the far right, the Auto Stable
requirement would not be met and AS would continue to blink. However,
if the sensitivity bar is set to the median threshold (1.275%), the Auto Stable
requirement would be met and AS would display steadily on the display.
If the Manual Sampling mode in the System menu is enabled, the Auto Stable
function will automatically be enabled and the sensitivity setting will be used to
determine when to hold the readings on the display. See Sampling Mode in the
System section of this manual for more information on the two Sampling mode
options.
SALINITY CORRECTION
The last feature in the Probe menu is the Salinity correction value for the mg/L
readings. Press Probe
, highlight Salinity, and press enter. Then, use the
numeric entry screen to enter the Salinity value of the water you will be testing
from 0 to 70 ppt.
The value entered here will be used when calculating mg/L from the temperature
and % saturation readings. As the salinity of water increases, its ability to dissolve
oxygen decreases. For example, fully oxygenated 20 °C water at sea level with
zero salinity will hold 9.092 mg/L of dissolved oxygen. If that same sample had
a salinity value of 9 ppt, then it would hold 8.621 mg/L of dissolved oxygen.
Therefore, to obtain accurate mg/L readings, it is important that you know the
salinity of the water you will be testing and input the value into the instrument.
The salinity of fresh water is typically 0-0.5 ppt and seawater is typically 35 ppt.
You will also have the opportunity to enter or modify the Salinity correction
value during DO calibration. Appendix B shows the oxygen solubility table.
calIBratIon - dIssolVed oxyGen
The ProODO sensor is an optical luminescent sensor which has greater stability
and is less susceptible to calibration drift than traditional electrochemistry
sensors. This increased stability means that the instrument may hold its
calibration for many months. However, for the highest data accuracy, YSI
recommends verifying the instrument’s calibration on a daily basis. To verify
the instrument’s calibration, place the sensor in its calibration environment
and check to see that the DO% is reading its calibration value based on the
barometric pressure. Refer to Appendix A for the DO% calibration values based
on barometric pressure.
The ProODO offers several options for calibrating dissolved oxygen. The
first and second methods calibrate the DO % saturation value to either water
saturated air or air saturated water. The third and fourth calibrates in mg/L
or ppm to a solution with a known DO concentration (usually determined by a
Winkler Titration). The fifth option is a zero calibration. If performing a zero
calibration, you must also perform a %, mg/L, or ppm calibration following the
zero calibration. For both ease of use and accuracy, YSI recommends performing
the following DO % water saturated air calibration:
It is not necessary to calibrate in both % and mg/L or ppm.
Calibrating in % will simultaneously calibrate
mg/L and ppm and vice versa.
CALIBRATING DO % IN WATER SATURATED AIR:
1-POINT CALIBRATION
Moisten the sponge in the storage sleeve with a small amount of clean water.
The sponge should be clean since bacterial growth may consume oxygen and
interfere with the calibration. Make sure there are no water droplets on the
sensor cap and temperature sensor and then install the storage sleeve over the
probe. Make sure the DO and temperature sensors are not immersed in water.
The storage sleeve ensures venting to the atmosphere. Wait approximately 5
to 10 minutes for the storage container to become completely saturated and to
allow the temperature and dissolved oxygen sensors to stabilize.
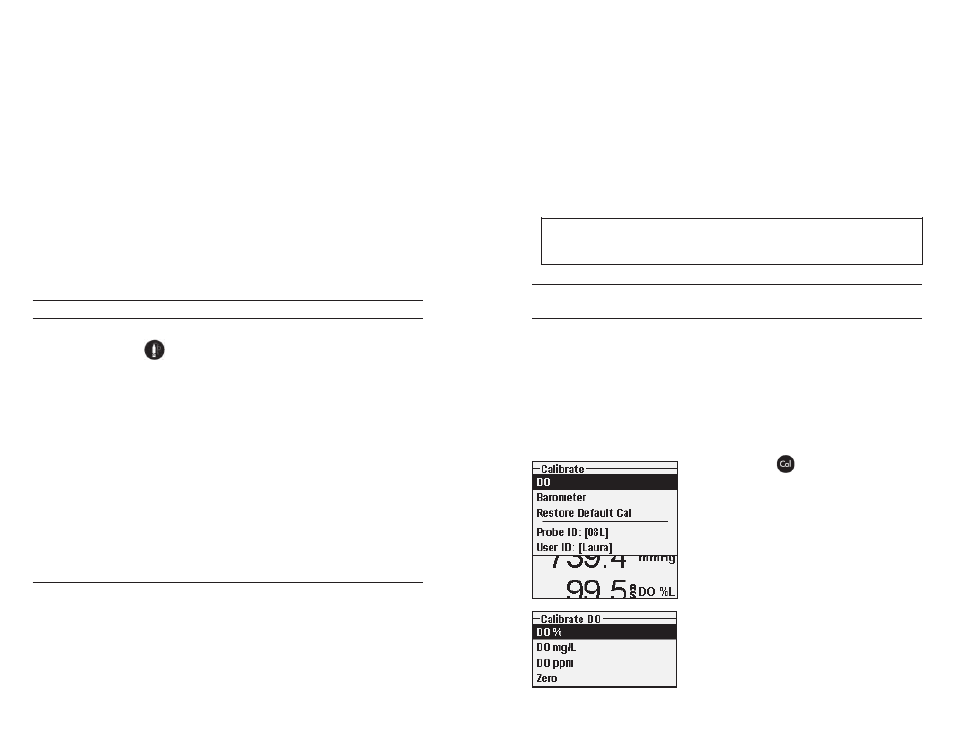
Press Calibration
. If Probe ID or User ID
are enabled in the System GLP menu you will be
able to highlight these features and add, select,
edit, or delete an ID. When enabled these IDs
are stored with each calibration record in the
GLP file.
After selecting the Probe ID and/or User ID if
appropriate, highlight DO and press enter.
Highlight DO % and press enter to confirm.
The instrument will use the value from the
internal barometer during calibration and will
display this value in brackets at the top of the
i