StreetGlow Wireless LED Undercar User Manual
Page 2
1
WIRELESS REMOTE
UPGRADE KIT
CONTENTS:
1 - Multi-Color LED Controller (SGLWRC)
1 - Wireless Remote Key Fob (SGLRKF)
Installation Instructions
Step 1 Replace your old controller with new Wireless Remote Controller or select a desired location for the Multi-Color
LED Controller (SGLWRC) and mount using the supplied mounting hardware.
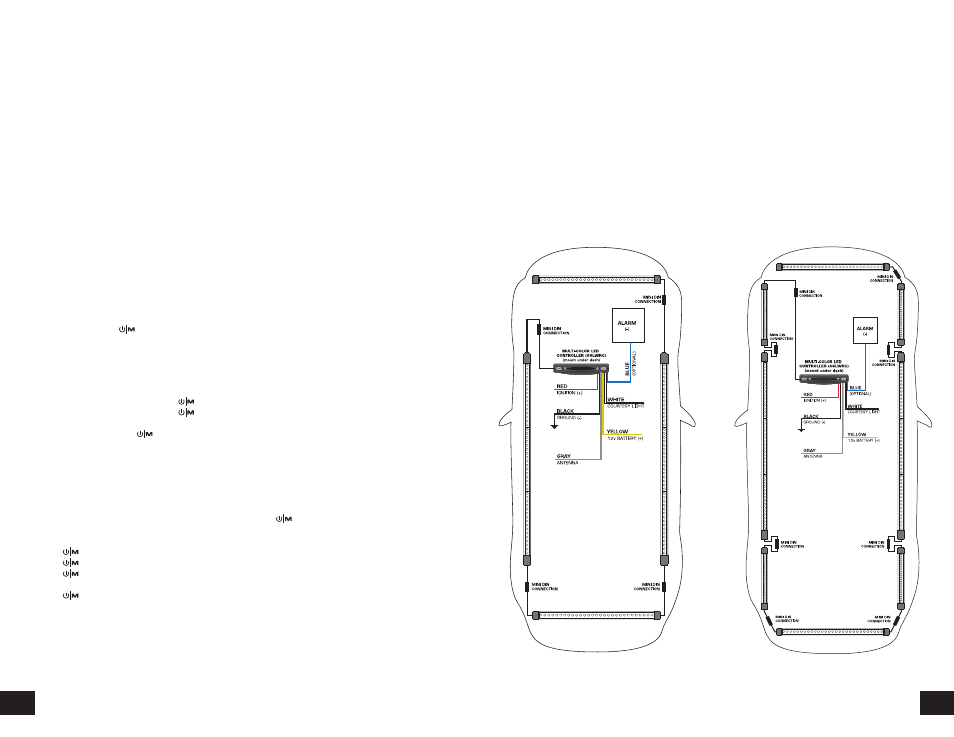
Step 2 With SGLWRC mounted, connect power and ground to the SGLWRC’s power harness (see FIGURE 1)
YELLOW
wire = 12v battery (+)
RED
wire = 12v switched ignition (+)
WHITE
wire = courtesy light (+) (optional connection)
BLACK wire = ground (-)
BLUE
wire = alarm (-) (optional connection)
GRAY
wire = antenna
Step 3 Connect the control wire of the SGLWRC to the control wire of the first LED tube.
Step 4 Once wiring and mounting for all components is completed, test the SGL100MC’s modes of operation.
Step 5 Press and hold the (POWER/MODE) button on the dash mount controller or wireless remote key fob
to activate all LED segments.
Note: If none of the LEDs light up, then go back to Step 3 and check your connections.
Multi-Color LED Controller (SGLWRC) / Wireless Remote Key Fob (SGLRKF)
Operation
1) Turn unit on by pressing and holding the button for 2 seconds.
2) Turn unit off by pressing and holding the button for 2 seconds.
3) To change color, press the
C (COLOR) button.
4) To change modes, press the button.
5) To change patterns, press the + or – buttons.
6) To increase brightness/speed/sensitivity, press and hold the + button.
7) To decrease brightness/speed/sensitivity, press and hold the – button.
Modes and Features
MODES: All LEDs On / RPM / Music Interface / Scanning Patterns
Turn unit on and select the desired mode of operation by pressing the (POWER/MODE) button.
Main Functions
1st press
button = All LED’s On Mode (solid show of lights)
2nd press
button = RPM Mode (kit reacts to the sound of the engine from front to back)
3rd press
button = Music Interface Mode (dances to the beat of your music)
NOTE: Use the + or – button to adjust sound sensitivity
4th press
button = Sequential Lighting Effects Mode (select from nine different lighting effects)
NOTE: To change pattern, press and RELEASE the + or – button
To increase pattern speed, press and HOLD the + button
To decrease pattern speed, press and HOLD the – button
2
WIRING DIAGRAMS
WITH SGLWWMC
FIGURE 1
See back panel for scanning patterns.
Changing Colors
To change colors, press the
C (COLOR) button. You may select between seven colors plus AUTO-CHANGE mode
(cycles through all seven colors): RED, YELLOW, GREEN, TURQUOISE, NEO BLUE, CORAL, and WHITE.
(AUTO-CHANGE mode is indicated by a RED/GREEN/BLUE flash on the tubes).
Alarm Feature
The SGLWRC’s alarm feature activates when the
BLUE
wire is triggered with a negative (ground) input.
This feature functions ONLY when the vehicle is off or when 12v is disconnected from the ignition
RED
wire
(see FIGURE 1 for details). When the alarm feature is active, the front and back tubes will flash once per second under
the vehicle.
Courtesy Light Feature
The SGLWRC’s courtesy light feature activates when the
WHITE
wire is triggered with a positive 12v input (dome
light circuit). This feature will illuminate the kit for as long as the door is opened.