Scanning patterns – StreetGlow LED Wheel Well Kit User Manual
Page 2
MULTI-COLOR LED CONTROLLER (SGMLC) OPERATION
1) Turn unit on by pressing and holding the
button for 2 seconds.
2) Turn unit off by pressing and holding the
button for 2 seconds.
3) To change color, press the C (COLOR) button.
4) To change modes, press the
button.
5) To change patterns, press the + or – buttons.
6) To increase brightness/speed/sensitivity, press and hold the + button.
7) To decrease brightness/speed/sensitivity, press and hold the – button.
INSTALLATION (Stand-Alone Use)
Step 1 Select the desired location for the Multi-color L.E.D. Controller (SGMLC) and mount
using the supplied mounting hardware.
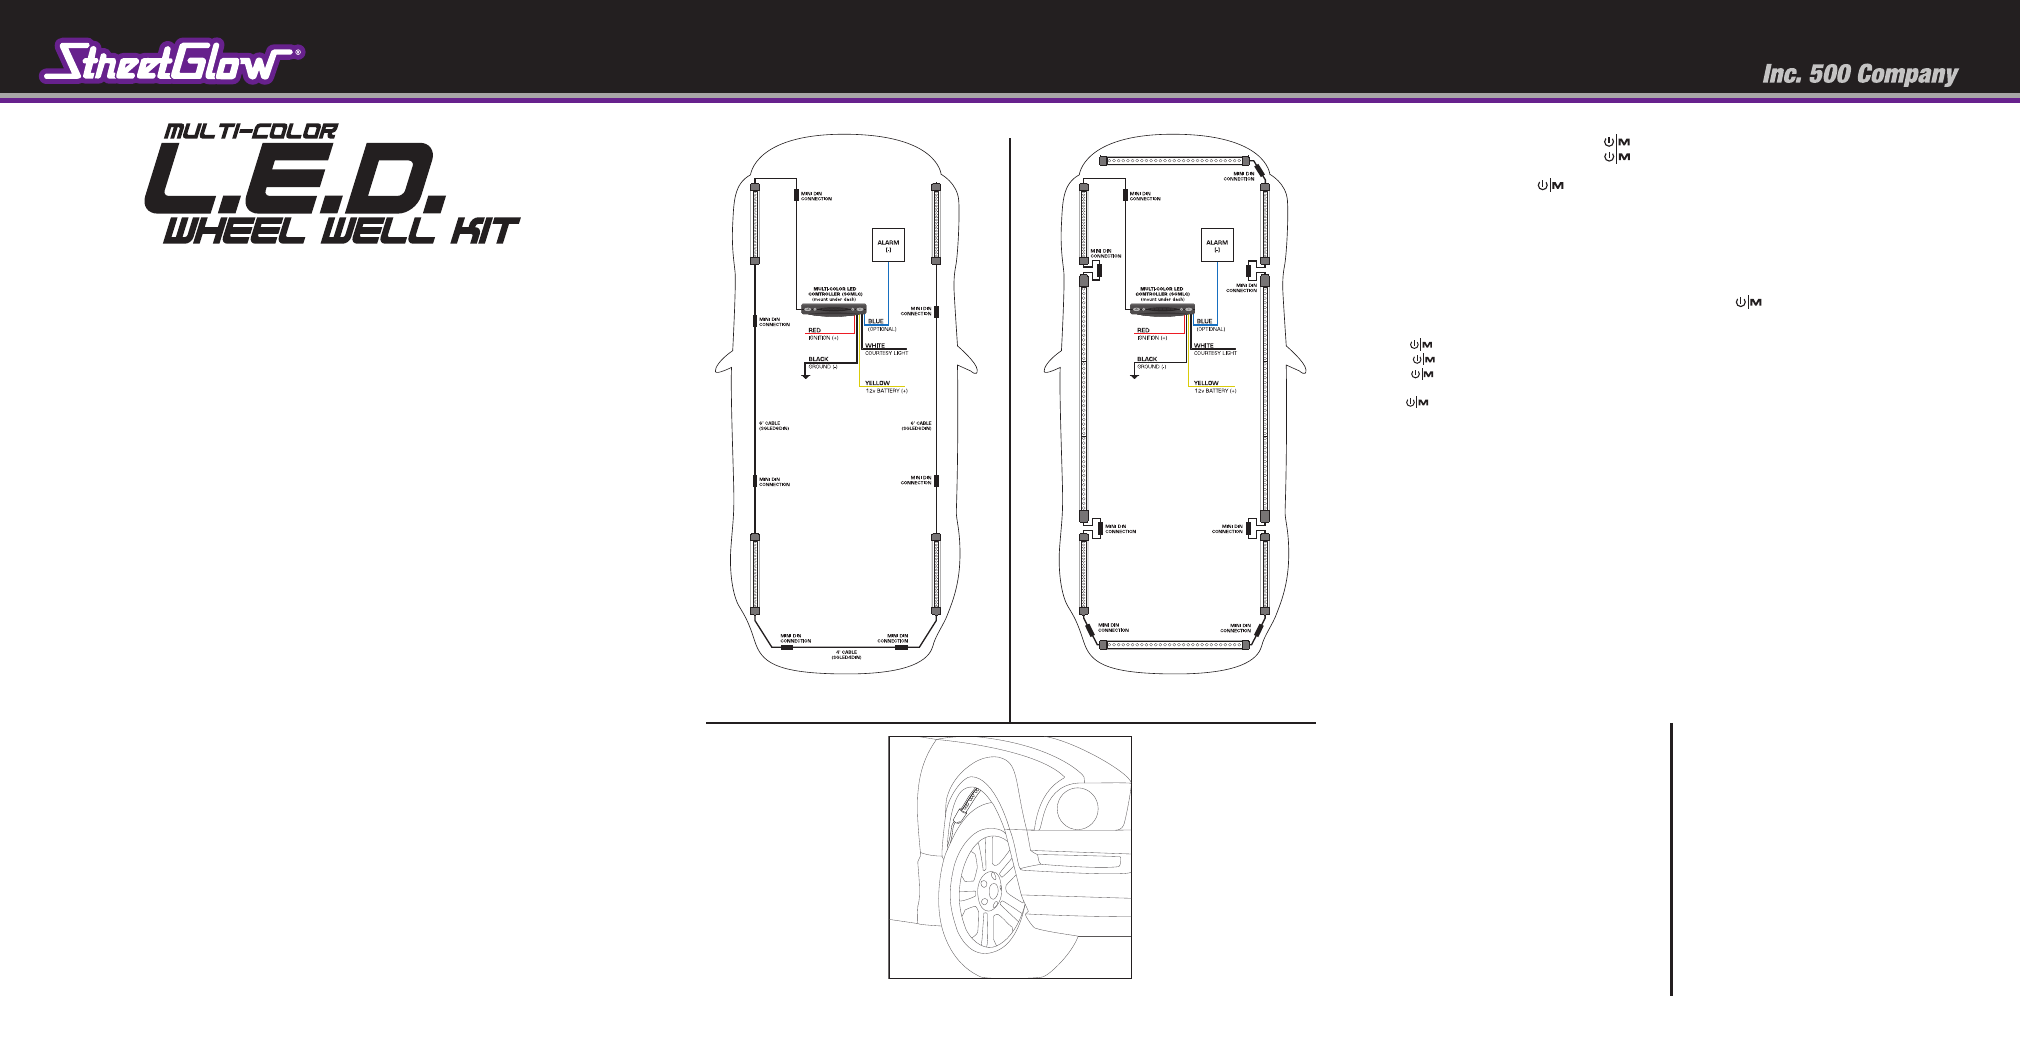
Step 2 With the SGMLC mounted make connections of power and ground to the power harness (Figure 1)
YELLOW
wire = 12v battery (+)
RED
wire = 12v ignition (+)
BLACK wire = ground (-)
BLUE
wire = alarm (-) (optional connection)
WHITE
wire = courtesy light (+) (optional connection)
NOTE: Vehicles with after market alarms can use the SGMLC's alarm feature to activate
when Ignition Kill is enabled with a negative trigger.
Step 3 Select the desired locations for the L.E.D. tube placement which are away from all fuel lines,
exhaust systems, areas of extreme heat, ABS components, SRS components, any moving
parts and where lifts or jacks are used to raise your vehicle.
Step 4 Using the tube mounting clamps (2 mounting clamps per tube) and the 3/4” self-tapping
screws, fasten the L.E.D. tubes to your vehicle in the recommended mounting positions. (Figure 3)
Step 5 Connect the control wire(s) of each tube together. Secure the wires to your vehicle.
NOTE: Be sure to align the arrows on the plugs and use electrical tape (not supplied)
around the secured plugs to ensure a proper weather tight connection.
Step 6 Run the control wire of the SGMLC to the control wire of the first L.E.D. tube and make connection.
Step 7 Once the wiring and mounting of all components is complete, test modes of operation
and scanning patterns.
INSTALLATION (With Multi-Color L.E.D. Undercar Kit, SGLED100MC)
Step 1 Select the desired locations for the L.E.D. tube placement which are away from all
fuel lines, exhaust systems, areas of extreme heat, ABS components, SRS components, any
moving parts and where lifts or jacks are used to raise your vehicle.
Step 2 Using the tube mounting clamps (2 mounting clamps per tube) and the 3/4” self-tapping screws,
fasten the L.E.D. tubes to your vehicle in the recommended mounting positions. (Figure 3)
Step 3 Connect the control wire(s) of each tube inline to the undercar kit tubes (Figure 2)
Secure the wires to your vehicle. NOTE: Be sure to align the arrows on the plugs and
use electrical tape (not supplied) around the secured plugs to ensure a proper
weather tight connection.
Step 4 Once the wiring and mounting of all components is complete, test modes of operation
and scanning patterns.
CONTENTS:
4 -
27” Flexible L.E.D. tubes (SGWW27MC)
1 -
Multi-Color L.E.D. Controller (SGMLC)
2 -
6' Cable (SGLED6DIN)
1 -
4' Cable (SGLED4DIN)
8 -
Tube mounting clamps
20 - 3/16" Wire clamps
44 - 3/4" Self-tapping screws
2 -
11/16" Screws for controller
FRONT
REAR
FRONT
REAR
Figure 1
(Stand-Alone)
Figure 3
Figure 2
(with SGLED100MC)
Design and specifications are subject to change without notice.
MODES AND FEATURES
MODES: All LEDs On / RPM / Music Interface / Scanning Patterns
Turn unit on and select the desired mode of operation by pressing the (POWER/MODE) button.
Main Functions
1st press
button = All LED’s On Mode (solid show of lights)
2nd press
button = RPM Mode (kit reacts to the sound of the engine from front to back)
3rd press
button = Music Interface Mode (dances to the beat of your music)
NOTE: Use the + or – button to adjust sound sensitivity
4th press
button = Sequential Lighting Effects Mode (select from nine different lighting effects)
NOTE: To change pattern, press and RELEASE the + or – button
To increase pattern speed, press and HOLD the + button.
To decrease pattern speed, press and HOLD the – button.
Changing Colors
To change colors, press the C (COLOR) button. You may select between seven colors plus AUTO-CHANGE mode
(cycles through all seven colors): RED, YELLOW, GREEN, TURQUOISE, NEO BLUE, CORAL, and WHITE.(AUTO-CHANGE
mode is indicated by a RED/GREEN/BLUE flash on the tubes).
Alarm Feature
The SGMLC’s alarm feature activates when the
BLUE
wire is triggered with a negative (ground) input.
This feature functions ONLY when the vehicle is off or when 12v is disconnected from the ignition
RED
wire
(see FIGURE 1 for details). When the alarm feature is active, the front and back tubes will flash once per second
under the vehicle.
Courtesy Light Feature
The SGMLC’s courtesy light feature activates when the
WHITE
wire is triggered with a positive 12v input (dome light
circuit). This feature will illuminate the kit for as long as the door is opened.
SCANNING PATTERNS
CLASSIC SCAN
a traditional light scan moving from the front of
the car to the rear, then reverse
PING-PONG
a continuous back and forth motion creating a ping-
pong-like effect
THE SHIFT
a 3-light bank leapfrog shift: three banks on, 6 banks
on, next three banks on.
MARCHING ANTS
alternating light banks turn on to create a forward
marching motion
FILL-REFILL
fills into a solid color, then empties one by one and
reverses direction
CHERRY-PICKING
a quick fill, then “picked out” one by one and
reverses direction
DROP-IT-IN
fills in one by one, then quickly dissolves and
reverses direction
PING-PONG FILL 1
a back and forth motion until all banks are lit, then
quickly dissoves and reverses direction
PING-PONG FILL 2
a back and forth motion until all banks are lit, then
empties one by one and reverses direction
ZIG-ZAG SCAN
a zig-zag pattern to the center and back out