Caution, Wiring diagram – StreetGlow Blue Line Neon Undercar Kit User Manual
Page 2
STRIPED
GROUND
GROUND
3A
FUSE
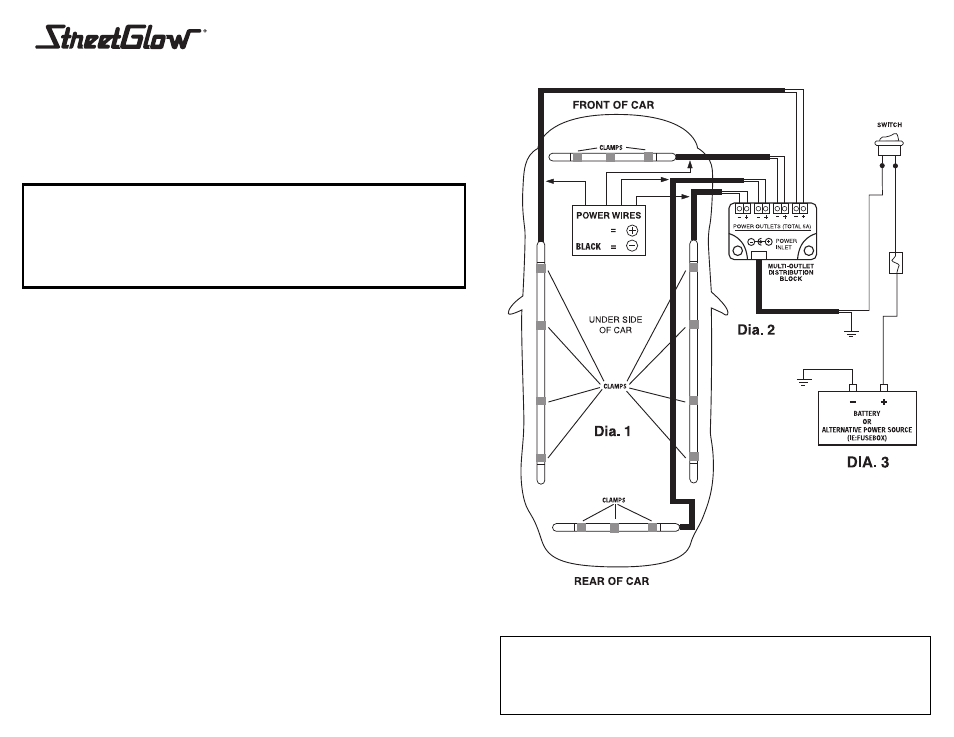
1) Select the desired locations for neon tubes that are away from all fuel lines, exhaust
systems, areas of extreme heat, ABS components, SRS components, any moving
parts, and where lifts or jacks are used to raise your vehicle.
2) Using the 3/4” tube mounting clamps and the 5/8” self-tapping screws (see Dia. 1),
fasten the neon tubes to your vehicle in the recommended mounting positions (4
mounting clamps per 48” tube; 3 clamps per 30” tube).
3] On a flat, moisture free area, mount the distribution block so that it is near your
power source (i.e. fuse box or battery) and accessable for neon wire lead connections.
Be sure to keep away from engine and moving parts
4) Run neon power wires to the distribution block that allows for the least length of wire.
Trim surplus wire from neon tubes before connecting to distribution block to avoid
slack. Complete connection of neon wires leads (see Dia. 2). Secure with the
provided 3/16” wire clamps and remaining screws. In the event where wire leads
need to be lengthened, insulate connection(s) with electrical tape.
4) Refer to Diagram 3 for power and switch connections.
5) Enjoy!
TECH TIPS:
TIP 1: StreetGlow Undercar Kits can also be installed in various applications
such as truck bedrails, engine compartments, interiors, or anywhere a 48”
or 30” neon light is desired.
TIP 2: Add our music interface module to create a multitude of effects.
WIRING DIAGRAM
CAUTION!
PLEASE READ CAREFULLY BEFORE INSTALLING KIT
• Disconnect your battery prior to installation.
• This is a high voltage system and may cause burn or shock if neon tubes are not properly connected.
• Loose wires can arc and may cause fires.
• Consult your mechanic or technician if uncertain of wiring or installation of neon tubes.
NEON UNDERCAR KIT
INSTALLATION INSTRUCTIONS
CONTENTS
2 - 48” neon tubes
2 - 30” neon tubes
1 - Distribution block
1 - 18GA spare wire (20’)
14 - 3/4” tube mounting clamps
12 - 3/16” wire clamps
26 - 5/8” self-Tapping screws
1 - Switch
1 - Warranty info packet
TOOLS NEEDED
Screw gun w/
#1 philips bit
Wire strippers
Electrical tape