Pinion disassembly – Spicer Drive Axles Service Manual G & M User Manual
Page 13
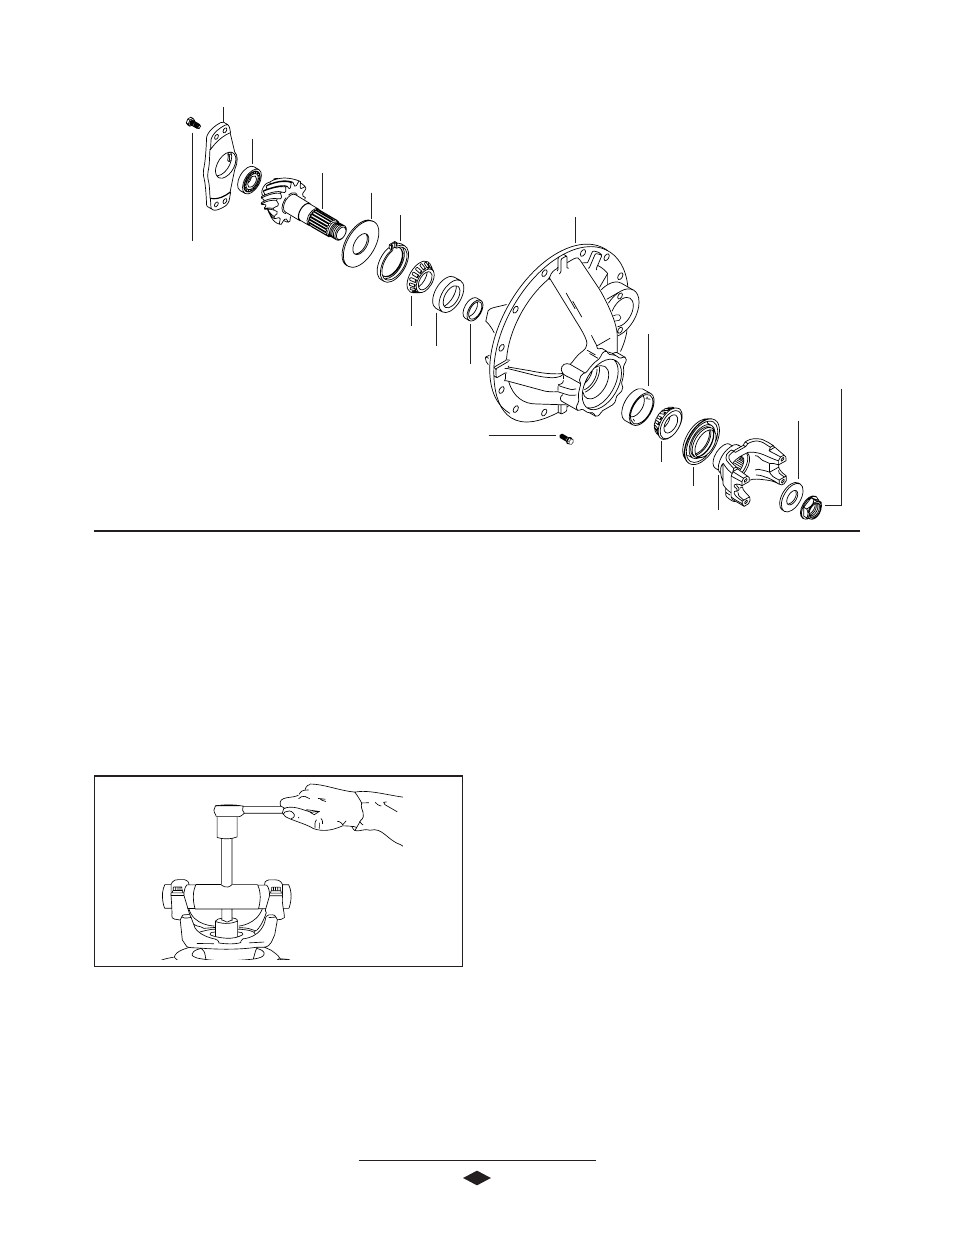
Pinion Bearing Spacer (Selective)
PINION DISASSEMBLY
Pinion
Pinion Pilot Bearing Cap
Pinion Pilot Bearing
Retainer Plate Bolt
(See Torque Specifications)
Carrier Housing
Inner Pinion Bearing Cup
Inner Pinion Bearing Cone
Oil Slinger Seal
Pinion Position Spacer (Selective)
Flanged Hex Nut
(700-900 Lb-Ft)
(949-1,220 N-m)
Washer
End Yoke Assembly
Pinion Oil Seal
Outer Pinion Bearing Cone
Outer Pinion Bearing Cup
Carrier Mounting Bolt
(See Torque Specifications)
11
3. Remove the end yoke using a suitable puller. See
Figure 5.
4. Replace flanged hex nut (finger tight). Tap pinion
free of bearing with soft hammer.
5. Supporting pinion from inside carrier, remove
flanged hex nut.
Pinion Disassembly Complete
6. Remove pinion.
7. Near the spline end of the pinion and between the
pinion bearings is a (selective) pinion bearing
spacer used for pinion bearing preload. Retain this
spacer for possible use in reassembly.
8. Remove pinion pilot bearing from end of pinion.
9. Remove inner bearing cone from pinion.
10. Remove the pinion oil seal. Discard the seal and
replace it with a new one at time reassembly.
Remove the outer pinion bearing cone.
11. Rotate carrier to pinion nose down position.
Remove the pinion oil slinger seal from the carrier
and discard. Install a new seal at the time of
reassembly.
12. With nose of the carrier down, remove the outer
pinion bearing cup.
13. Turn the carrier over and remove the inner bearing
cup.
CAUTION: Do not nick the carrier bearing bore.
1. Turn the carrier to a vertical position and remove
the four pilot bearing cap bolts. Lift the pilot
bearing cap from the roller bearing and carrier
housing, tapping with soft hammer from underneath
side if necessary.
2. Turn the nose of the carrier to a horizontal position
to remove the flanged hex nut. Hold the end yoke
stationary, and remove the flanged hex nut and
washer.
FFFFFigur
igur
igur
igur
igure 5
e 5
e 5
e 5
e 5