Vfd programming parameters – Trane INTELLIPAK ™ ™ ™ ™ ™ Commercial Single-Zone Rooftop Air Conditioners with CV or VAV Control User Manual
Page 108
106
Service & Maintenance (Continued)
WARNING
Hazardous Voltage!
Disconnect all electric power, including remote discon-
nects before servicing. Follow proper lockout/tagout
procedures to ensure the power can not be inadvert-
ently energized. Failure to disconnect power before ser-
vicing could result in death or serious injury.
VFD Programming Parameters
Units shipped with an optional variable frequency drive
(VFD) are preset and run tested at the factory. If a problem
with a VFD occurs, ensure that the programmed param-
eters listed in Table 5-8 have been set before replacing the
drive.
Note: Check to make sure that parameter 104 is set
to 60 Hz. To check parameter 104 press the
Extended Menu button, press the Left Arrow button
until menu Load & Motor is shown, press the up
arrow until parameter 104 is displayed. Parameter
104 can then be modified by pressing the Change
Data button and then the Up Arrow button. When
the desired selection has been made press the OK
button.
Should replacing the a VFD become necessary, the re-
placement is not configured with all of Trane's operating
parameters. The VFD must be programmed before at-
tempting to operate the unit.
To verify and/or program a VFD, use the following steps:
1. At the unit, turn the 115 volt control circuit switch 1S70 to
the "Off" position.
2. Turn the 24 volt control circuit switch to the "Off' position.
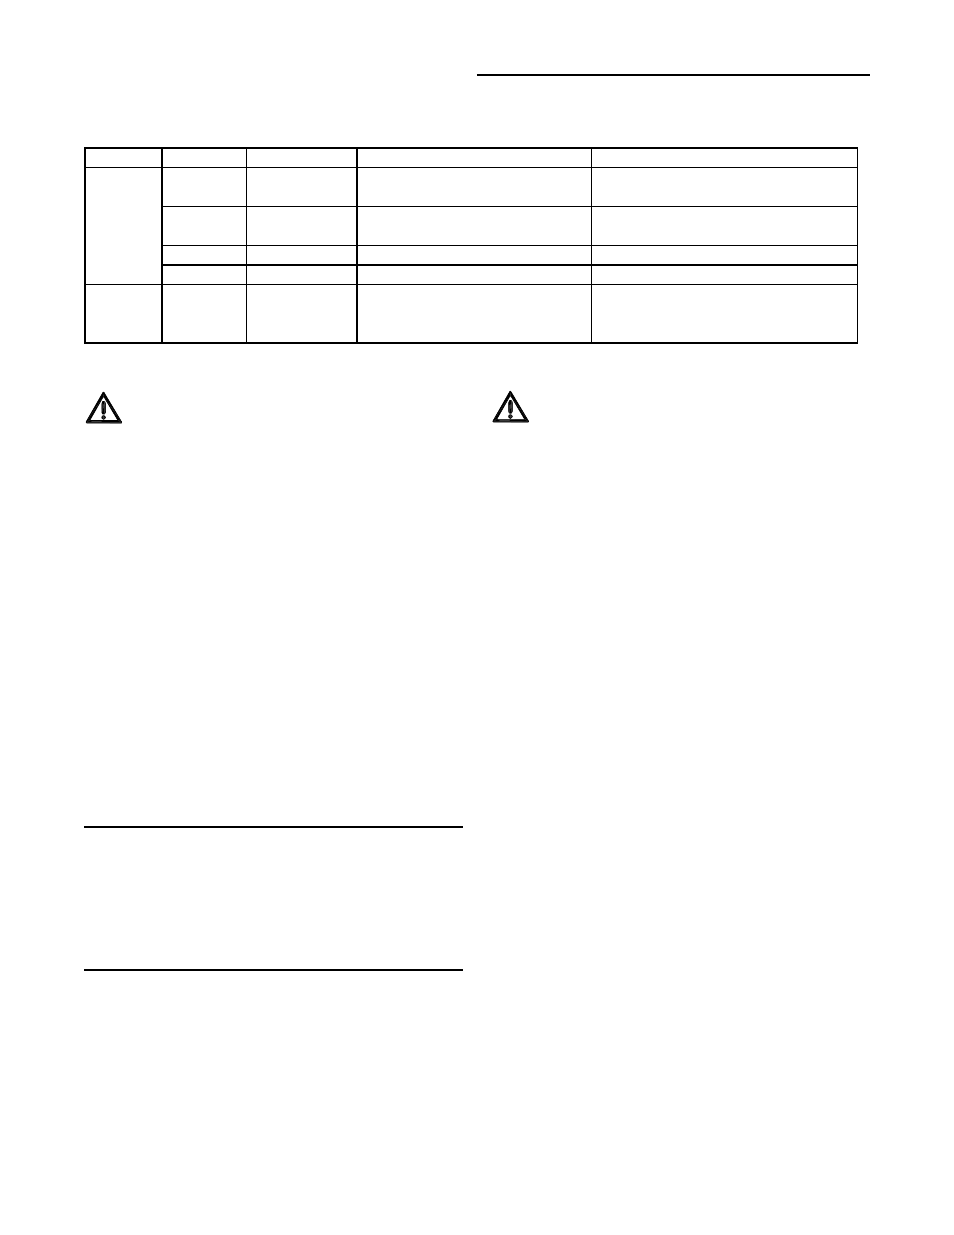
Table 5-8
Supply and Exhaust Fan VFD Programming Parameters
* These parameters are motor specific and the actual motor nameplate rating must be used. Do not use the unit name
plate values.
Menu
Parameter Description
Setting
Description
102
Motor Power
Set Based on Motor Nameplate
Set only for applications using 3hp Hi-
Efficiency motors. Set to 2.2 kW.
103
Motor Voltage Set Based on Motor Nameplate
Set only for 200/230v 60hz & 380/415
50hz applications
105
Motor Current Set Based on Motor Nameplate Sets the motor FLA
106
Motor RPM
Set Based on Motor Nameplate Sets the motor RPM
Reference
&
Limits
215
Current Limit
1 x Rated Current
Limits the maximum current to motor
Load
&
Motor
HIGH VOLTAGE IS PRESENT AT TERMINAL BLOCK
1TB1 OR UNIT DISCONNECT SWITCH 1S14.
3. To modify parameters:
(a) Press the Extended Menu button
(b) Press the Left or Right Arrow button to scroll
through menus
(c) Press the up or down arrow to scroll through
parameter settings within a specified menu
(d) Press the Change Data button to allow a parameter
value to be changed
(e) Press the Up or Down arrow button to change the
parameter
(f)
Press OK button when desired change has been
made.
4. Repeat step (3) for each menu selection setting in Table
5-8.
5. To reset all programming parameters back to the factory
defaults:
(g) Press the Extended Menu button
(h) Press the Left or Right Arrow button to scroll to the
KEYB. & DISPLAY menu.
(i)
Press the Down Arrow button to scroll to the Active
Setup menu.
(j)
Press the Change Data button.
(k) Press the Up Arrow button to scroll to the Factory
Default setting.
(l)
Press the OK button.
(m) Press the Up Arrow button to scroll to the Setup
Copy menu.
(n) Press the Change Data button.
(o) Press the Up Arrow button to scroll to the Copy to
Setup 1 setting.
(p) Press the OK button.
WARNING
Hazardous Voltage! w/Capacitors!
Disconnect all electric power, including remote discon-
nects before servicing. Follow proper lockout/tagout
procedures to ensure the power cannot be inadvertently
energized. For variable frequency drives or other en-
ergy storing components provided by Trane or others,
refer to the appropriate manufacturer’s literature for al-
lowable waiting periods for discharge of capacitors.
Verify with an appropriate voltmeter that all capacitors
have discharged. Failure to disconnect power and dis-
charge capacitors before servicing could result in death
or serious injury.
Note: For additional information regarding the safe dis-
charge of capacitors, see
PROD-SVB06A-EN