Gas connections – Lochinvar EnergyRite ER302 User Manual
Page 33
6
Gas connections
(continued)
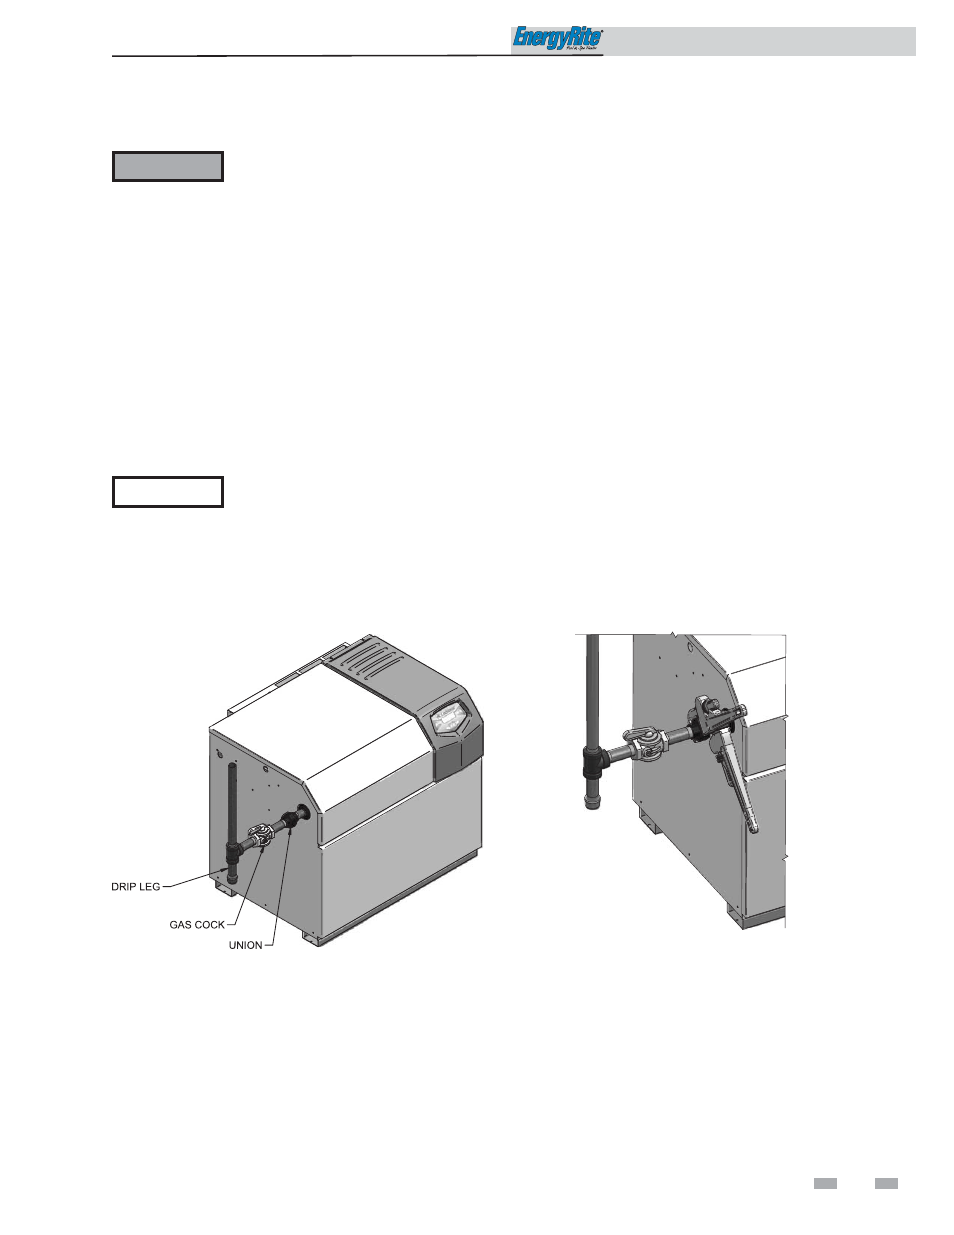
Figure 6-1_Gas Line Connection to unit w/sediment
trap and manual main gas shut-off valve
Gas piping
All gas connections must be made with pipe joint
compound resistant to the action of liquefied petroleum
and natural gases. All piping must comply with local codes
and ordinances. Tubing installations must comply with
approved standards and practices.
Figure 6-2_Wrench to Support Gas Valve for Piping
Connection
8.
Connect the gas pipe to the inlet of the unit. Use a wrench
to support the gas manifold on the unit (FIG. 6-2).
9.
For LP gas, consult your LP gas supplier for expert
installation.
10. Ensure that all air is properly bled from the gas line before
starting the ignition sequence. Start up without properly
bleeding air from the gas line may require multiple reset
functions of the ignition control module to achieve
proper ignition.
Install piping to gas valve
1.
The gas line should be a separate line direct from the
meter unless the existing gas line is of sufficient capacity.
Verify pipe size with your gas supplier.
2.
Use new, properly threaded black iron pipe free from
chips. If tubing is used, make sure the ends are square,
deburred, and clean. All tubing bends must be smooth
and without deformation. Avoid flexible gas connections.
Internal diameter of flexible lines may not provide the unit
with the proper volume of gas.
3.
Install a manual main gas shutoff valve at the pool
heater’s gas inlet, outside of the pool heater and before
the gas valve. When the pool heater is installed in, under,
or directly attached to the pool or spa structure, the
manual main gas shutoff valve must be located outside
the pool structure.
4.
Run pipe or tubing to the pool heater’s gas inlet. If
tubing is used, obtain a tube to pipe coupling in order to
connect the tubing to the pool heater’s gas inlet.
5.
Install a sediment trap (drip leg) in the supply line to the
pool heater’s gas inlet (see FIG. 6-1).
6.
Apply a moderate amount of good quality pipe
compound (DO NOT use Teflon tape) to pipe only,
leaving two end threads bare.
7.
Remove seal over gas inlet to pool heater.
LP gas installations
LP (propane) gas is heavier than air and
will remain at floor level if there is a leak.
Basements, crawl spaces, alcoves, and
areas below ground level will serve as
pockets for accumulation of leaking gas.
Before lighting, sniff at floor level. If you
smell gas, follow instructions on page 3
of this manual. Shut off gas at LP tank
outside of the building. DO NOT
operate appliance until leakage is
corrected.
ƽ WARNING
LP gas cylinders shall be located outdoors and away from
the pool structure in accordance with the latest edition of
the Standard for the Storage and Handling of Liquefied
Petroleum Gases, ANSI/NFPA 58, or CAN/CSA B149.2, and
applicable local codes.
Installation & Operation Manual
33
NOTICE
If an inline high gas pressure regulator is
used, it must be located a minimum of
10 feet from the appliance. Failure to do
so may result in insufficient gas volume
supplied to the appliance.