Cylinder service -2, Maintenance – Servis-Rhino 95HD User Manual
Page 30
F3788-7-04
Maintenance Section 5-2
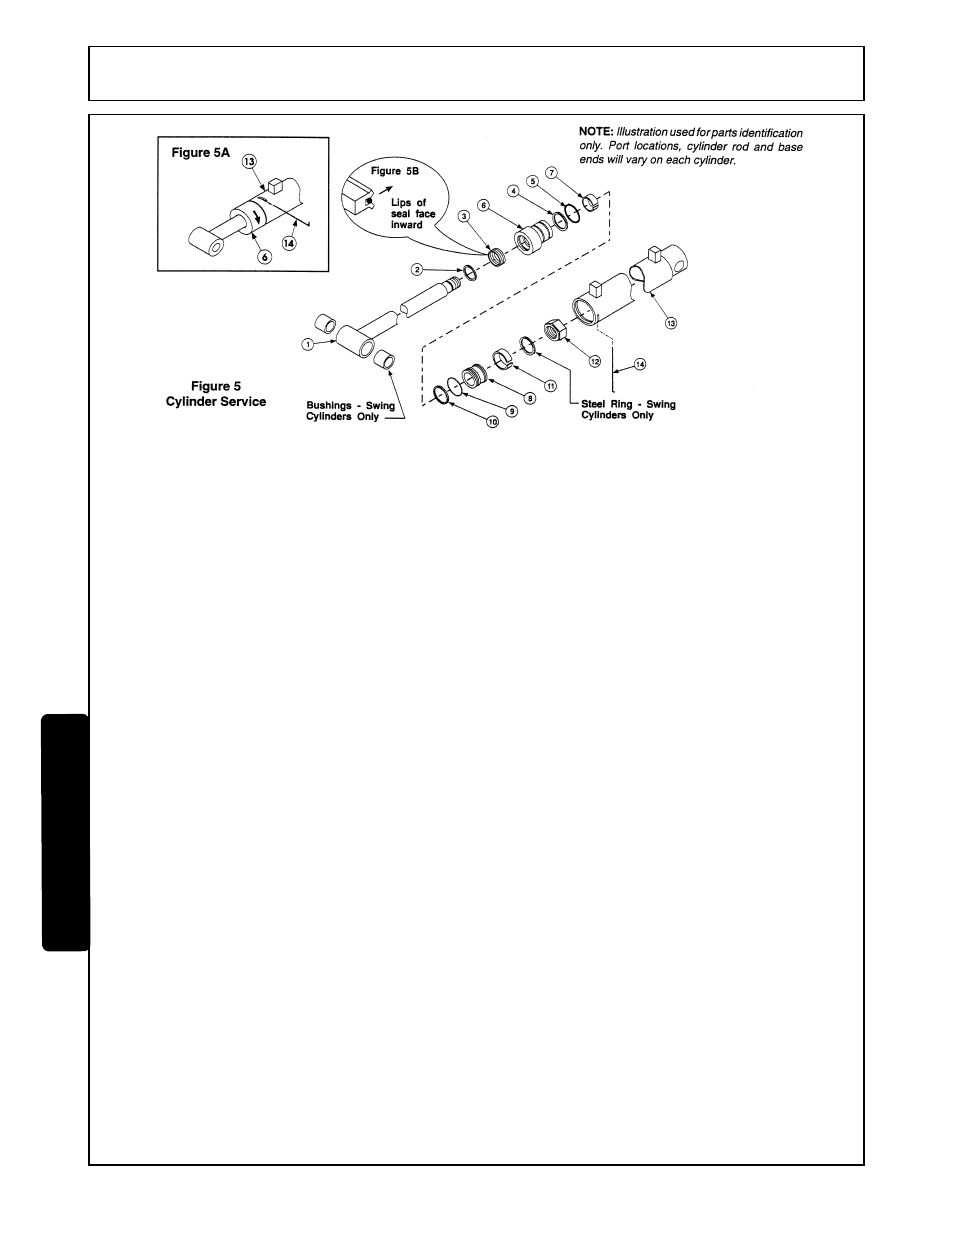
CYLINDER SERVICE
Cylinders are designed to be reliable and easy to service.
If a cylinder should malfunction during warranty period,
return
complete
cylinder
assembly,
without
disassembling, to your authorized service department or
contact your authorized service department for
instructions. Unauthorized disassembly of a cylinder in
warranty period will VOID WARRANTY.
Following is an outline procedure for disassembling and
reassembling cylinders.
CYLINDER
1. Hold cylinder tube (13 figure 5A) stationary and pull
wire ring (14) out through slot. Rotate head (6) to ease
disassembly.
2. Pull shaft (1), with all assembled parts, out of cylinder
tube.
NOTE: Resistance will be felt until head and piston seal (5
& 10) slides over wire retaining ring groove. Seals are
usually damaged when cylinder is disassembled.
3. Remove lock nut (12) from end of shaft and slide piston
(8) and cylinder head (6) off shaft.
4. Remove piston wear ring (11), piston seal (10), and o-
ring (9) from outside grooves on piston (Swing and
boom cylinders have additional steel ring between
piston and nut).
5. Remove wiper seal (2), rod seal (3) and wear ring (7)
from inside of cylinder head and o-ring (5) with backup
washer (4) from groove on outside of head.
6. Clean all parts including cylinder tube, in a suitable
cleaning solvent, then use air pressure to blow any dirt
or excess solvent from all parts.
7. Examine all parts for wear or damage and replace, if
necessary.
CYLINDER ASSEMBLY
NOTE: Be careful not to damage seals and o-rings on
edges or holes in cylinder tube. Inspect and remove burrs
and sharp edges if necessary before reassembly.
1. Place rod seal (3) into groove inside cylinder head.
NOTE: Lips of seal (3) must face inward and seal must be
firmly seated in groove (Figure 5B). For easier installation,
place seal (3) in 120°F water to warm seal.
2. Install wiper seal (2) with lip of seal facing out and flush
with top of cylinder head. Install wear ring (7) inside
other end of head.
3. Place o-ring (5) with back-up washer (4) in groove on
outside of head. Back-up washer must be on rod side.
4. Remove sharp edges on outer edge of threaded end of
shaft (1). Lubricate wiper seal (2) and rod seal (3) in
head and carefully slide head onto shaft.
5. Place o-ring (9), piston seal (10) and piston wear ring
(11) in grooves on outside of piston.
NOTE: For easier installation, place piston seal (10) in
120°F water to warm seal.
6. Slide piston onto threaded end of shaft with wear ring
twoard base of cylinder and install lock nut (12). Swing
and stabilizer cylinders, tighten lock nut (12) to 300 ft.
lbs. Lift, dipperstickand bucket cylinders tighten lock
nut (12) to 480 ft. lbs.
7. Lubricate piston wear ring (11) and piston seal (10) on
piston, o-ring (5) and backup washer (4) on head and
inside of cylinder tube (13), then carefully slide piston
and head into cylinder tube.
8. Insert wire retaining ring (14) into slot in cylinder tube
(13). Apply pressure to wire ring to thread it into groove
while turning cylinder head.
MAINTENANCE
MAINTENANCE
© 2004 Alamo Group Inc.