Servis-Rhino BOOM ROTARY MOWER 2160 User Manual
Servis 2160, Operator’s manual
© 2011 Alamo Group Inc.
SERVIS
2160
Published 06/11
Part No. 00765708C
OPERATOR’S MANUAL
RHINO
®
1020 S. Sangamon Ave.
Gibson City, IL 60936
800-446-5158
Email: [email protected]
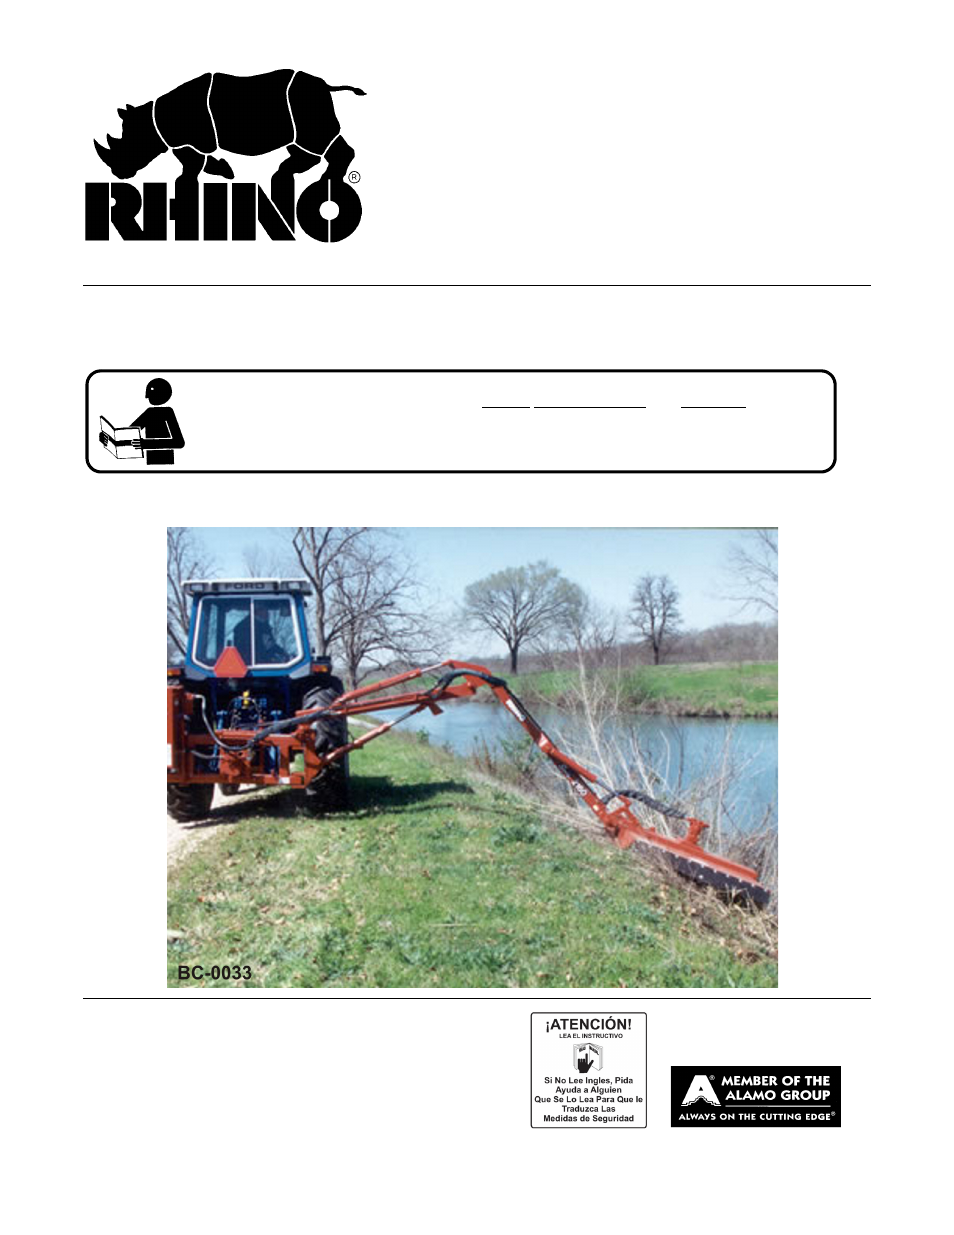
BOOM ROTARY MOWER
This Operator's Manual is an integral part of the safe operation of this machine and must
be maintained with the unit at all times. READ, UNDERSTAND, and FOLLOW the Safety
and Operation Instructions contained in this manual before operating the equipment. C01-
Cover
$0.00
Table of contents
Document Outline
- SERVIS
- 2160
- OPERATOR’S MANUAL
- To the Owner/Operator/Dealer
- DEALER to CUSTOMER Pre-Delivery / Operation Instructions
- TABLE OF CONTENTS
- CONNECTING OR DISCONNECTING IMPLEMENT SAFETY
- THROWN OBJECTS HAZARDS
- THROWN OBJECTS HAZARDS (Continued)
- MOWER BLADE CONTACT HAZARDS
- ELECTRICAL & FIRE HAZARDS
- TRANSPORTING HAZARDS
- HAZARDS WITH MAINTENANCE OF IMPLEMENT
- PARTS INFORMATION
- Decal Location
- 1. D636 1 IMPORTANT Do Not Operate PTO in OFF
- 2. D388 1 DANGER Boom Multi-Hazard
- 3. D630 1 IMPORTANT Service Hydraulic System
- 4. D617 1 DANGER Hydraulic Oil Hazard
- 5. D616 1 DANGER Multi-Hazard
- 6. D670 1 INSTRUCT Lubrication Chart
- 7. D635 1 WARNING Operate at 540 RPM
- 8. D643 1 WARNING Entanglement Hazard
- 9. D628 1 DANGER Crushing Hazard
- 10. D623 4 WARNING Pinch Points
- 11. 00764866 1 LOGO Servis 2160 Nane
- 12. D304 2 LOGO Rhino Logo
- 13. D401 1 WARNING Operate at 1000 RPM
- 14. nfs 1 SERIAL PLATE Serial Number Plate
- 15. D726 3 INFORMATION Grease Fitting Inside
- 16. 02964509 2 INSTRUCT Unhitching Instruction
- SAFETY SECTION
- Decal Description
- Federal Laws and Regulations
- Features
- RHINO LIMITED WARRANTY
- 1. LIMITED WARRANTIES
- 2. REMEDIES AND PROCEDURES.
- 3. LIMITATION OF LIABILITY.
- 4. MISCELLANEOUS.
- General Assembly
- 1. Prepare the area where the unit is to be assembled. The area should be on a hard concrete floor that has been swept clean of all dust and contaminants. Un-package the mower unit carefully so that the seals on the hydraulic components are not broke...
- 2. Inspect and clean all hydraulic hoses and fittings prior to installing them onto the tractor or mower. If dirt or material is seen in any of the parts, they should be washed and cleaned thoroughly with an oil- compatible solution. Do not blow the ...
- TRACTOR PREPARATION
- 1. Move left rear tire out so that it is 50 inches minimum from the outside of left rear tire to the center of tractor. Then move the right rear tire out so that it is 96 inches minimum between the outside of the left and right rear tires. Refer to y...
- 3. Extend front wheels out so that it is 55" inches between the inside of the tires. Asm-B-0030.
- 1. Separate two halves of driveline and connect one half to tractor and the other half to mower.
- 2. Lower mower to normal operating position.
- 3. Bring the two driveline halves together as shown in figure 6. At this maximum compressed length there should be 1-1/2 inches or more clearance from tubes bottoming out. If not, shorten the driveline to obtain clearance. Shorten shield tubes and sl...
- 4. Raise mower to transport position. Check driveline length at this maximum extension to make sure profile tubes are always engaged at least 8 inches.
- ATTACHMENT OF HYDRAULIC HOSES
- ATTACHMENT OF HYDRAULIC HOSES
- HOSE CONNECTIONS ELECTRONIC
- HOSE ATTACHMENT
- 1. Remove the top link of the three point from the tractor.
- 2. Connect the center lug (1) of the Hydraulic Relief Arm (HRA) to the tractor, with the double lugs (2) up, where the top link was removed.
- 3. Back the tractor up to the SERVIS 2160 and connect the lower arms (3) of the three point, making sure that the HRA does not interfere with the SERVIS 2160.
- 4. Attach the top link of the three point between the SERVIS 2160 and the double lugs (2) on the HRA.
- 5. Connect the SERVIS 2160 Hydraulics to the tractor so that they are functional.
- 6. Lift the three point of the tractor so that the SERVIS 2160 is at the desired height.
- 7. Carefully adjust the SERVIS 2160 hydraulics so that the lower arms (3) of the HRA align with the holes (4) on the SERVIS 2160.
- 8. Bolt the HRA arms to the SERVIS 2160.
- 9. Relieve pressure from the tractor three point.
- 1. Make sure unit has been properly assembled, all cylinders, Hoses, and the driveline have been connected.
- 2. Run the mower for about 2 - 3 minutes to fill hydraulic lines and hoses with fluid.
- 3. Check the fluid level at sight gauge (Asm-B-0011). If oil is below sight gauge fill as required to bring to sight gauge.
- 4. Remove the filler cap. (Asm-B-0007)
- 5. Fill the hydraulic reservoir until the fluid is visible through the sight gauge. (Asm-B-0010)
- 6. Avoid hydraulic contamination by filtering the hydraulic oil while filling the hydraulic tank. Filter buggies or carts are commercially available for hydraulic system clean-up. These consist of a high-efficiency, high- capacity filter, a circulati...
- 7. When adding hydraulic oil, use only new oil from a sealed barrel. Used oil or oil from an open barrel may contain high levels of contamination. Transfer the oil into the hydraulic tank by using a hydraulic filter pump unit equipped with a properly...
- 8. Run the mower at PTO operating speed (540 or 1000 RPM) for 20 minutes while checking for any a leaks and making sure mower is operating correctly.
- 1. The Right side and top of the operators compartment must be completely protected as shown. In the case of a tractor with a ROPS mounted hard canopy, only the right side will need to be protected.
- 2. The grating must be not larger than 1-1/2: by 2-1/4", but not so small as to block vision. The frame should be made for 1" square tubing, or equivalent.
- 3. The right side must be completely protected (floor-fender-roof) as shown in FIGURE 20, and extend from the engine hood to at least 12" behind the back of the operator seat. The roof must be at least 48" above the seat.
- 4. No grating on the front or back as it will block vision for driving.
- 5. Only use clamp type attachment on the ROPS. Do not drill, tap, or weld to the ROPS. You may (provided that it is strong enough) attach L-brackets to the fender and to the floor board, to secure the rest of the cage.
- HYDRAULIC BOOM ROTARY CUTTER
- EXTRA EQUIPMENT OPTIONAL EQUIPMENT
- 2. OPERATOR REQUIREMENTS
- 4. GETTING ON AND OFF THE TRACTOR
- 5. STARTING THE TRACTOR
- 6. CONNECTING ATTACHING HEADS TO THE BOOM
- 7. PRE-OPERATION INSPECTION AND SERVICE
- 8. DRIVING THE TRACTOR AND IMPLEMENT
- 9. OPERATING THE TRACTOR AND IMPLEMENT
- 10. TRACTOR, BOOM, AND ATTACHED HEAD STORAGE
- 1. Quick - Hitch
- 2. Swing the mower head to the rear.
- 3. Place mower head on the ground. Make sure dipper section is vertical.
- 4. Disconnect PTO.
- 5. Level the frame by adjusting the boom.
- 6. Lower the stands onto the ground.
- 7. Disengage the locking mechanism on the quick hitch.
- 8. Lower the 3-point hitch arms until quick hitch comes off the frame.
- 10.1 Hydraulic Relief Arm
- 1. Swing the mower head to the rear.
- 2. Place the mower head on the ground. Maker sure dipper section is vertical.
- 3. Lift the 3-point hitch to keep pressure on the frame.
- 4. Lower the stand slightly above the ground.
- 5. Lower the 3-point hitch lift arms, until stands are on the ground.
- 6. Adjust boom to level frame.
- 7. Unbolt the Hydraulic Relief Arm.
- 8. Disconnect the top link.
- 9. Disconnect PTO.
- 10. Remove valve or remote control box from the tractor or any other hoses, cables, etc. that might still be connected from the mower to the tractor.
- 11. Remove the lower arms.
- 11. TRANSPORTING THE TRACTOR AND IMPLEMENT
- HAZARDS WITH MAINTENANCE OF IMPLEMENT
- PARTS INFORMATION
- Proper Oil Level
- Blades
- BLADE SERVICING
- BLADE REMOVAL
- BLADE REMOVAL
- BLADE CARRIER INSPECTION
- BLADE CARRIER INSTALLATION
- BASIC TROUBLESHOOTING OF ELECTRONIC CONTROL VALVE
- CONTROL HANDLE
- 1. Check electrical supply with a voltmeter. Connect the positive lead from the meter to the red wire that supplies power to the handle and connect the other lead to the frame of the vehicle. Reading should be 12-14 volts. Be certain that the ground ...
- 2. Check for power at valve or load. Connect positive lead to each of the wires that supply the load, connect the other lead to vehicle ground. Operating buttons on handle should turn each wire on/off, 12-14 volts.
- 3. Check for proper grounding of valve or load. Connect positive lead to the valve block or to the ground connection of the load, connect the other lead to the vehicle frame (ground). There should be little or no voltage present. If there is a readin...
- 4. If voltage is present at coil terminal and ground connection is good, check to see if solenoid coil is being energized by touching the large nut on the top of the coil with a screwdriver or small wrench. When coil is energized, the tool will light...
- CONTROL HANDLE
- Cylinder Rod Maintenance
- Boom Cylinder Removal and Replacement Instructions
- 1. Clear the area of all personnel before lowering the boom mower head.
- 2. From the tractor seat with your seat belt fastened around you, Lower the boom mower head to the ground. Extend the boom to the furthest reach and lower the mower head flat on the ground. DO NOT attempt to replace the cylinders with the boom in the...
- 3. Shut off the tractor, engage the parking brake, place the tractor transmission in the park position, and remove the key before dismounting.
- 4. Allow the system to cool to room temperature before removing any hydraulic components.
- 5. Wear Safety glasses and impenetrable gloves when working with hydraulic hoses and fittings.
- 6. Release all oil pressure from the hydraulic circuit by manually stroking each valve section with the tractor engine off. Utilize the Manual Override function if the unit is equipped with an electric over hydraulic valve.
- 7. Utilize blocks, jack stands or a suitable over head hoist to support the weight of the boom section and remove pressure form the cylinder mounting pins.
- 8. Check to see that the cylinder to be replaced is not under pressure by moving the cylinder pins by hand. The pins should be loose and should slide form the pin bore easily. If the pins are tight and cannot be moved, the cylinder may be under press...
- 9. Cylinder assemblies are heavy and can fall when the pins are removed. Support the hydraulic cylinder with a suitable hoist or jack.
- 10. Slowly loosen the hydraulic connections to the cylinder. Carefully unscrew hose fitting and allow any remaining pressure to bleed off. Use Extreme Care. Oil must be cool, and the technician should stand to the side to prevent exposure to any hydr...
- 11. Cap both ends of the fitting with suitably sized metal caps.
- 12. Remove the cylinder pins starting with the ROD end cylinder pin. Make sure the cylinder is properly supported, and remove the base end cylinder pin. The cylinder may be heavy, use proper lifting techniques to lift and handle the cylinder. If need...
- 13. Measure the distance between the cylinder pin holes and extend the new cylinder the correct length prior to attempting an installation.
- 14. Install the new cylinder in place and install both cylinder pins and retaining hardware.
- 15. Remove the metal caps, and re-install the hydraulic hoses.
- 16. Check the hydraulic reservoir of the boom mower to ensure there is sufficient oil. Follow the manufactures recommendations for proper oil type and filtering techniques and requirements to add oil to the system.
- 17. Clear the area of all persons prior to starting the tractor.
- 18. Consult the Operator's Manual for instruction in regard to the proper operating procedure.
- 19. From the tractor seat, with the seat belt fastened, operate the boom to ensure proper operation of the boom function.
- 20. From the tractor seat, with the seat belt fastened, operate the boom controls to fully extend and retract the new cylinder several times to purge any trapped air from the system.
- 21. From the tractor seat, with the seat belt fastened, look for signs of and oil leak. If an oil leak is observed, shut the tractor down and follow the steps to remove pressure from the hydraulic circuit. Identify the source of the leak, and resolve...
- 22. Upon completion of the required repairs, return to Step # 16 to recheck the cylinder for proper operation.
- Hydraulic Component Maintenance Schedule
- LEXAN Sheet Cleaning Recommendations
- Cleaning Procedure for Small Areas - Manual
- 1. Gently wash sheet with a solution of mild soap and lukewarm water, using a soft, grid-free cloth or sponge to loosen any dirt or grime.
- 2. Fresh paint splashes, grease and smeared glazing compounds can be removed easily before drying by rubbing lightly with a soft cloth using petroleum ether (BP65), hexane or heptane. Afterwards, wash the sheet using mild soap and lukewarm water.
- 3. Scratches and minor abrasions can be minimized by using a mild automobile polish. We suggest that a test be made on a small area of Lexan sheet with the polish selected and that the polish manufacturer's instructions be followed, prior to using th...
- 4. Finally, thoroughly rinse with clean water to remove any cleaner residue and dry the surface with a soft cloth to prevent water spotting.
- Cleaning Procedure for Large Areas - Automated
- Other Important Instructions for All Lexan Sheets:
- Additional Important Considerations for Multiwall, Corrugated and Sign Sheet:
- Graffiti removal from Lexan* Margard* sheet
- Cleaning Procedure for Small Areas - Manual
- PROPER TORQUE FOR FASTENERS
- LEXAN Sheet Cleaning Recommendations
- SERVICE OF SPINDLE HOUSING
- MOTOR & COUPLING INSTALLATION
- TAPER BUSHING & SHEAVE INSTALLATION
- START UP PROCEDURE
- 1. Read all safety instructions. Decals on the Machete Boom warn you of particular and multiple hazards. Many decals are attached close to part of the Machete Boom where there is a possible hazard. Read and make sure you understand the safety message...
- 2. Before operating, read all the safety and operating instructions in the Operators Manual for both the tractor and mower.
- 3. When the hydraulic tank has been filled and the mower unit properly assembled, the unit should be started up. NOTE: Make sure that no materials, tools, or jacks, have been left under the mower head. Make sure the front and rear of the mower are pr...
- 4. Start the tractor and idle at a slow engine speed until oil is being pumped.
- 5. Engage the Cutter Control Valve at low engine PTO Speed and run the mower slowly for a short period until all air is removed from the hoses. Keep all persons WELL CLEAR of mower since Blades can THROW OBJECTS with great velocity for a considerable...
- 6. With the area clear of any ground and overhead obstructions, work each cylinder on the boom one at a time, several times, to expel any air in the Hoses and Cylinders.
- 7. Run the Mower Head for 5 minutes. While the tractor is idling, blocked, wearing protective clothing and eye protection, CAREFULLY check for leaking hydraulic fittings, hoses and ports at this point with a piece of cardboard. DO NOT USE YOUR HAND! ...
- 8. Check the fluid level in the Hydraulic Tank on the Tractor, and add oil if required. As the air has been forced out of the Cylinders and Hoses, it goes into the Hydraulic Tank and reduces the oil level. Check your Tractors Operators Manual for the...
- STORAGE
- 1. Thoroughly clean the cutter.
- 2. Lubricate the cutter as covered in Maintenance Section.
- 3. Tighten all bolts and pins to the recommended torque.
- 4. Check the cutter for worn or damaged parts. Make replacements immediately.
- 5. Store the cutter in a clean, dry place with the cutter housing resting on blocks.
- 6. Use spray touch-up enamel where necessary to prevent rust and maintain the appearance of the cutter.
- MAINTENANCE SECTION
- Safety Section SP 16.pdf
- INSTRUCCIONES DE SEGURIDAD Y PRÁCTICAS GENERALES
- SEGURIDAD DEL OPERADOR
- RIESGO DE APLASTAMIENTO
- CONECTAR O DESCONECTAR EL IMPLEMENTO DE SEGURIDAD
- RIESGO DE OBJECTOS LANZADOS
- 1. MARQUE los objetos que no se puedan quitar.
- 2. EVITE estos objetos cuando use la cortadora.
- 1. LAS CUCHILLAS PUEDEN FALLAR con el impacto y los objetos pueden ser arrojados a gran velocidad.
- 2. INSPECCIONE y REEMPLACE las cuchillas dañadas.
- 3. VERIFIQUE el equilibrio del porta cuchillas y REEMPLÁCELO si está dañado.
- RIESGO DE ATROPELLO
- RIESGO DE ENREDO POR EL PTO
- RIESGO DEL CONTACTO A LAS CUCHILLAS DE CORTADORA
- RIESGO DE FILTRACION DE ACEITE HIDRÁULICO DE ALTA PRESIÓN
- RIESGOS ELÉCRTICOS Y DE FUEGO
- RIESGOS EN TRANSPORTE
- RIESGOS CON EL MANTENIMIENTO DEL IMPLEMENTO
- INFORMACIÓN DE PARTES
- SECCIÓN DE SEGURIDAD
- INFORMACIÓN DE PARTES
- Safety Section SP 15.pdf
- INSTRUCCIONES DE SEGURIDAD Y PRÁCTICAS GENERALES
- SEGURIDAD DEL OPERADOR
- RIESGO DE APLASTAMIENTO
- CONECTAR O DESCONECTAR EL IMPLEMENTO DE SEGURIDAD
- RIESGO DE OBJECTOS LANZADOS
- 1. MARQUE los objetos que no se puedan quitar.
- 2. EVITE estos objetos cuando use la cortadora.
- 1. LAS CUCHILLAS PUEDEN FALLAR con el impacto y los objetos pueden ser arrojados a gran velocidad.
- 2. INSPECCIONE y REEMPLACE las cuchillas dañadas.
- 3. VERIFIQUE el equilibrio del porta cuchillas y REEMPLÁCELO si está dañado.
- RIESGO DE ATROPELLO
- RIESGO DE ENREDO POR EL PTO
- RIESGO DEL CONTACTO A LAS CUCHILLAS DE CORTADORA
- RIESGO DE FILTRACION DE ACEITE HIDRÁULICO DE ALTA PRESIÓN
- RIESGOS ELÉCRTICOS Y DE FUEGO
- RIESGOS EN TRANSPORTE
- RIESGOS CON EL MANTENIMIENTO DEL IMPLEMENTO
- INFORMACIÓN DE PARTES
- SECCIÓN DE SEGURIDAD
- INFORMACIÓN DE PARTES
- Safety Section SP 14.pdf
- INSTRUCCIONES DE SEGURIDAD Y PRÁCTICAS GENERALES
- SEGURIDAD DEL OPERADOR
- RIESGO DE APLASTAMIENTO
- CONECTAR O DESCONECTAR EL IMPLEMENTO DE SEGURIDAD
- RIESGO DE OBJECTOS LANZADOS
- 1. MARQUE los objetos que no se puedan quitar.
- 2. EVITE estos objetos cuando use la cortadora.
- 1. LAS CUCHILLAS PUEDEN FALLAR con el impacto y los objetos pueden ser arrojados a gran velocidad.
- 2. INSPECCIONE y REEMPLACE las cuchillas dañadas.
- 3. VERIFIQUE el equilibrio del porta cuchillas y REEMPLÁCELO si está dañado.
- RIESGO DE ATROPELLO
- RIESGO DE ENREDO POR EL PTO
- RIESGO DEL CONTACTO A LAS CUCHILLAS DE CORTADORA
- RIESGO DE FILTRACION DE ACEITE HIDRÁULICO DE ALTA PRESIÓN
- RIESGOS ELÉCRTICOS Y DE FUEGO
- RIESGOS EN TRANSPORTE
- RIESGOS CON EL MANTENIMIENTO DEL IMPLEMENTO
- INFORMACIÓN DE PARTES
- SECCIÓN DE SEGURIDAD
- INFORMACIÓN DE PARTES
- Safety Section SP 13.pdf
- INSTRUCCIONES DE SEGURIDAD Y PRÁCTICAS GENERALES
- SEGURIDAD DEL OPERADOR
- RIESGO DE APLASTAMIENTO
- CONECTAR O DESCONECTAR EL IMPLEMENTO DE SEGURIDAD
- RIESGO DE OBJECTOS LANZADOS
- 1. MARQUE los objetos que no se puedan quitar.
- 2. EVITE estos objetos cuando use la cortadora.
- 1. LAS CUCHILLAS PUEDEN FALLAR con el impacto y los objetos pueden ser arrojados a gran velocidad.
- 2. INSPECCIONE y REEMPLACE las cuchillas dañadas.
- 3. VERIFIQUE el equilibrio del porta cuchillas y REEMPLÁCELO si está dañado.
- RIESGO DE ATROPELLO
- RIESGO DE ENREDO POR EL PTO
- RIESGO DEL CONTACTO A LAS CUCHILLAS DE CORTADORA
- RIESGO DE FILTRACION DE ACEITE HIDRÁULICO DE ALTA PRESIÓN
- RIESGOS ELÉCRTICOS Y DE FUEGO
- RIESGOS EN TRANSPORTE
- RIESGOS CON EL MANTENIMIENTO DEL IMPLEMENTO
- INFORMACIÓN DE PARTES
- SECCIÓN DE SEGURIDAD
- INFORMACIÓN DE PARTES
- Safety Section SP 12.pdf
- INSTRUCCIONES DE SEGURIDAD Y PRÁCTICAS GENERALES
- SEGURIDAD DEL OPERADOR
- RIESGO DE APLASTAMIENTO
- CONECTAR O DESCONECTAR EL IMPLEMENTO DE SEGURIDAD
- RIESGO DE OBJECTOS LANZADOS
- 1. MARQUE los objetos que no se puedan quitar.
- 2. EVITE estos objetos cuando use la cortadora.
- 1. LAS CUCHILLAS PUEDEN FALLAR con el impacto y los objetos pueden ser arrojados a gran velocidad.
- 2. INSPECCIONE y REEMPLACE las cuchillas dañadas.
- 3. VERIFIQUE el equilibrio del porta cuchillas y REEMPLÁCELO si está dañado.
- RIESGO DE ATROPELLO
- RIESGO DE ENREDO POR EL PTO
- RIESGO DEL CONTACTO A LAS CUCHILLAS DE CORTADORA
- RIESGO DE FILTRACION DE ACEITE HIDRÁULICO DE ALTA PRESIÓN
- RIESGOS ELÉCRTICOS Y DE FUEGO
- RIESGOS EN TRANSPORTE
- RIESGOS CON EL MANTENIMIENTO DEL IMPLEMENTO
- INFORMACIÓN DE PARTES
- SECCIÓN DE SEGURIDAD
- INFORMACIÓN DE PARTES
- Safety Section SP 11.pdf
- INSTRUCCIONES DE SEGURIDAD Y PRÁCTICAS GENERALES
- SEGURIDAD DEL OPERADOR
- RIESGO DE APLASTAMIENTO
- CONECTAR O DESCONECTAR EL IMPLEMENTO DE SEGURIDAD
- RIESGO DE OBJECTOS LANZADOS
- 1. MARQUE los objetos que no se puedan quitar.
- 2. EVITE estos objetos cuando use la cortadora.
- 1. LAS CUCHILLAS PUEDEN FALLAR con el impacto y los objetos pueden ser arrojados a gran velocidad.
- 2. INSPECCIONE y REEMPLACE las cuchillas dañadas.
- 3. VERIFIQUE el equilibrio del porta cuchillas y REEMPLÁCELO si está dañado.
- RIESGO DE ATROPELLO
- RIESGO DE ENREDO POR EL PTO
- RIESGO DEL CONTACTO A LAS CUCHILLAS DE CORTADORA
- RIESGOS ELÉCRTICOS Y DE FUEGO
- RIESGOS EN TRANSPORTE
- RIESGOS CON EL MANTENIMIENTO DEL IMPLEMENTO
- INFORMACIÓN DE PARTES
- SECCIÓN DE SEGURIDAD
- INFORMACIÓN DE PARTES
- Safety Section SP 10.pdf
- INSTRUCCIONES DE SEGURIDAD Y PRÁCTICAS GENERALES
- SEGURIDAD DEL OPERADOR
- RIESGO DE APLASTAMIENTO
- CONECTAR O DESCONECTAR EL IMPLEMENTO DE SEGURIDAD
- RIESGO DE OBJECTOS LANZADOS
- 1. MARQUE los objetos que no se puedan quitar.
- 2. EVITE estos objetos cuando use la cortadora.
- 1. LAS CUCHILLAS PUEDEN FALLAR con el impacto y los objetos pueden ser arrojados a gran velocidad.
- 2. INSPECCIONE y REEMPLACE las cuchillas dañadas.
- 3. VERIFIQUE el equilibrio del porta cuchillas y REEMPLÁCELO si está dañado.
- RIESGO DE ATROPELLO
- RIESGO DE ENREDO POR EL PTO
- RIESGO DEL CONTACTO A LAS CUCHILLAS DE CORTADORA
- RIESGO DE FILTRACION DE ACEITE HIDRÁULICO DE ALTA PRESIÓN
- RIESGOS ELÉCRTICOS Y DE FUEGO
- RIESGOS EN TRANSPORTE
- RIESGOS CON EL MANTENIMIENTO DEL IMPLEMENTO
- INFORMACIÓN DE PARTES
- SECCIÓN DE SEGURIDAD
- INFORMACIÓN DE PARTES
- Safety Section SP 9.pdf
- INSTRUCCIONES DE SEGURIDAD Y PRÁCTICAS GENERALES
- SEGURIDAD DEL OPERADOR
- RIESGO DE APLASTAMIENTO
- CONECTAR O DESCONECTAR EL IMPLEMENTO DE SEGURIDAD
- RIESGO DE OBJECTOS LANZADOS
- 1. MARQUE los objetos que no se puedan quitar.
- 2. EVITE estos objetos cuando use la cortadora.
- 1. LAS CUCHILLAS PUEDEN FALLAR con el impacto y los objetos pueden ser arrojados a gran velocidad.
- 2. INSPECCIONE y REEMPLACE las cuchillas dañadas.
- 3. VERIFIQUE el equilibrio del porta cuchillas y REEMPLÁCELO si está dañado.
- RIESGO DE ATROPELLO
- RIESGO DE ENREDO POR EL PTO
- RIESGO DEL CONTACTO A LAS CUCHILLAS DE CORTADORA
- RIESGO DE FILTRACION DE ACEITE HIDRÁULICO DE ALTA PRESIÓN
- RIESGOS ELÉCRTICOS Y DE FUEGO
- RIESGOS EN TRANSPORTE
- RIESGOS CON EL MANTENIMIENTO DEL IMPLEMENTO
- INFORMACIÓN DE PARTES
- SECCIÓN DE SEGURIDAD
- INFORMACIÓN DE PARTES
- Safety Section SP 8.pdf
- INSTRUCCIONES DE SEGURIDAD Y PRÁCTICAS GENERALES
- SEGURIDAD DEL OPERADOR
- RIESGO DE APLASTAMIENTO
- CONECTAR O DESCONECTAR EL IMPLEMENTO DE SEGURIDAD
- RIESGO DE OBJECTOS LANZADOS
- 1. MARQUE los objetos que no se puedan quitar.
- 2. EVITE estos objetos cuando use la cortadora.
- 1. LAS CUCHILLAS PUEDEN FALLAR con el impacto y los objetos pueden ser arrojados a gran velocidad.
- 2. INSPECCIONE y REEMPLACE las cuchillas dañadas.
- 3. VERIFIQUE el equilibrio del porta cuchillas y REEMPLÁCELO si está dañado.
- RIESGO DE ATROPELLO
- RIESGO DE ENREDO POR EL PTO
- RIESGO DEL CONTACTO A LAS CUCHILLAS DE CORTADORA
- RIESGO DE FILTRACION DE ACEITE HIDRÁULICO DE ALTA PRESIÓN
- RIESGOS ELÉCRTICOS Y DE FUEGO
- RIESGOS EN TRANSPORTE
- RIESGOS CON EL MANTENIMIENTO DEL IMPLEMENTO
- INFORMACIÓN DE PARTES
- SECCIÓN DE SEGURIDAD
- INFORMACIÓN DE PARTES
- Safety Section SP 7.pdf
- INSTRUCCIONES DE SEGURIDAD Y PRÁCTICAS GENERALES
- SEGURIDAD DEL OPERADOR
- RIESGO DE APLASTAMIENTO
- CONECTAR O DESCONECTAR EL IMPLEMENTO DE SEGURIDAD
- RIESGO DE OBJECTOS LANZADOS
- 1. MARQUE los objetos que no se puedan quitar.
- 2. EVITE estos objetos cuando use la cortadora.
- 1. LAS CUCHILLAS PUEDEN FALLAR con el impacto y los objetos pueden ser arrojados a gran velocidad.
- 2. INSPECCIONE y REEMPLACE las cuchillas dañadas.
- 3. VERIFIQUE el equilibrio del porta cuchillas y REEMPLÁCELO si está dañado.
- RIESGO DE ATROPELLO
- RIESGO DE ENREDO POR EL PTO
- RIESGO DEL CONTACTO A LAS CUCHILLAS DE CORTADORA
- RIESGO DE FILTRACION DE ACEITE HIDRÁULICO DE ALTA PRESIÓN
- RIESGOS ELÉCRTICOS Y DE FUEGO
- RIESGOS EN TRANSPORTE
- RIESGOS CON EL MANTENIMIENTO DEL IMPLEMENTO
- INFORMACIÓN DE PARTES
- SECCIÓN DE SEGURIDAD
- INFORMACIÓN DE PARTES
- Safety Section SP 6.pdf
- INSTRUCCIONES DE SEGURIDAD Y PRÁCTICAS GENERALES
- SEGURIDAD DEL OPERADOR
- RIESGO DE APLASTAMIENTO
- CONECTAR O DESCONECTAR EL IMPLEMENTO DE SEGURIDAD
- RIESGO DE OBJECTOS LANZADOS
- 1. MARQUE los objetos que no se puedan quitar.
- 2. EVITE estos objetos cuando use la cortadora.
- 1. LAS CUCHILLAS PUEDEN FALLAR con el impacto y los objetos pueden ser arrojados a gran velocidad.
- 2. INSPECCIONE y REEMPLACE las cuchillas dañadas.
- 3. VERIFIQUE el equilibrio del porta cuchillas y REEMPLÁCELO si está dañado.
- RIESGO DE ATROPELLO
- RIESGO DE ENREDO POR EL PTO
- RIESGO DEL CONTACTO A LAS CUCHILLAS DE CORTADORA
- RIESGO DE FILTRACION DE ACEITE HIDRÁULICO DE ALTA PRESIÓN
- RIESGOS ELÉCRTICOS Y DE FUEGO
- RIESGOS EN TRANSPORTE
- RIESGOS CON EL MANTENIMIENTO DEL IMPLEMENTO
- INFORMACIÓN DE PARTES
- SECCIÓN DE SEGURIDAD
- INFORMACIÓN DE PARTES
- Safety Section SP 5.pdf
- INSTRUCCIONES DE SEGURIDAD Y PRÁCTICAS GENERALES
- SEGURIDAD DEL OPERADOR
- RIESGO DE APLASTAMIENTO
- CONECTAR O DESCONECTAR EL IMPLEMENTO DE SEGURIDAD
- RIESGO DE OBJECTOS LANZADOS
- 1. MARQUE los objetos que no se puedan quitar.
- 2. EVITE estos objetos cuando use la cortadora.
- 1. LAS CUCHILLAS PUEDEN FALLAR con el impacto y los objetos pueden ser arrojados a gran velocidad.
- 2. INSPECCIONE y REEMPLACE las cuchillas dañadas.
- 3. VERIFIQUE el equilibrio del porta cuchillas y REEMPLÁCELO si está dañado.
- RIESGO DE ATROPELLO
- RIESGO DE ENREDO POR EL PTO
- RIESGO DEL CONTACTO A LAS CUCHILLAS DE CORTADORA
- RIESGO DE FILTRACION DE ACEITE HIDRÁULICO DE ALTA PRESIÓN
- RIESGOS ELÉCRTICOS Y DE FUEGO
- RIESGOS EN TRANSPORTE
- RIESGOS CON EL MANTENIMIENTO DEL IMPLEMENTO
- INFORMACIÓN DE PARTES
- SECCIÓN DE SEGURIDAD
- INFORMACIÓN DE PARTES
- Safety Section SP 4.pdf
- INSTRUCCIONES DE SEGURIDAD Y PRÁCTICAS GENERALES
- SEGURIDAD DEL OPERADOR
- RIESGO DE APLASTAMIENTO
- CONECTAR O DESCONECTAR EL IMPLEMENTO DE SEGURIDAD
- RIESGO DE OBJECTOS LANZADOS
- 1. MARQUE los objetos que no se puedan quitar.
- 2. EVITE estos objetos cuando use la cortadora.
- 1. LAS CUCHILLAS PUEDEN FALLAR con el impacto y los objetos pueden ser arrojados a gran velocidad.
- 2. INSPECCIONE y REEMPLACE las cuchillas dañadas.
- 3. VERIFIQUE el equilibrio del porta cuchillas y REEMPLÁCELO si está dañado.
- RIESGO DE ATROPELLO
- RIESGO DE ENREDO POR EL PTO
- RIESGO DEL CONTACTO A LAS CUCHILLAS DE CORTADORA
- RIESGO DE FILTRACION DE ACEITE HIDRÁULICO DE ALTA PRESIÓN
- RIESGOS ELÉCRTICOS Y DE FUEGO
- RIESGOS EN TRANSPORTE
- RIESGOS CON EL MANTENIMIENTO DEL IMPLEMENTO
- INFORMACIÓN DE PARTES
- SECCIÓN DE SEGURIDAD
- INFORMACIÓN DE PARTES
- Safety Section SP 3.pdf
- INSTRUCCIONES DE SEGURIDAD Y PRÁCTICAS GENERALES
- SEGURIDAD DEL OPERADOR
- RIESGO DE APLASTAMIENTO
- CONECTAR O DESCONECTAR EL IMPLEMENTO DE SEGURIDAD
- RIESGO DE OBJECTOS LANZADOS
- 1. MARQUE los objetos que no se puedan quitar.
- 2. EVITE estos objetos cuando use la cortadora.
- 1. LAS CUCHILLAS PUEDEN FALLAR con el impacto y los objetos pueden ser arrojados a gran velocidad.
- 2. INSPECCIONE y REEMPLACE las cuchillas dañadas.
- 3. VERIFIQUE el equilibrio del porta cuchillas y REEMPLÁCELO si está dañado.
- RIESGO DE ATROPELLO
- RIESGO DE ENREDO POR EL PTO
- RIESGO DEL CONTACTO A LAS CUCHILLAS DE CORTADORA
- RIESGO DE FILTRACION DE ACEITE HIDRÁULICO DE ALTA PRESIÓN
- RIESGOS ELÉCRTICOS Y DE FUEGO
- RIESGOS EN TRANSPORTE
- RIESGOS CON EL MANTENIMIENTO DEL IMPLEMENTO
- INFORMACIÓN DE PARTES
- SECCIÓN DE SEGURIDAD
- INFORMACIÓN DE PARTES
- Safety Section SP 2.pdf
- SERVIS
- 2160
- MANUAL DE OPERADOR
- RHINO®
- Al propietario/operador/distribuidor
- CORTADORA CON BRAZO HYDRÁULICO
- Instrucciones de operaciones antes de la entrega del DISTRIBUIDOR al CLIENTE
- LUBRICACIÓN E HIDRÁULICA
- CORTADORA
- ACCESORIOS E INSTALACIÓN
- CONEXIONES DE CORTADORA A TRACTOR
- ELEMENTOS DE SEGURIDAD
- Safety Section SP 1.pdf
- INSTRUCCIONES DE SEGURIDAD Y PRÁCTICAS GENERALES
- SEGURIDAD DEL OPERADOR
- RIESGO DE APLASTAMIENTO
- CONECTAR O DESCONECTAR EL IMPLEMENTO DE SEGURIDAD
- RIESGO DE OBJECTOS LANZADOS
- 1. MARQUE los objetos que no se puedan quitar.
- 2. EVITE estos objetos cuando use la cortadora.
- 1. LAS CUCHILLAS PUEDEN FALLAR con el impacto y los objetos pueden ser arrojados a gran velocidad.
- 2. INSPECCIONE y REEMPLACE las cuchillas dañadas.
- 3. VERIFIQUE el equilibrio del porta cuchillas y REEMPLÁCELO si está dañado.
- RIESGO DE ATROPELLO
- RIESGO DE ENREDO POR EL PTO
- RIESGO DEL CONTACTO A LAS CUCHILLAS DE CORTADORA
- RIESGO DE FILTRACION DE ACEITE HIDRÁULICO DE ALTA PRESIÓN
- RIESGOS ELÉCRTICOS Y DE FUEGO
- RIESGOS EN TRANSPORTE
- RIESGOS CON EL MANTENIMIENTO DEL IMPLEMENTO
- INFORMACIÓN DE PARTES
- Safety Section SP 2.pdf
- INSTRUCCIONES DE SEGURIDAD Y PRÁCTICAS GENERALES
- SEGURIDAD DEL OPERADOR
- RIESGO DE APLASTAMIENTO
- CONECTAR O DESCONECTAR EL IMPLEMENTO DE SEGURIDAD
- RIESGO DE OBJECTOS LANZADOS
- 1. MARQUE los objetos que no se puedan quitar.
- 2. EVITE estos objetos cuando use la cortadora.
- 1. LAS CUCHILLAS PUEDEN FALLAR con el impacto y los objetos pueden ser arrojados a gran velocidad.
- 2. INSPECCIONE y REEMPLACE las cuchillas dañadas.
- 3. VERIFIQUE el equilibrio del porta cuchillas y REEMPLÁCELO si está dañado.
- RIESGO DE ATROPELLO
- RIESGO DE ENREDO POR EL PTO
- RIESGO DEL CONTACTO A LAS CUCHILLAS DE CORTADORA
- RIESGO DE FILTRACION DE ACEITE HIDRÁULICO DE ALTA PRESIÓN
- RIESGOS ELÉCRTICOS Y DE FUEGO
- RIESGOS EN TRANSPORTE
- RIESGOS CON EL MANTENIMIENTO DEL IMPLEMENTO
- INFORMACIÓN DE PARTES
- SECCIÓN DE SEGURIDAD
- INFORMACIÓN DE PARTES
- Safety Section SP 2.pdf
- INSTRUCCIONES DE SEGURIDAD Y PRÁCTICAS GENERALES
- SEGURIDAD DEL OPERADOR
- RIESGO DE APLASTAMIENTO
- CONECTAR O DESCONECTAR EL IMPLEMENTO DE SEGURIDAD
- RIESGO DE OBJECTOS LANZADOS
- 1. MARQUE los objetos que no se puedan quitar.
- 2. EVITE estos objetos cuando use la cortadora.
- 1. LAS CUCHILLAS PUEDEN FALLAR con el impacto y los objetos pueden ser arrojados a gran velocidad.
- 2. INSPECCIONE y REEMPLACE las cuchillas dañadas.
- 3. VERIFIQUE el equilibrio del porta cuchillas y REEMPLÁCELO si está dañado.
- RIESGO DE ATROPELLO
- RIESGO DE ENREDO POR EL PTO
- RIESGO DEL CONTACTO A LAS CUCHILLAS DE CORTADORA
- RIESGO DE FILTRACION DE ACEITE HIDRÁULICO DE ALTA PRESIÓN
- RIESGOS ELÉCRTICOS Y DE FUEGO
- RIESGOS EN TRANSPORTE
- RIESGOS CON EL MANTENIMIENTO DEL IMPLEMENTO
- INFORMACIÓN DE PARTES
- SECCIÓN DE SEGURIDAD
- INFORMACIÓN DE PARTES
- Front Cover SP 6.pdf
- SERVIS
- 2160
- MANUAL DE OPERADOR
- RHINO®
- Al propietario/operador/distribuidor
- CORTADORA CON BRAZO HYDRÁULICO
- Instrucciones de operaciones antes de la entrega del DISTRIBUIDOR al CLIENTE
- LUBRICACIÓN E HIDRÁULICA
- CORTADORA
- ACCESORIOS E INSTALACIÓN
- CONEXIONES DE CORTADORA A TRACTOR
- ELEMENTOS DE SEGURIDAD
- Front Cover SP 5.pdf
- SERVIS
- 2160
- MANUAL DE OPERADOR
- RHINO®
- Al propietario/operador/distribuidor
- CORTADORA CON BRAZO HYDRÁULICO
- Instrucciones de operaciones antes de la entrega del DISTRIBUIDOR al CLIENTE
- Front Cover SP 4.pdf
- SERVIS
- 2160
- MANUAL DE OPERADOR
- RHINO®
- Al propietario/operador/distribuidor
- CORTADORA CON BRAZO HYDRÁULICO
- Instrucciones de operaciones antes de la entrega del DISTRIBUIDOR al CLIENTE
- LUBRICACIÓN E HIDRÁULICA
- CORTADORA
- ACCESORIOS E INSTALACIÓN
- CONEXIONES DE CORTADORA A TRACTOR
- ELEMENTOS DE SEGURIDAD
- Front Cover SP 3.pdf
- SERVIS
- 2160
- MANUAL DE OPERADOR
- RHINO®
- Al propietario/operador/distribuidor
- CORTADORA CON BRAZO HYDRÁULICO
- Instrucciones de operaciones antes de la entrega del DISTRIBUIDOR al CLIENTE
- LUBRICACIÓN E HIDRÁULICA
- CORTADORA
- ACCESORIOS E INSTALACIÓN
- CONEXIONES DE CORTADORA A TRACTOR
- ELEMENTOS DE SEGURIDAD
- Front Cover SP 2.pdf
- SERVIS
- 2160
- MANUAL DE OPERADOR
- RHINO®
- Al propietario/operador/distribuidor
- CORTADORA CON BRAZO HYDRÁULICO
- Instrucciones de operaciones antes de la entrega del DISTRIBUIDOR al CLIENTE
- LUBRICACIÓN E HIDRÁULICA
- CORTADORA
- ACCESORIOS E INSTALACIÓN
- CONEXIONES DE CORTADORA A TRACTOR
- ELEMENTOS DE SEGURIDAD
- Front Cover SP 1.pdf
- SERVIS
- 2160
- MANUAL DE OPERADOR
- Al propietario/operador/distribuidor
- Instrucciones de operaciones antes de la entrega del DISTRIBUIDOR al CLIENTE
- LUBRICACIÓN E HIDRÁULICA
- CORTADORA
- ACCESORIOS E INSTALACIÓN
- CONEXIONES DE CORTADORA A TRACTOR
- ELEMENTOS DE SEGURIDAD
- AEM-FEMA Ind-Agri Mower Manual 10-10.pdf
- English Cover.pdf
- Page 1
- Complete Ind Ag Mower Spanish 10-10.pdf
- Spanish Cover.pdf
- Page 1
- Spanish Cover.pdf
- Complete Ind Ag Mower Spanish 10-10.pdf
- Spanish Cover.pdf
- Page 1
- Spanish Cover.pdf
- English Cover.pdf