Sanyo ECO R410A User Manual
Page 30
30
3-27. Removing and Attaching the Front Panel
(Floor-Standing Type)
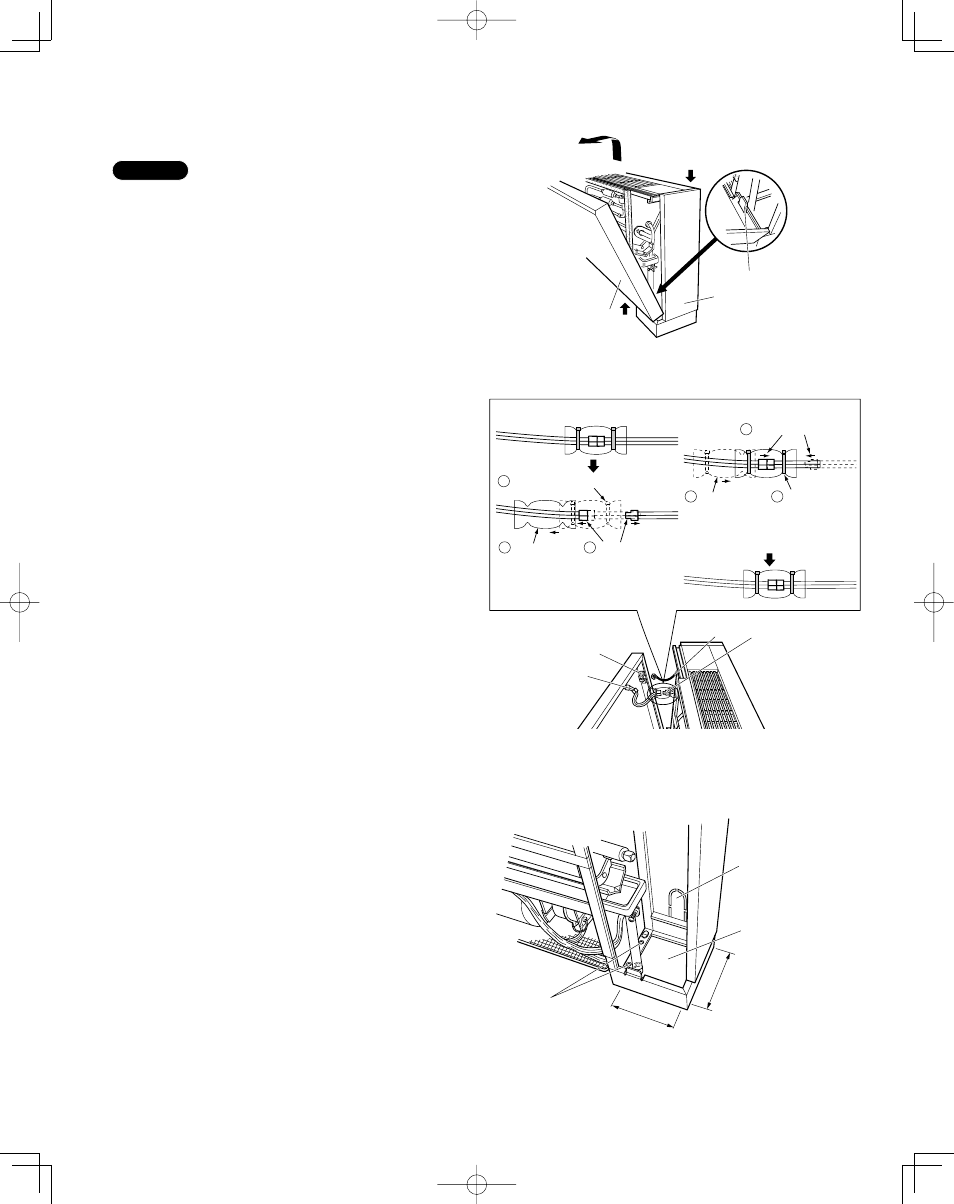
How to remove the front panel
(1) Remove the 2 screws at the lower part of the front panel.
(2) Holding A at the upper right of the unit, push up at B at
the lower right of the panel. The right side of the front
panel is removed. Then remove the left side of the front
panel following the same procedure.
(3) Cut off the binding strap to loosen the glass fiber tube.
(4) Disengage the lead-wire connector from the dewpreven-
tion heater by pressing the tab.
(5) Remove the string connecting the front panel of the unit
by unhooking it from the fixture attached to the panel.
How to attach the front panel
(1) Hook the string to the fixture of the front panel.
(2) Expose the tip of the dew-prevention heater from the
glass fiber tube in order to make connection smoothly.
(3) Connect the lead-wire connector to the dew-prevention
heater until the click sounds.
(4) After the connection, tighten the glass fiber tube nearby
connected area inside the tube with the binding strap.
(5) Align the slots at the lower part of the front panel to the
tabs at the lower part of the indoor unit and put the upper
trim tab of the front panel on the groove of the unit. Then
press down the panel.
(6) Insert the 2 screws at the lower part of the front panel.
3-28. Installing the Refrigerant Tubing
(1) When connecting the gas tube use the supplied tubing.
(2) Tubes can be extended in 2 directions: downward and at
rear.
For floor-standing type
• When a rear tube is required, it can run through the rear-
tube outlet of the rear panel.
• When a downward tube is required, refer to the opening
dimensions shown in Fig. 3-64.
NOTE
A dew-prevention heater is secured behind the front panel.
When removing or attaching the panel, take care not to
damage the lead wire to the heater.
B
A
Front panel
Tab
Side panel
Fig. 3-62
Dew-prevention
heater
Fixture
Front
panel
String
Cut off the both binding straps.
Removing the front panel
Expose the tip
of the dew-
prevention
heater from the
glass fiber tube.
Disengage the
lead-wire
connector from
the dew-
prevention heater.
1
3
2
Tighten the
glass fiber tube
with the binding
strap at both
side.
Attaching the front panel
Expose the tip
of the dew-
prevention
heater from the
glass fiber tube.
Connect each other.
1
3
2
Lead-wire connector
(4P WHT)
Fig. 3-63
6-37/64"
6-31/32"
Holes for fixing the
unit to the floor
Rear-tube outlet
Refrigerant tubing
space for
downward tubing
Fig. 3-64