Manual channel set, Delete a channel, Change station channel position – JVC TH-R3 User Manual
Page 83: 79 manual channel set, Subsidiary settings
Masterpage:Right+
Filename [TH-R1R3EK_10Subsidiary.fm]
Page 79Friday, 8 April 2005 16:00
SUBSIDIARY SETTINGS
79
Manual Channel Set
Store channels that were not stored during Auto Set Up
(A pg. 18), Preset Download (A pg. 19) or Auto Channel Set
(A pg. 78).
1
Press SET UP to access the Main Menu screen.
2
Press selection keys to select
AINITIAL SET UPB, then press
ENTER for confirmation.
3
Press selection keys to select
AMANUAL CH SETB, then press
ENTER.
4
Press selection keys
to select a blank
position in which you
want to store a
channel, then press
ENTER twice.
5
Press selection keys
to select
ABANDB, then
press ENTER.
6
Press selection keys
to change the band
between CH (regular)
and CC (cable), then
press ENTER.
7
Press selection keys
to select
ACHB, then
press ENTER for
confirmation.
8
Press selection keys
to select a channel
number you want to store, then press ENTER.
●
To enter the registered station name (A pg. 90), press
selection keys to select
AIDB, then press ENTER. Press F G.
●
For fine tuning adjustment, press selection keys to select
AFINEB. Press D E to perform fine-tuning.
●
When
AL-2 SELECTB is set to AVIDEO/RGBB, AS-VIDEO/RGBB,
ASAT VIDEO/RGBB or ASAT S-VIDEO/RGBB, the ADECODERB
setting cannot be changed. (A pg. 69)
9
Press SET UP or RETURN 3 times to complete the setting.
●
To change positions, see
AChange Station Channel PositionB on
the right column.
●
If you wish to set station names other than the ones registered
in your unit, see
ASet Stations (B)B (A pg. 80).
Delete A Channel
1
Perform steps 1 - 3 of
AManual Channel SetB on the left
column.
2
Press selection keys to select the channel you want to delete.
3
Press CANCEL to delete a channel. The channel next to the
cancelled one moves up one line.
●
Repeat steps 2 - 3 as necessary.
4
Press SET UP or RETURN twice to complete the setting.
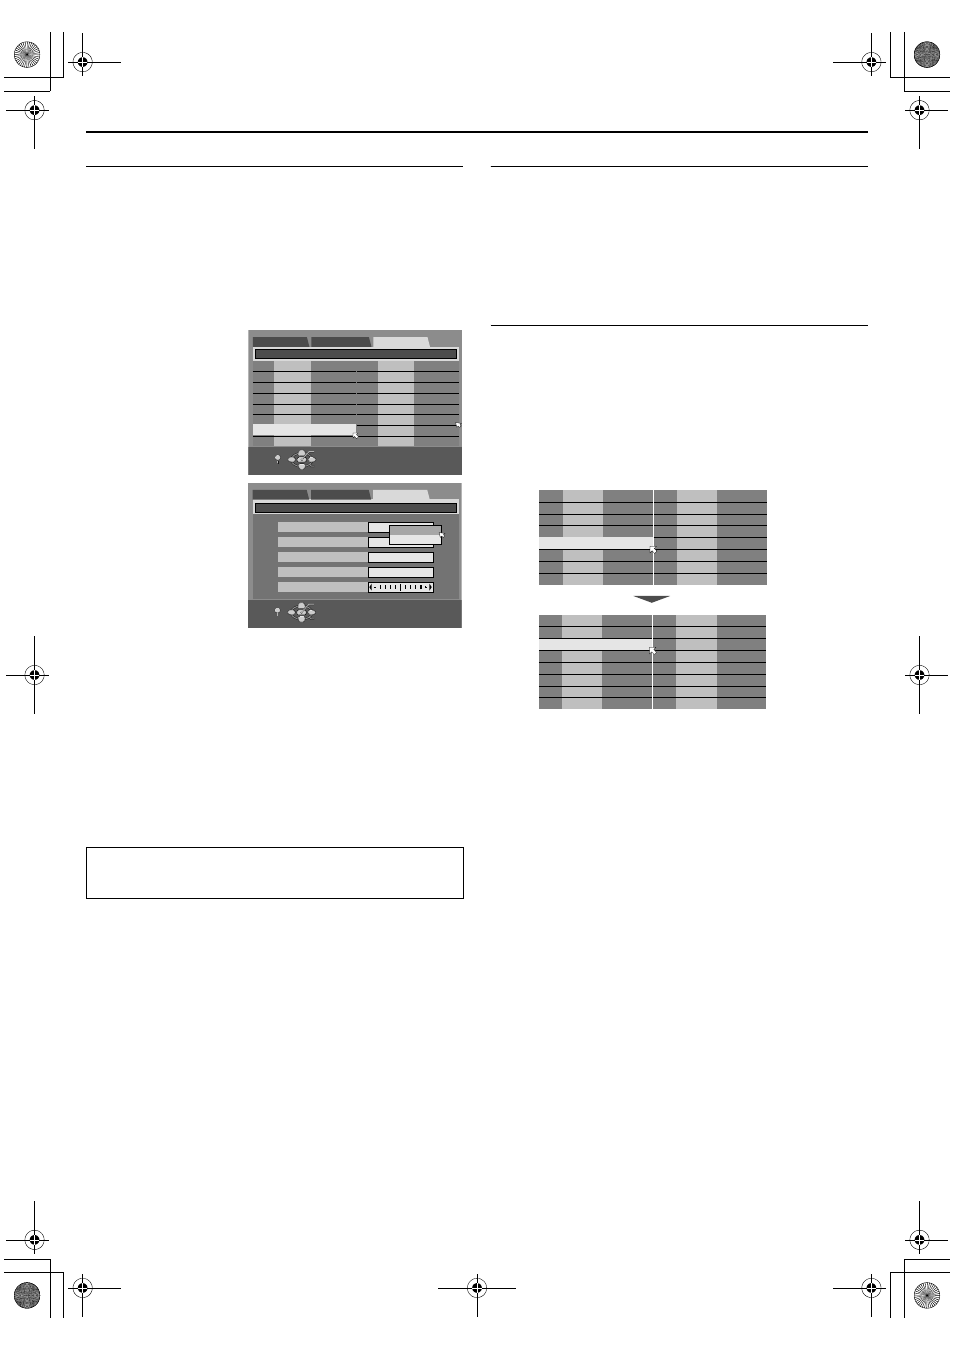
Change Station Channel Position
1
Perform steps 1 - 3 of
AManual Channel SetB on the left
column.
2
Press selection keys to select the channel you want to move,
then press ENTER.
3
Press selection keys to select the new channel position, then
press ENTER.
Example: If you moved the station in position 4 to position 2, the
stations originally in positions 2 and 3 each move down
one space.
●
Repeat steps 2 - 3 as necessary.
4
Press SET UP or RETURN twice to complete the setting.
ATTENTION:
Guide Programme numbers are not set when channels are
stored manually. (A pg. 77,
AVIDEO Plus+ System SetupB)
(Example) To store in position 6.
01
26
BBC1
02
33
BBC2
03
23
ITV
04
30
CH4
05
37
CH5
06
----
07
----
08
09
----
----
10
----
11
----
12
----
13
----
14
----
DVD SET UP
FUNCTION SET UP
INITIAL SET UP / MANUAL CH SET
SELECT WITH [CURSORS]
THEN PRESS [ENTER]
INITIAL SET UP
OK
SELECT
RETURN
SET UP
PR
CH
PR
CH
ID
ID
CH
01
E-SP
DVD SET UP
FUNCTION SET UP
INITIAL SET UP / MANUAL CH SET
SELECT WITH [CURSORS]
THEN PRESS [ENTER]
INITIAL SET UP
BAND
CH
ID
DECODER
FINE
CC
CH
OK
SELECT
RETURN
SET UP
OFF
PR
CH
ID
01
26
BBC1
02
23
ITV
03
30
CH4
04
33
BBC2
05
37
CH5
06
----
07
----
PR
CH
ID
08
----
09
----
10
----
11
----
12
----
13
----
14
----
PR
CH
ID
01
26
BBC1
02
23
ITV
03
30
CH4
04
33
BBC2
05
37
CH5
06
----
07
----
PR
CH
ID
08
----
09
----
10
----
11
----
12
----
13
----
14
----
TH-R1R3EK_00.book Page 79 Friday, April 8, 2005 4:00 PM