2 generator compartments, 1 compartment size, 2 compartment construction – Guardian Technologies QUIETPACT 40LP 004701-0 User Manual
Page 23
2.2 generator coMpartMents
Whether the generator set is being installed inside a
compartment specifically manufactured to house a
generator or inside a compartment that the installer
constructs, the compartment must meet certain spec-
ifications as outlined in the following sections:
2.2.1 coMpartMent sIze
Plan the compartment size carefully. Provide a mini-
mum clearance of 1/2 inch (13 mm) on the front and
top, 1/2 inch (25 mm) on the left side, two (2) inches
on the right side, and 2-1/2 inch (63.5 mm) from the
back for air circulation AFTER the compartment has
been lined with metal and sound insulation (Figure
2.3).
Figure 2.3 – Clearances
2-1/2" Clearance
in Back
1/2" Clearance on Top
2" Right Side
1/2"
in Front
Insulation
Plywood
Compartment
18" Cleara
nce
Recommended
Belo
w (Mini
mu
m 12"
)
1/2" Left Side
NOTE:
Refer to “Figure 1.2 – Major Features and
Dimensions”.
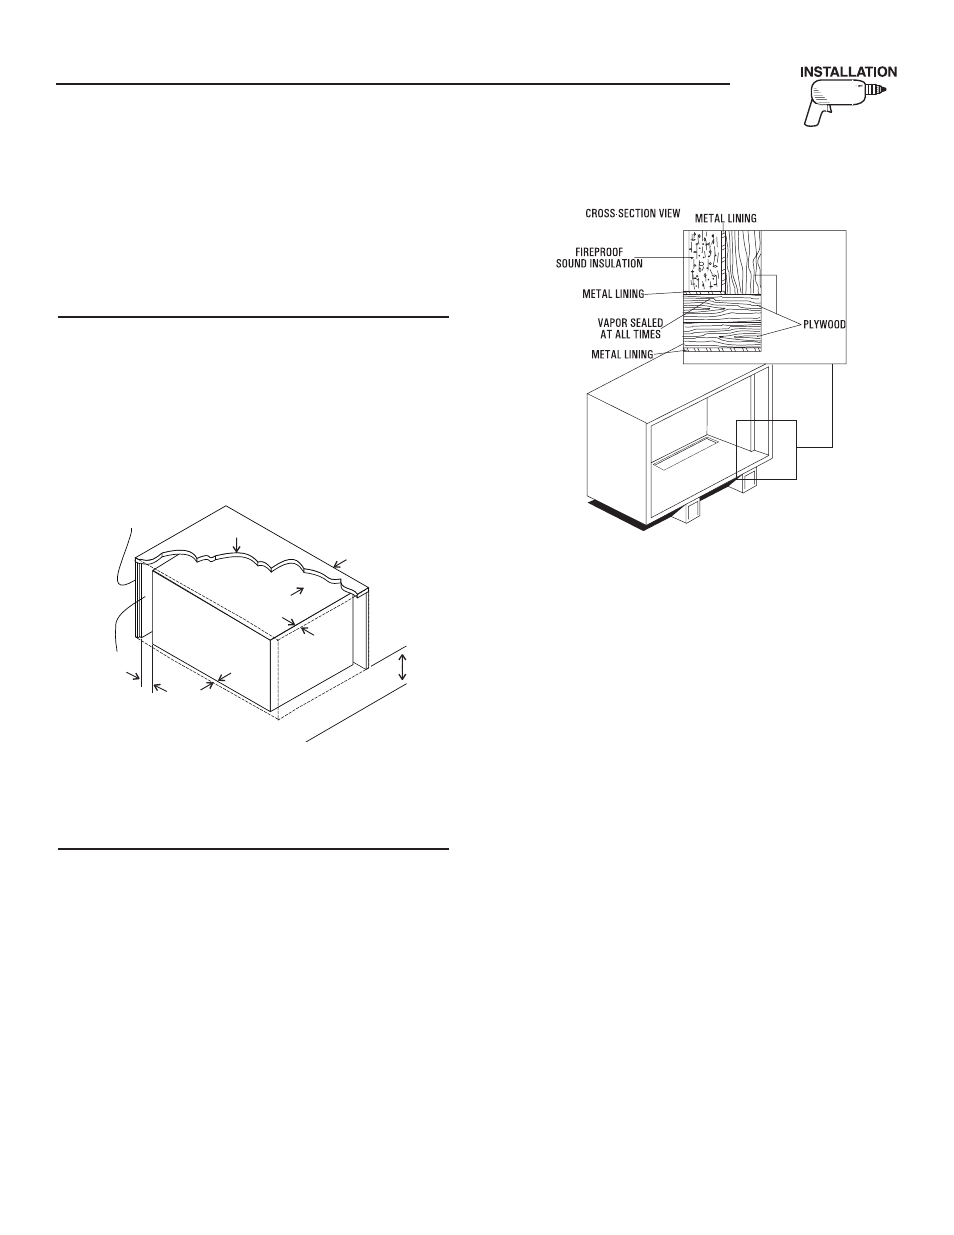
2.2.2 coMpartMent constructIon
• The generator compartment should be either con-
structed of, or lined with, 26-gauge galvanized
steel.
NOTE:
Aluminum is NOT an acceptable alternative
to galvanized steel due to aluminum’s low
melting point.
• If the compartment is lined with galvanized steel,
it may be constructed of any material. The manu-
facturer recommends that the compartment be
constructed of 1/2-inch thick plywood (not strand-
board), with the floor made of a double thickness
of 1/2-inch plywood with the grain of the wood at
cross section for added strength (Figure 2.4).
• If constructing a compartment, line the exterior
(underside) of the compartment floor with 26-
gauge galvanized steel.
Figure 2.4 – Typical Compartment Construction
• All seams, splices and joints of the compart-
ment walls (unless vapor tight by design) should
be caulked to prevent poisonous, flammable or
explosive vapors from entering the vehicle inte-
rior.
NOTE:
Caulking must be done so that the caulking mate-
rial will stay in place permanently. Pressing such
materials as putty tape onto joints and seams is
NOT acceptable. A high quality silicone rubber base
sealant is recommended.
• Holes and openings made in the compartment
walls to allow for the passage of electrical conduit,
conductors, hoses, cables, etc., into the vehicle liv-
ing area must be sealed vapor tight with silicone
rubber base sealant.
• If flexible metal conduit is used, it must be sealed
internally at the end where it terminates inside the
compartment’s electrical junction box.
NOTE:
Flexible metal conduit, due to its unique construc-
tion, is NOT vapor tight along its entire length.
• Seams and joints of the galvanized steel (whether
used as a liner or for the compartment itself) must
be lapped and mechanically secured. Such seams
may be manufactured, welded, bolted, riveted or
screwed. Manufactured lock seams are shown in
Figure 2.5. Installer constructed compartments
typically utilize a standard lap joint.
• After the compartment has been metal lined and
vapor sealed, line the compartment interior walls
and ceiling with an approved, nonflammable sound
insulating material. See Section 2.2.3.
section 2 – Installation
recreational vehicle generator