70
English
INITIAL SET
1
INTRODUCTION
SE
TTINGS
NE
T
W
O
R
K
CO
NT
RO
L
NETW
ORK
O
P
E
RATION
NE
T
W
ORK
S
E
TTINGS
OTHE
R
OPE
RATION
4
Turn the jog dial to select “YES” and
then turn the shuttle dial clockwise.
Connected cameras are automatically detected.
When detection is completed, the display returns to the
screen.
5
Press the [EXIT/OSD] button.
The display returns to the normal screen.
Use the following procedure to set a unique title for each
camera so that these titles can be displayed on-screen.
z
Titles can be up to 10 characters in length per camera.
The following characters can be used.
z
Letters: A to Z
z
Numbers: 0 to 9
z
Symbols: - : . / * _ (space)
z
Numbers can also be entered by using the [CAMERA
SELECT] buttons 1 through 9 or the [QUAD] button.
z
The display limits for monitor 2 camera title is 8 characters
for multi 9 screen display and 6 characters for multi 16
screen display.
Example: Setting the title “HALL-1STFL” for Camera No. 3.
1
Press the [MENU] button.
The MENU indicator lights up and the is
displayed.
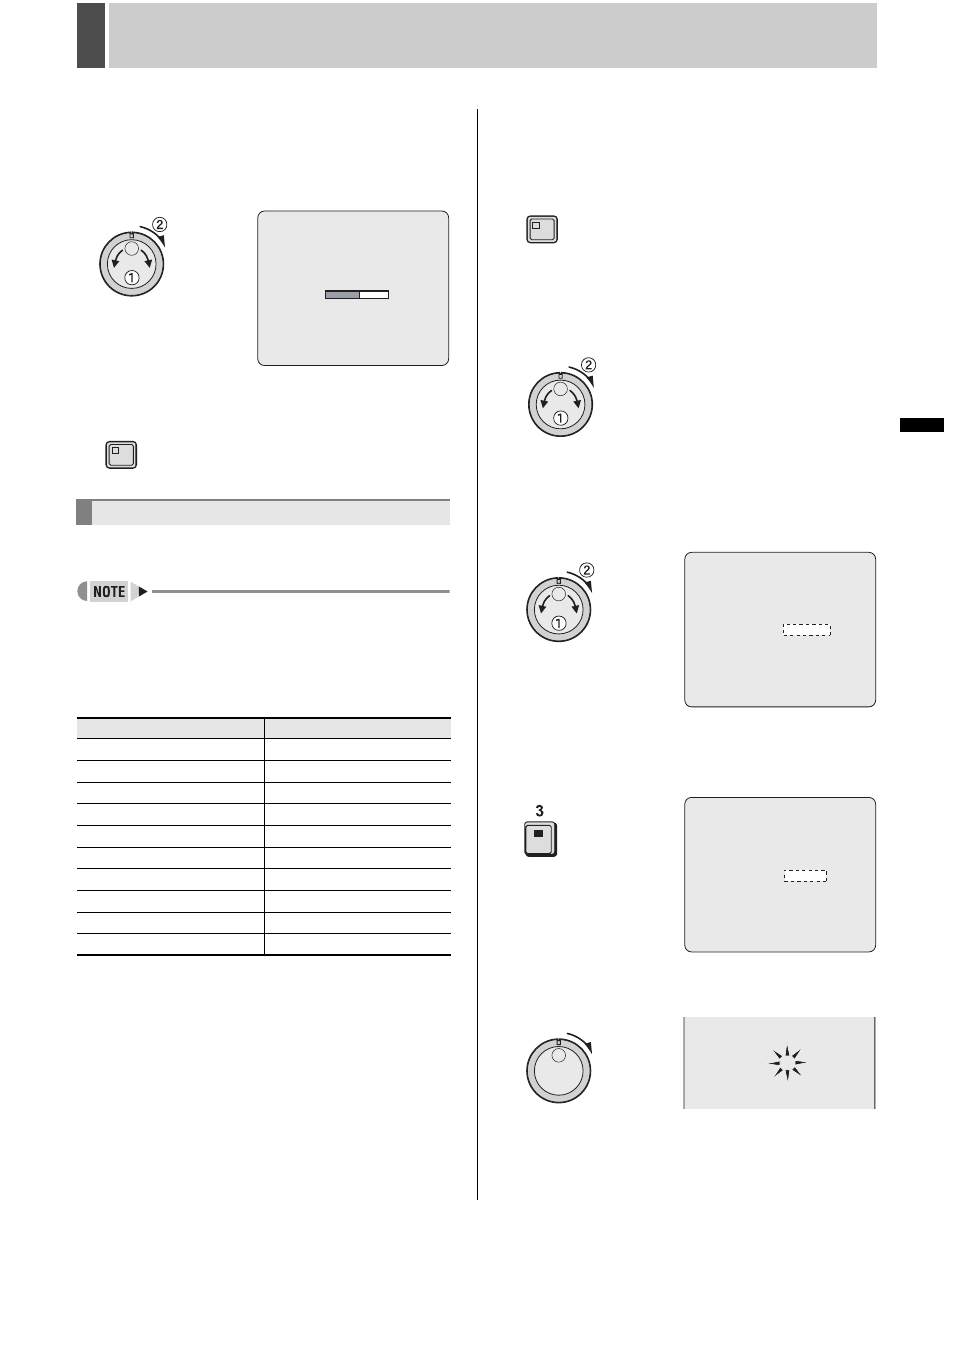
2
Turn the jog dial to select “1.INITIAL
SET” and then turn the shuttle dial
clockwise.
The screen is displayed.
3
Turn the jog dial to select “3.TITLE SET”
and then turn the shuttle dial clockwise.
The title setting field is displayed on the monitoring screen.
The default setting is “-----01” (camera No.).
4
Press the No. 3 [CAMERA SELECT]
button.
The video from Camera No. 3 is displayed on-screen.
5
Turn the shuttle dial clockwise.
The first character position in the title flashes.
Setting camera titles
[CAMERA SELECT] Buttons
Characters that can be entered
1
1
2
2
3
3
4
4
5
5
6
6
7
7
8
8
9
9
QUAD
0
CAMERA DETECT !
EXIT/OSD
MENU
</p><p style="position:absolute;top:588px;left:689px;white-space:nowrap" class="ft010"> </p><p style="position:absolute;top:627px;left:689px;white-space:nowrap" class="ft010"> CAMERA NO.01 ________01 </p><p style="position:absolute;top:807px;left:689px;white-space:nowrap" class="ft010"> <TITLE SET> </p><p style="position:absolute;top:833px;left:689px;white-space:nowrap" class="ft010"> </p><p style="position:absolute;top:872px;left:689px;white-space:nowrap" class="ft010"> CAMERA NO.03 ________03 </p><p style="position:absolute;top:1021px;left:688px;white-space:nowrap" class="ft010"> </p><p style="position:absolute;top:1059px;left:688px;white-space:nowrap" class="ft010"> CAMERA NO.03 ________03 </p></div> </div> <div class="manual-page-original" itemscope="itemscope" itemtype="https://schema.org/ImageObject" data-img="/screens/165807/71.png" style="display: none;"> </div> </div> <a href="/manuals/145316/sanyo-dsr-5716p-dsr-5709p.html?page=70" class="manual-view__prev -onpage-nav" title="Previous (← + Ctrl)" aria-label="Previous page"><svg class="svg-icon"><use xlink:href="#icon-arrow-6"></use></svg></a> <a href="/manuals/145316/sanyo-dsr-5716p-dsr-5709p.html?page=72" class="manual-view__next -onpage-nav" title="Next (Ctrl + →)" aria-label="Next page"><svg class="svg-icon"><use xlink:href="#icon-arrow-6"></use></svg></a> </div> </div> <nav class="inline-nav inline-nav--dark-grey inline-nav--bottom"> <div class="pager pager--left" id="def-pager"> <span class="pager__label">Pages:</span> <a class="pager__a pager__prev" aria-label="Previous page" href="/manuals/145316/sanyo-dsr-5716p-dsr-5709p.html?page=70"><svg class="svg-icon"><use xlink:href="#icon-arrow-2"></use></svg></a> <a class="pager__a pager__number" href="/manuals/145316/sanyo-dsr-5716p-dsr-5709p.html">1</a> <span class="pager__hellip">…</span> <a class="pager__a pager__number" href="/manuals/145316/sanyo-dsr-5716p-dsr-5709p.html?page=69">69</a> <a class="pager__a pager__number" href="/manuals/145316/sanyo-dsr-5716p-dsr-5709p.html?page=70">70</a> <span class="pager__a pager__number active">71</span> <a class="pager__a pager__number" href="/manuals/145316/sanyo-dsr-5716p-dsr-5709p.html?page=72">72</a> <a class="pager__a pager__number" href="/manuals/145316/sanyo-dsr-5716p-dsr-5709p.html?page=73">73</a> <span class="pager__hellip">…</span> <a class="pager__a pager__number" href="/manuals/145316/sanyo-dsr-5716p-dsr-5709p.html?page=236">236</a> <a class="pager__a pager__next" aria-label="Next page" href="/manuals/145316/sanyo-dsr-5716p-dsr-5709p.html?page=72"><svg class="svg-icon"><use xlink:href="#icon-arrow-3"></use></svg></a> </div> <div class="complain"> <div class="popup-menu complain__menu" id="complain-wnd" style="display: none;"> <ul> <li><a href="javascript:" class="ajax-link" data-type="brand">wrong Brand</a></li> <li><a href="javascript:" class="ajax-link" data-type="model">wrong Model</a></li> <li><a href="javascript:" class="ajax-link" data-type="readability">non readable</a></li> </ul> </div> </div> </nav> </div> </div> </div> <div class="manual-also-for"> <span class="title title--h2">This manual is related to the following products:</span> <div class="manual-also-for__list"> <ul class="list-block__list"> <li> <a href="/models/sanyo/dsr-5709p.html">DSR-5709P</a> </li> </ul> </div> </div> <div class="manual-related-docs"> <span class="title title--h2">See also other documents in the category Sanyo Car DVR:</span> <div class="manual-also-for__list"> <ul class="list-block__list"> <li> <a href="/manuals/139914/sanyo-dsr-m810.html"> <span class="model-name">DSR-M810</span> <span class="pages">(55 pages)</span> </a> </li> <li> <a href="/manuals/138990/sanyo-va-sw8000-va-sw8000lite.html"> <span class="model-name">VA-SW8000LITE</span> <span class="pages">(132 pages)</span> </a> </li> <li> <a href="/manuals/142668/sanyo-dsr-2108-dsr-2116.html"> <span class="model-name">DSR-2116</span> <span class="pages">(92 pages)</span> </a> </li> <li> <a href="/manuals/151996/sanyo-icr-b29.html"> <span class="model-name">ICR-B29</span> <span class="pages">(96 pages)</span> </a> </li> <li> <a href="/manuals/149216/sanyo-dsr-m814.html"> <span class="model-name">DSR-M814</span> <span class="pages">(73 pages)</span> </a> </li> <li> <a href="/manuals/150986/sanyo-icr-b35.html"> <span class="model-name">ICR-B35</span> <span class="pages">(32 pages)</span> </a> </li> <li> <a href="/manuals/151046/sanyo-dsr-2016.html"> <span class="model-name">DSR-2016</span> <span class="pages">(2 pages)</span> </a> </li> <li> <a href="/manuals/151174/sanyo-dsr-3016.html"> <span class="model-name">DSR-3016</span> <span class="pages">(96 pages)</span> </a> </li> <li> <a href="/manuals/141075/sanyo-dsr-2004.html"> <span class="model-name">DSR-2004</span> <span class="pages">(2 pages)</span> </a> </li> <li> <a href="/manuals/148684/sanyo-dsr-m800.html"> <span class="model-name">DSR-M800</span> <span class="pages">(50 pages)</span> </a> </li> <li> <a href="/manuals/154462/sanyo-icr-b31.html"> <span class="model-name">ICR-B31</span> <span class="pages">(96 pages)</span> </a> </li> <li> <a href="/manuals/145905/sanyo-icr-b34.html"> <span class="model-name">ICR-B34</span> <span class="pages">(96 pages)</span> </a> </li> <li> <a href="/manuals/137750/sanyo-dsr-300.html"> <span class="model-name">DSR - 300</span> <span class="pages">(136 pages)</span> </a> </li> </ul> </div> </div> </div> </div> </main></div><footer class="footer"> <nav class="bottom-menu"> <a href="/">Home</a> <a href="/brands.html">Brands</a> <a href="/models/top.html">Popular manuals</a> <a href="/models/updated.html">Recently added</a> </nav> <div class="footer__content"> <div class="logo logo--footer"> <span class="logo__title logo__title--footer"><b>Manuals</b> Directory</span> </div> <p class="copyrights">© 2012–2025, azmanual.top<br>All rights reserved.</p> </div></footer> <script async type="text/javascript" src="/assets/js/apps/responsive/master.min.js?28"></script></body></html>