Havis-Shields Kwik-Kit KK-100-03 User Manual
Page 10
KK-XXX-03_INST_10-07
10
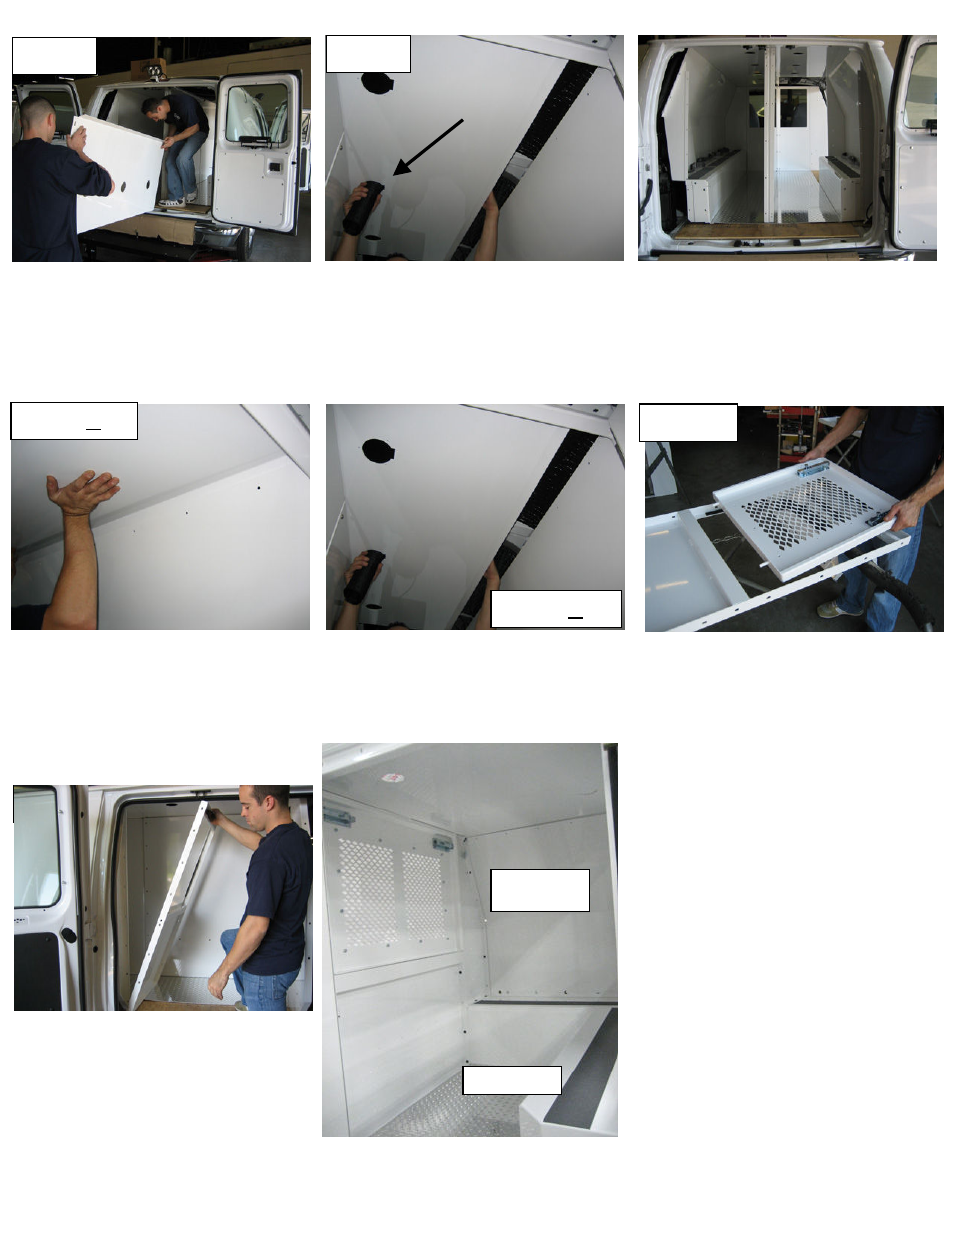
Item #9
Remove Bulkhead Emergency
Exit Hatches to ease installation.
Item #9
Route dome light wires, HVAC
hoses, video cables, etc to their
respective locations
Item #8
Place Passenger-side Ceiling section into
vehicle
Do not attach any hardware at this time
Item #8
Position Middle Bulkhead to
separate front and rear
compartments
Current view of installation
Slide the ceiling sections out of the way in order to access A/C hoses, wires, etc.
Note: These components will be hard to access once ceiling is mounted.
Remove all slack from hoses to maximize airflow.
Item #7 & #8
Item #7 & #8
Item #12
Install forward compartment
driver sidewall / bench assembly.
Item 10.
Install forward compartment
ceiling assembly. Item 12.
Place rear facing bench against
front bulkhead. Item 16.
Item # 10
Item # 16
- P-MFK-9 (2 pages)
- C-SM-800 (82 pages)
- KR-15XX-ALF-X (2 pages)
- Kwik-Kit KK-120-05 (22 pages)
- Telescoping Computer Base C-TCB-12 (2 pages)
- C-HK (4 pages)
- 1995-2007 Ford Crown Victoria Trak-Mount Kit C-TM-CV (2 pages)
- 2002-2008 Chevrolet Trailblazer & GMC Envoy C-TCB-32 (2 pages)
- Heavy Duty Trak Mount C-TM-F250-1 (2 pages)
- Universal License Plate Bracket C-TIR3-UNV (1 page)
- Heavy Duty Trak Mount C-TM-GMC (2 pages)
- C-VS-0812-CHGR (4 pages)
- KK-K9-C14-K-32 (5 pages)
- 2000-2005 Chevrolet Impala Trak-Mount Kit C-TM-IMP (2 pages)
- C-VS-2400-CHGR (3 pages)
- C-B23 (1 page)
- C-VS-800-CV (4 pages)
- Cupholders C-CUP2 Series (2 pages)
- Dodge Charger Spare Tire Bracket C-TTB-CHGR (5 pages)
- KK-K9-C13-K-32 (5 pages)
- Heavy Duty Trak Mount C-TM-EXC (2 pages)
- KK-K9-F12-K (3 pages)
- Telescoping Computer Base Lock C-TCB-LOCK (1 page)
- Slide-Out Radio Tray C-3190 (1 page)
- Computer Laptop Mount and Accessories C-3089's (4 pages)
- 18" Vehicle Specific Console for '04-08 Ford Econoline Van E-250/E-350 (2 pages)
- Half Size Trunk Box Organizer C-TBO-CV (1 page)
- Vehicle Specific Console C-VS-1100-F150 (2 pages)
- C-VS-0309-F250 (4 pages)
- 1997-2007 Dodge Dakota Telescoping Computer Base C-TCB-28 (3 pages)
- KK-F-ST-SS (2 pages)
- GSM33060-1 (1 page)
- 1997-2008 Ford Expedition Interior Window Guards WGI-F14 (1 page)
- K9/Prisoner Transport Unit KK-K9-C20-K-PT (7 pages)
- Four Compartment Prisoner Transport Insert KK-100-07 (3 pages)
- 1996-2008 Crown Victoria Swing-Out Dash Monitor Mount S-DMM-XXX-CV-SO (5 pages)
- Impala C-SM-830 (1 page)
- Cold Cathode Compartment Light KR-CCL Series (1 page)
- Telescoping Computer Base C-TCB-34 (1 page)
- C-TCB-27 (1 page)
- C-3085-UN-1 (1 page)
- Dual In-Dash Microphone Clip Bracket 1996-2007 Ford Crown Victoria C-MCB-CV (2 pages)
- Angled Series Consoles C-AS-MMP (2 pages)
- C-TSM-CHGR-D (1 page)