Environmental protection, Changing cutting disc, Maintenance – Sealey SM355D User Manual
Page 4
5. CHANGING CUTTING DISC
DaNGER! The use of damaged discs is dangerous and may cause injury.
WaRNING! Ensure that the saw is unplugged from the power supply before attempting to change the cutting disc.
5.1. IMPORTANT!
Cutting discs used with this machine must be of an adequate speed rating and suitable for the task in hand.
(See specification). Only persons qualified under the “Abrasive Wheels Regulations” and holding a current grinding wheel
certificate are to change cutting discs.
5.1.1. Before using a cutting disc ensure that there are no fissures or cracks in it. Once mounted on the saw, test the disc before use by facing
the saw in a safe direction (turned away from yourself, others and vulnerable items) and run it for a short time.
5.2.
REMOVING AND INSTALLING CUTTING DISCS
5.2.1. Release the arm as described in 4.1. (Remember to hold the arm as it rises).
5.2.2. Identify the spring loaded guard catch as shown in Fig.8.
5.2.3. Open the moving disc guard manually and hold it in the open position whilst moving the spring loaded catch to the right. Rotate
the abrasive disc until you can see a hole in the inner mounting flange. Align this hole with the sprung guard catch and slide the catch
over until it is fully inserted into the hole. (See fig.8). Keep finger pressure on the catch and slowly lower the guard until it rests on the
catch pin. Let go of the guard before letting go of the catch.
5.2.4. Loosen the two fixing bolts as shown in fig.9. The access cover is held under the bolts by a keyhole arrangement. Slide the cover towards
the centre of the wheel and lift it off to reveal the wheel fixing.
5.2.5. Using the 8mm Hex key provided remove the disc fixing bolt, the clamping washer and the front mounting flange as shown in fig.10. Finally
remove the disc from the boss.
5.2.6. Place the new disc over the central boss on the rear flange. Place the front flange onto the raised spigot ensuring that the flats on the flange are
aligned with the flats on the spigot. Retain the assembly with the clamping washer and centre bolt. Do not over tighten the centre bolt.
6. MAINTENANCE
WaRNING! Ensure that the saw is unplugged from the power supply before attempting any maintenance.
6.1.
Regularly clean the dust which accumulates inside the protective guard and on the external parts.
6.2.
Periodically clean dust from motor ventilation openings with a soft brush.
6.3.
Periodically clean and oil the vice screw.
6.4.
Change the abrasive disc when it is worn and/or does not operate efficiently.
6.5.
Before each use, check for obvious signs of damage to the machine. Also check for loose screws and other moving parts, incorrectly
mounted or misaligned parts and any other factors that might create an unsafe working environment.
6.5.
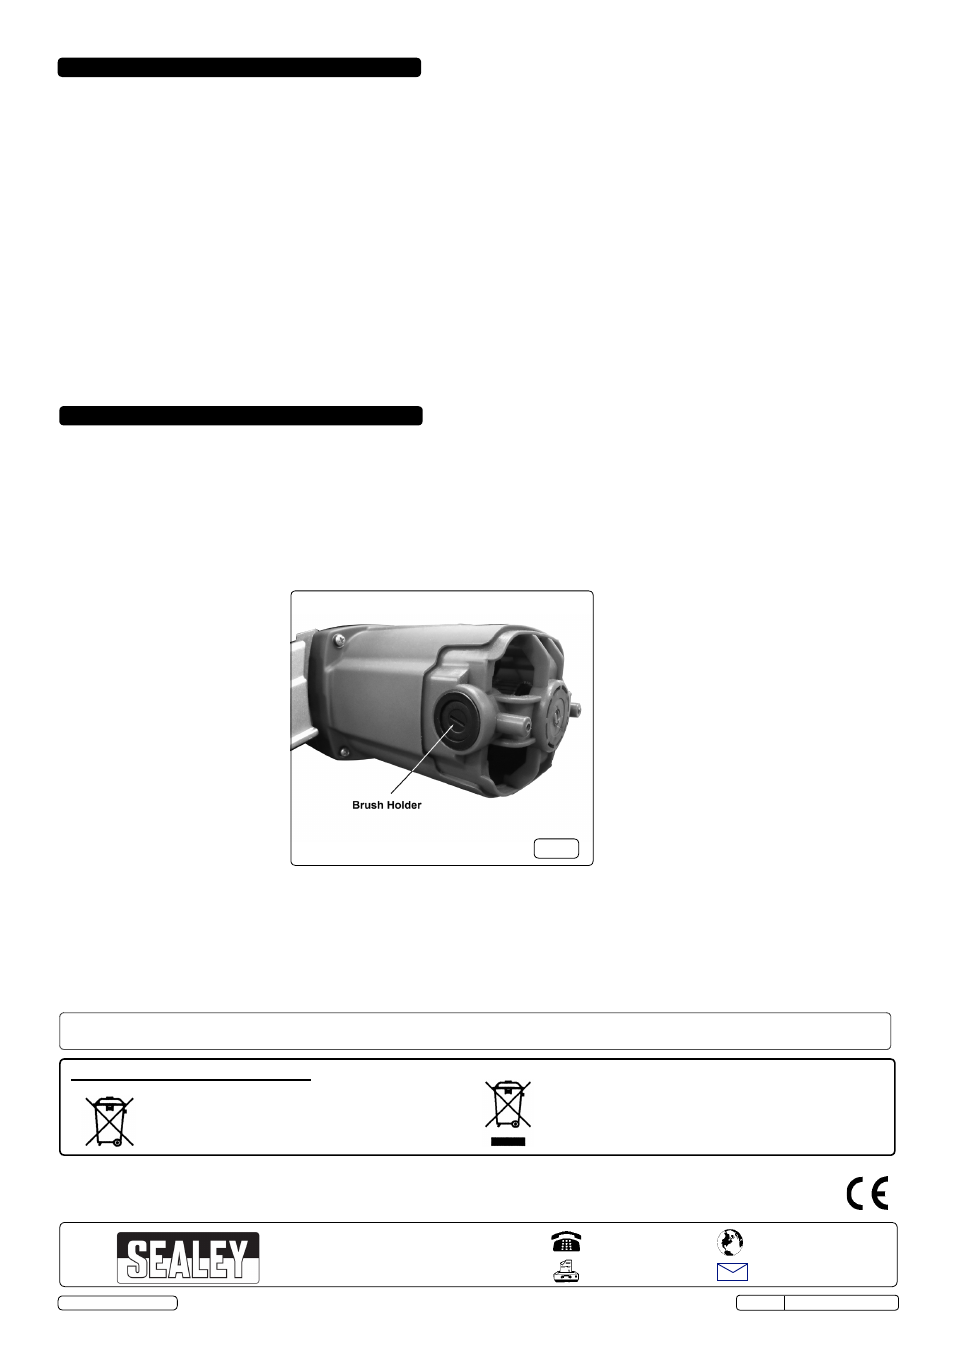
CHANGING THE MOTOR BRUSHES. (fig.11)
The motor brushes should be checked periodically for wear and renewed when worn down or pitted. The brushes can be accessed by
undoing the cover securing screws and removing the motor end cover.(fig.1)
6.5.1. Unscrew the brush holders and withdraw the brush assemblies for inspection.Ffig.11)
6.5.2. Insert the new brush into the brush holder, if required. Place the plastic cap over the head of the brush assembly and press the spring
downwards ensuring that the tabs on either side of the brush head enter the same keyway as the brush. Screw the caps back into
position.
6.5.3. Replace motor end cover.
NOTE: It is our policy to continually improve products and as such we reserve the right to alter data, specifications and component parts without prior notice.
IMPORTANT: No liability is accepted for incorrect use of this product.
WARRANTY: Guarantee is 12 months from purchase date, proof of which will be required for any claim.
INFORMATION: For a copy of our latest catalogue and promotions call us on 01284 757525 and leave your full name and address, including postcode.
01284 757500
01284 703534
Sole UK Distributor, Sealey Group,
Kempson Way, Suffolk Business Park
,
Bury St. Edmunds, Suffolk,
IP32 7AR
www.sealey.co.uk
Web
SM355D Issue:2 (SP) - 09/12/13
fig.11
© Jack Sealey Ltd
Environmental Protection.
Recycle unwanted materials instead of disposing of them as
waste. All tools, accessories and packaging should be
sorted, taken to a recycle centre and disposed of in
a manner which is compatible with the environment.
WEEE REGULATIONS. Dispose of this product at the end of
its working life in compliance with the EU Directive on Waste
Electrical and Electronic Equipment. When the product is no
longer required, it must be disposed of in an environmentally
protective way.
WARNING! Should excessive noise or vibration occur, cease use immediately. Turn off the machine and disconnect from power supply.
DO NOT use the machine again until the problem has been fully resolved.
Parts support is available for this product. To obtain a parts listing and/or diagram, please log on to www.sealey.co.uk,
email [email protected] or phone 01284 757500.
Original Language Version