Operating instructions – Sealey SM355D User Manual
Page 3
WARNING! Before cutting ensure that you wear approved safety goggles, ear
defenders, appropriate dust mask if cutting generates dust, and safety gloves.
All safety instructions in Section 1 must be followed.
4.1.
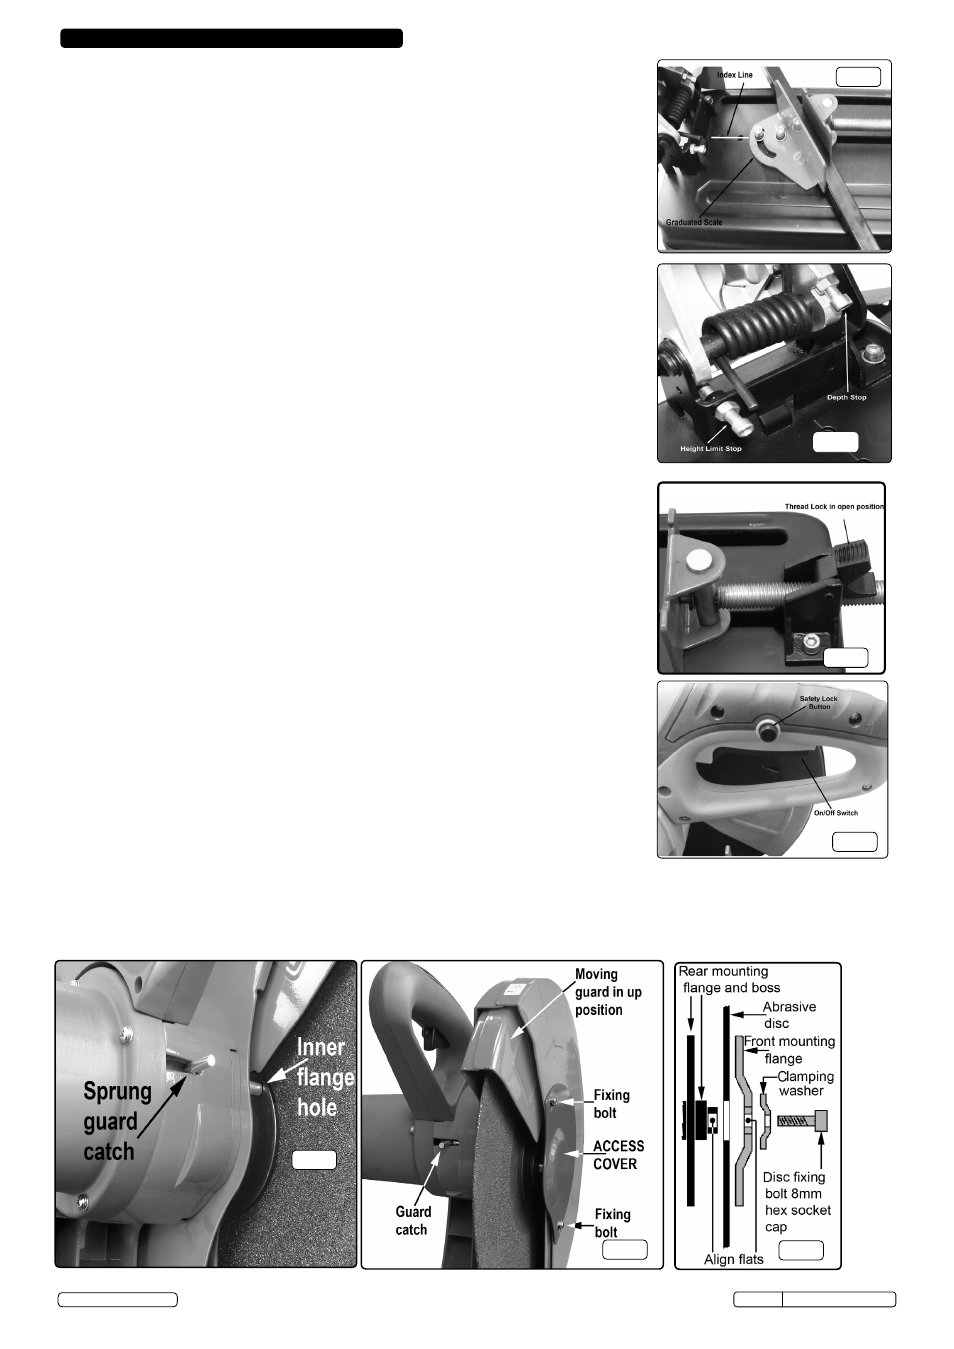
USING THE LIFT ARM LOCK BUTTON.(fig.2)
When not in use or when being transported the cutting arm should always be locked down. To
lock the arm down, pull it to its lowest position against the return spring pressure until it is
against the stop. Hold it in this position and push the button in. When the pressure on the
arm is released it will move up slightly and then hold.
To release the arm, push it down against the stop and hold it there. Pull the locking button
outwards to free it and hold onto the operating handle whilst the arm rises.
If necessary the arm can be locked in the up position by pushing the knob back to the locked
position.
4.2.
DUST EXTRACTION.
4.2.1. The SM355D cut off saw comes with a dust extraction port, situated at the rear of the cutting
table.
4.2.2. Attach dust extraction pipe (not included) to the port (See internal and external dimensions in
specification).
4.2.3. Activate dust extractor (not included), then activate cut off saw.
4.3.
SECURING THE WORKPIECE.(fig.3)
4.3.1.
Ensure that the saw is unplugged from the power supply.
4.3.2. Check that the back stop is at 90
° to the abrasive disc using a set square.
Ensure the back stop fixings are tight using the hex key provided.
4.3.3. To move the other jaw up to the workpiece, flip the thread lock open as shown in fig.6
and slide the jaw face up to the workpiece. Flip the thread lock back down and tighten the
workpiece in the vice.
4.3.4. For additional cutting capacity relocate the back stop (fig.3) in the alternative mounting holes
indicated and fully secure.
4.3.5. When cutting long workpieces use additional supports along the length.
4.4.
CUTTING DEPTH.
4.4.1. As the abrasive disc begins to wear down during use it may be necessary to adjust the cutting
depth. (See depth stop in fig.5) Only a small movement of the depth stop is required to
increase/decrease the depth.
4.5.
MITRE CUTTING.
4.5.1. To cut at an angle loosen the two hex cap bolts on the back stop with the hex key
provided and rotate the back stop to the required angle using the graduated scale
stamped on the back edge of the back stop. Align the required angle with the index
line on the base plate as shown in fig.4. and tighten down the back stop fixings.
Place the workpiece against the back stop and move the other jaw up to it and tighten.
4.6.
ON/OFF SWITCH.(fig.7)
4.6.1. The On/Off switch is locked in the Off position. To turn On the saw you must press in the safety
button with your thumb before pulling the switch upwards. The switch is spring loaded and
must be held in the up position in order for the saw to continue running. As soon as the
pressure on the switch is released the saw will turn off.
4.7.
OPERaTION
WARNING! DO NOT switch on the saw whilst the disc is in contact with the
workpiece. Bring the rotating disc to the workpiece.
4.7.1. The cutting disc must be running at maximum speed before attempting to lower the cutting
edge onto the workpiece.
4.7.2. Lower the cutting disc slowly and smoothly down towards the workpiece (avoid jerky
movements).
4.7.3. Avoid subjecting the disc to excessive strain. Always ease the disc down against the
workpiece (a harsh downward impact may cause disc failure) and do not apply undue
force on the handle when cutting the workpiece. Maintain a controlled cutting speed.
4.7.4. When cutting is complete, fully raise the cutting disc and release the On/Off switch.
4.7.5. Wait until the disc has stopped rotating before attempting to remove the workpiece.
fig.4
fig.5
fig.7
fig.6
fig.8
fig.9
fig.10
© Jack Sealey Ltd
4. OPERATING INSTRUCTIONS
SM355D Issue:2 (SP) - 09/12/13