Fig.2, Fig.1 fig.3, Operation – Sealey CPG18V User Manual
Page 2
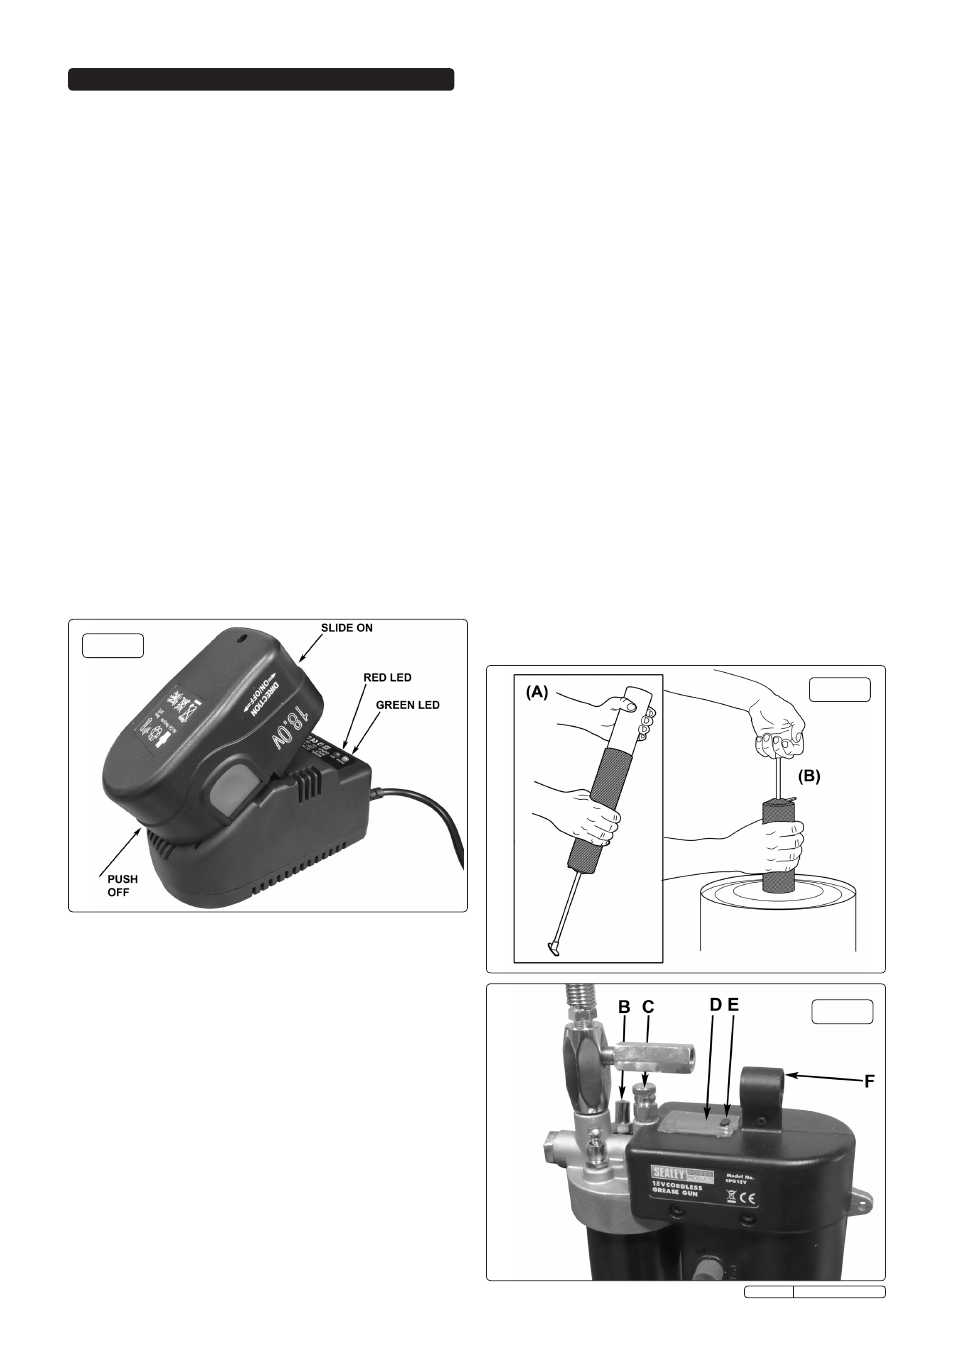
Fig.2
IMPORTANT WARRANTY INFORMATION:
the battery pack fitted to this cordless tool are considered to
be a consumable item and its ability to accept charge will
reduce over time. We will warranty it against mechanical and
electrical defect for a period of one year - this does not cover
fair wear and tear. if the battery is not properly charged
before 1st use, or regularly conditioned, its capacity will
diminish. under these circumstances we will not replace the
battery pack even if it is less than one year old.
3.1
CHARGING THE BATTERY
Important: Before using the grease gun for the first time the
battery must be charged for a minimum of 1.5 hours.
3.1.1 To charge the battery, slot the ridges on the battery into the
keyways on the charger and push on until the battery stops.
Press the red release catches inwards and push the battery
fully home until the body of the battery makes contact with the
body of the charger as shown in fig.1. To release the battery,
simply push it off in the direction shown.
WARNING! Do not obstruct the vents situated on the top and
bottom of the charger as this will cause the charger to
overheat.
3.1.2 Plug the charger into the mains power supply. A red LED will
light on the charger indicating that charging has commenced.
When the battery is fully charged the red LED will go out and
the green LED will illuminate. See fig.1.
3.2
ATTACHING THE BATTERY PACk TO GREASE GUN
3.2.1 To attach the battery, line up the ridges on the battery
moulding with the keyways at the base of the handle and
slide the battery towards the grease canister until it clicks
into place.
3.2.2 To remove the battery from the unit press the two red release
catches located each side of the battery simultaneously and
slide the battery off the base of the handle.
3.3
PRIMING THE GUN
3.3.1 Before loading the gun with a cartridge or filling via a grease
bucket, the gun must be primed.
3.3.2 To prime the gun, pack grease into the cavity located
at the entrance of the gun assembly (where the grease tube
screws into the gun). When the filled grease canister is
attached, operate the trigger to induce the intake of grease
into the gun assembly.
3.4
REMOVING EMPTY GREASE CARTRIDGE
3.4.1 fully draw back the plunger handle. When released it will
automatically be locked by the catch plate. See fig.4J.
3.4.2 unscrew the grease canister from the grease gun.
3.4.3 To eject the cartridge, hold the plunger handle, press the
catch plate and hold it down whilst slowly releasing the
plunger.
3.5
LOADING A NEW GREASE CARTRIDGE
3.5.1 unscrew the grease canister from the grease gun. Eject the
old cartridge as described in section 3.4.
3.5.2 fully draw back the plunger handle again. When released it
will automatically be locked by the catch plate. See fig.4J.
3.5.3 remove the base cap from the grease cartridge.
3.5.4 insert the open end of the cartridge into the grease canister
and push it all the way in (fig.2A). remove the seal or pull
tab from the other end of the cartridge.
3.5.5 Pack grease into the cavity in the pump head where the
grease canister attaches.
3.5.6 Screw the grease canister into the grease gun. Press and
hold down the catch plate to release the plunger rod.
3.5.7 Purge air from the system. See Section3.9.
3.6
SUCTION FILLING
3.6.1 unscrew the grease tube from the grease gun and eject the
cartridge, if fitted.
3.6.2 Ensure the plunger rod has been released by pressing
the catch plate. See fig.4J.
3.6.3 Pack grease into the cavity in the pump head where the
grease canister attaches.
3.6.4 Submerge the open end of the grease canister into a grease
bucket by approximately 50mm (2”). Slowly pull out the
plunger rod whilst pushing the canister deeper into the
grease to prevent air pockets from being pulled into the
canister (fig.2B). continue until the rod is fully extended and
locked by the catch plate (fig.4J).
3.6.5 Screw the grease canister back into the grease gun. Press
the catch plate and release the plunger rod.
3.6.6 Press and hold the catch plate and push the plunger rod
down until some resistance is felt. release the catch plate.
3. OPERATION
Fig.1
Fig.3
Original Language Version
cPG18V issue: 2 - 20/12/11