Fig 1 fig 3 fig 2 – Sealey CPG12V User Manual
Page 2
2. INTROdUCTION & SPECIFICATION
3. OPERATION
High power, professional, cordless grease gun, developing 6000psi. Ideal for
in-field lubrication where power and speed are required. Suitable for 400g
cartridges, manual or bulk filling. Features lCD battery condition indicator, air
bleed and heavy-duty aluminium pressure head. Supplied with 12V 1.7Ah bat-
tery, mains charger and in-car adaptor. Supplied in a robust carry-case.
Voltage:. . . . . . . . . . . . . . . . . . . . . . . . . . . . . . . . . . . . . . . . . . . . . . . . . . . . . 12V
Pressure: . . . . . . . . . . . . . . . . . . . . . . . . . . . . . . . . . . . . . . . . . . . . . . . .6000psi
Hose length: . . . . . . . . . . . . . . . . . . . . . . . . . . . . . . . . . . . . . . . . . . . . . 700mm
Replacement Battery:. . . . . . . . . . . . . . . . . . . . . . . . . . . . . . . . . . . .CPG12VBP
Fig 1
Fig 3
Fig 2
Maintain correct balance and footing whilst performing the task. Ensure floor is
not slippery and wear non-slip shoes.
Keep children and unauthorised persons away from the work area.
Dispose of waste grease in accordance with local authority regulations.
When not in use ensure the battery is removed.
DO NOT allow unauthorised persons to operate the gun.
WARNING! DO NOT tamper with or open pump unit. Doing so will invalidate
your warranty.
DO NOT point grease gun at yourself or other persons or animals.
DO NOT pull the grease gun unit by the hose.
DO NOT use the gun for a task it is not designed to perform.
DO NOT operate the gun when you are tired or under the influence of
alcohol, drugs or intoxicating medication.
When not in use, clean the unit and store in a dry, safe, childproof area.
IMPORTANT WARRANTY INFORMATION: the battery pack fitted to this
cordless tool are considered to be a consumable item and its ability to accept
charge will reduce over time. We will warranty it against mechanical and
electrical defect for a period of one year - this does not cover fair wear and
tear. If the battery is not properly charged before 1st use, or regularly
conditioned, its capacity will diminish. Under these circumstances we will not
replace the battery pack even if it is less than one year old.
3.1
CHARGING THE bATTERY
Important: Before using the grease gun for the first time the battery must be
charged for a minimum 1.5 hours.
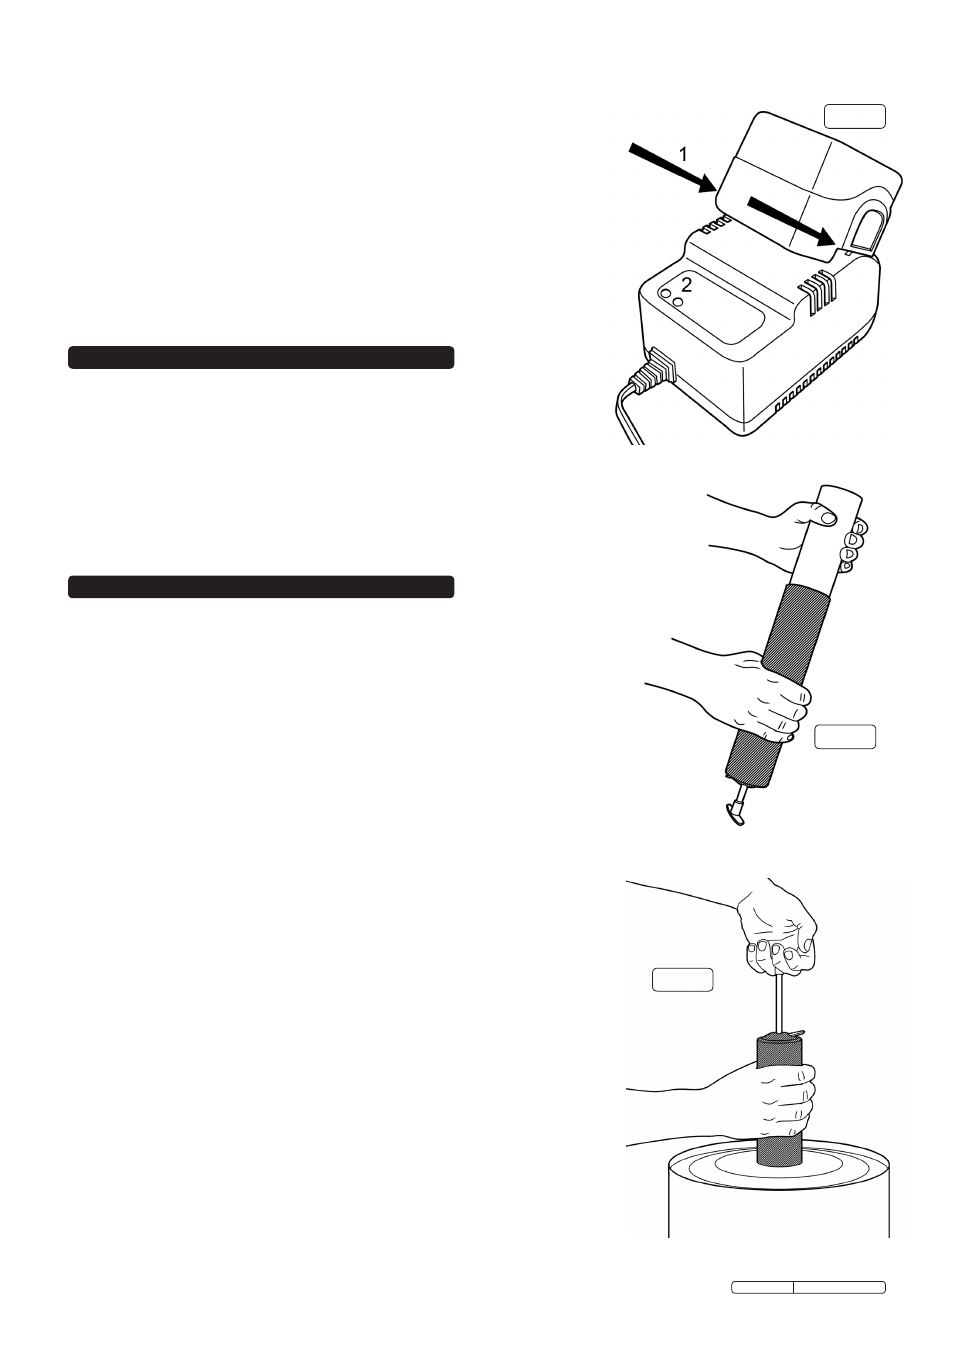
3.1.1 To charge the battery, slot the battery onto the charger (Fig 1.1).
WARNING! Do not obstruct the vents situated on the top and bottom of the
charger as this will cause the charger to overheat.
3.1.2 Once plugged in correctly and the mains has been switched on, the red light
situated at the front of the charger (Fig 1.2) will illuminate. When charging is
complete the green light will illuminate.
3.2
REMOvING THE bATTERY PACk
3.2.1 To remove the battery from the unit press the two buttons located
each side of the battery simultaneously and pull the battery away from the
body.
3.2.2 To insert the battery, line up the ridges on the battery with the slots on the
handle base and push towards the unit firmly until you hear a click.
3.2.3 Gun may be operated froma 12V vehicle battery by using the in-car adapter,
fitted to gun in place of battery pack.
3.3
CARTRIdGE LOAdING
3.3.1 Unscrew the grease tube from the grease gun.
3.3.2 Fully draw back the plunger handle.
3.3.3 Insert the open end of the cartridge into the grease tube and push it all the
way in (Fig 2). Remove the seal or pull tab end from the cartridge.
3.3.4 Screw the grease tube back into the grease gun. Press the catch plate and
release the plunger rod. Push down on the plunger handle.
3.4
SUCTION FILLING
3.4.1 Unscrew the grease tube from the grease gun.
3.4.2 Ensure the handle has been released (by pressing the catch plate).
3.4.3 Submerge the open end of the grease tube into grease bucket by
approximately 50mm (2”) and slowly pull the plunger handle out fully (Fig 3).
3.4.4 Screw the grease tube back in to the grease gun. Press the catch plate and
release the plunger rod. Push down on the plunger handle.
Original Language Version
CPG12V.V2 Issue: 3 - 19/12/11