Application & specification, Assembly, Chip extraction – Sealey SM1311 User Manual
Page 2
2. APPLicAtiON & sPEciFicAtiON
compact and portable power planer/thicknesser with heavy-duty cast
base for accurate and smooth operation. Accurate fence tilts between 45°
and 90°. fitted with two blades capable of handling timber up to 200mm
wide. Easy conversion from planer to thicknesser. thicknesser fitted with
feed rollers. no-volt release switch prevents uncontrolled re-start after
power interruption.
3.1
AssEMBLY
WARNiNG! DO NOt plug the planer into the mains power supply
until completely assembled.
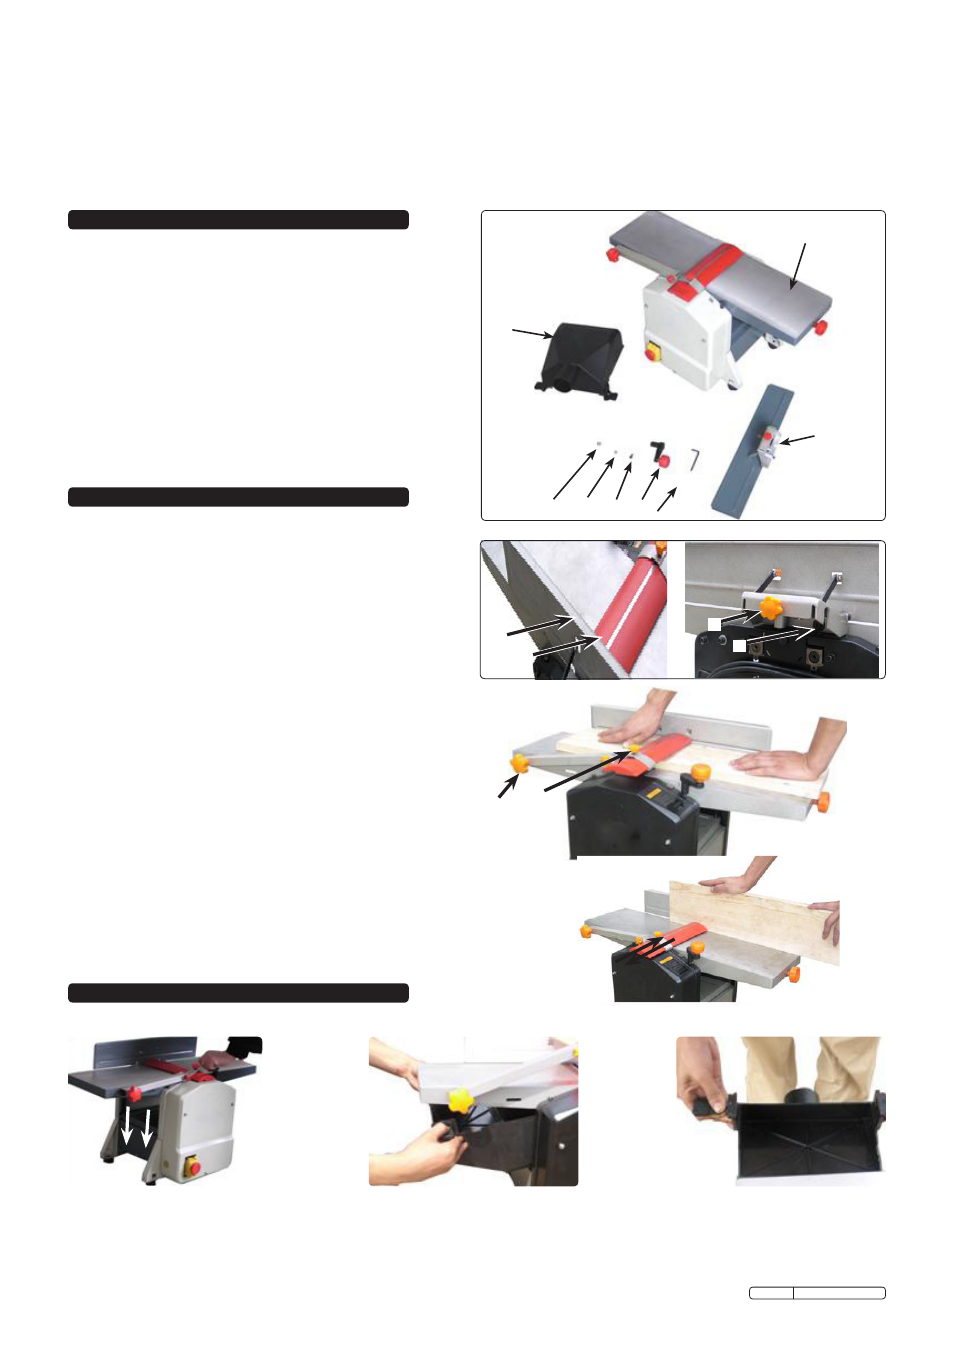
the machine is shipped nearly complete in one carton. Additional
parts which need to be fastened to machine should be located and
accounted for before assembling. (
fig. 1).
A.
Planer and thicknesser
B.
Angle fence
c.
4mm Hex wrench
D.
Handle assembly
E.
Hex bolt
f.
5mm lock washer
G.
5mm flat washer
H.
Dust chute
3.2
sEttiNG ANGLE FENcE (fig. 2)
3.2.1 Insert screw into the slot (A), then locate the fence on screw
(D). securely tighten screw (A) first, then screw (D).
Angle adjustment is made by loosening knob (c) and
tilting fence to the desired angle using scale (B). re-tighten
knob (c)
fig. 2.
3.3
sEttiNG sAFEtY GUARD (fig. 3)
3.3.1 to adjust the height of the guard, loosen knob A, raise
or lower the guard (B), until it is in firm sliding contact with the
workpiece. tighten knob A.
3.3.2 After adjusting the guard height it can be adjusted sideways
to set the required stock width for jointing. (As in fig.4)
Note! Make sure that the switch is in off position before adjusting
the cutting depth, replacing or adjusting blades. Make sure the blade
screws are securely tightened.
3. AssEMBLY
4. chiP EXtRActiON
fIG. 4
Motor . . . . . . . . . . . . . . . . . . . . . . . . . . . . . . . . . . 1250W, 230V 50Hz.
Maximum thicknessing capacity. . . . . . . . . . . . . . . . . . . . . . . 120mm
Maximum cut (Width x Depth). . . . . . . . . . . . . . . . . . . . . . 200 x 2mm
thicknesser feed rate . . . . . . . . . . . . . . . . . . . . . . . . . . . . . 7mtr/min
cutter-head speed . . . . . . . . . . . . . . . . . . . . . . . . . . . . . . . . . 8000rpm
fence Angle . . . . . . . . . . . . . . . . . . . . . . . . . . . . . . . . . . . . . . . .45-90°
Working table size. . . . . . . . . . . . . . . . . . . . . . . . . . . . . 737 x 210mm
Weight . . . . . . . . . . . . . . . . . . . . . . . . . . . . . . . . . . . . . . . . . . . . . 29kg
fIG. 1
A
H
G
f
E
D
c
B
A
c
D
B
fIG. 3
A
B
4.1
PLANiNG
4.1.1 set the thicknessing table to the
lowest position.
4.1.3 Pull the keys on either side of the
chute and align the chute with the
work table.
4.1.2 Insert the dust chute underneath
the planing work table.
fIG. 2
Original Language Version
sM1311 Issue: 2 - 23/11/09
check for alignment of moving parts, binding of moving parts, mounting and any other conditions that may affect it's operation.
If a guard or other part is damaged it should be properly repaired or replaced by an authorized service centre unless otherwise indicated in
this instruction manual.
stay alert - Watch what you are doing, use common sense and do not operate the tool when you are tired.
When not in use switch off the sM1311 and remove plug from the power supply.
NOTE! Max. allowable blade projection over cutterblock 1.0mm/0.004 inch +10%.