Assembly 2. description & specifications – Sealey SM1303 User Manual
Page 2
Unpack the product and check contents for damage. Should there be any damaged or missing parts contact your supplier immediately.
3.1.
Saw Assembly
An assistant may be required to help.
3.1.1. To install the worktable:
SM1303: Carefully place worktable (fig.1.M) onto its supporting base, whilst sliding saw blade through its slot. Fix to base with three
bolts, nuts and washers. Before finally tightening these, check that the table blade slot and sawblade are in line, set correctly and then
tighten all fixings. Using a square backed up to the saw blade, check that the worktable is square to the saw blade, if any adjustment
is needed slacken the two knobs underneath the worktable near the angle scale, set table to correct angle, tighten the two knobs and
then adjust the nut and bolt underneath the rear of worktable so that the worktable is just resting on the bolt head. Secure bracket
across the saw blade slot using two bolts and two plastic knobs.
SM1304: Carefully place worktable (fig.3.M) onto its supporting base, whilst sliding saw blade through its slot. Fix to base with four
bolts and washers. Before finally tightening these, check that the table blade slot and sawblade are in line, set correctly and then
tighten all bolts. Using a square backed up to the saw blade, check that the worktable is square to the saw blade, if any adjustment is
needed slacken the four bolts holding the supporting bracket to the main frame of the saw. Set table to correct angle, tighten all
fixings. Attach the table side guide (fig.3.H) to worktable using four bolts and washers.
3.1.2. Fit the fence (fig.1 & 3.E) by sliding onto the worktable from either the front or the back as required. Push down handle (fig.1 & 3.G) to
lock when fence is in required position.
3.1.3.
Important! The saw must be placed on a firm, stable work surface capable of supporting the saw and any workpiece.
Using four pre-drilled holes in base, fix to the work surface with appropriate fixings.
DO NOT attempt to use the saw if it is not on a stable surface as it may topple over during use and cause damage and/or personal
injury.
3.1.4. Connect extraction port (Ø60mm) to dust extractor system (if available).
1.2.
GENERAL SAFETY Continued
Disconnect the saw from the power supply before removing wood chips or dust.
Use a workpiece support when sawing material which extends beyond the saw table.
DO NOT operate the machine if damaged.
DO NOT operate the machine if any parts are missing as this may cause failure and/or personal injury.
DO NOT use saw blades which are damaged or deformed. Use only Sealey blades and spare parts. Non-standard blades can be dangerous.
DO NOT get the saw wet or use in damp or wet locations or areas where there is condensation.
DO NOT expose the saw housing to flame or high temperature.
DO NOT allow untrained persons to operate the saw.
DO NOT use saw where there are flammable liquids, solids or gases such as paint solvents and including waste wipers or cleaning rags etc.
DO NOT leave the saw operating unattended.
DO NOT operate the saw if either of the blade covers is open or if the blade guard is not fitted.
DO NOT operate the saw when you are tired or under the influence of alcohol, drugs or intoxicating medication.
DO NOT use the saw for a task it is not designed to perform.
When not in use switch off the saw and unplug from the mains power.
Fully approved to current CE regulations. Steel chassis with locking blade wheel covers. No-volt release switch prevents uncontrolled blade
re-start after power interruption. Suitable for cutting wood and plastics. Fitted with tilting table for bevel cuts. Supplied with quick adjusting rip
fence, mitre gauge, dust extraction port, blade wheel brushes and push stick.
3. ASSEMBLY
2. DESCRIPTION & SPECIFICATIONS
Model No: . . . . . . . . . . . . . SM1303 . . . . . . . . SM1304
Throat Depth: . . . . . . . . . . . .200mm . . . . . . . . . 245mm
Max. Cutting Height:. . . . . . . .80mm . . . . . . . . . 105mm
Table Size: . . . . . . . . . .300x300mm . . . . . 340x335mm
Table Tilt Adjustment: . . . . . . . 0-45° . . . . . . . . . . . 0-45°
Blade Length: . . . . . . . . . . .1400mm . . . . . . . . 1712mm
Cutting Speed: . . . . . . . . .900m/min . . . . . . . 730m/min
Motor Power: . . . . . . . . . . . . . 250W . . . . . . . . . 370W
Power Supply: . . . . . . 230V - 50Hz . . . . . 230V - 50Hz
Dust Extraction Port: . . . . . Ø40mm . . . . . . . . .Ø45mm
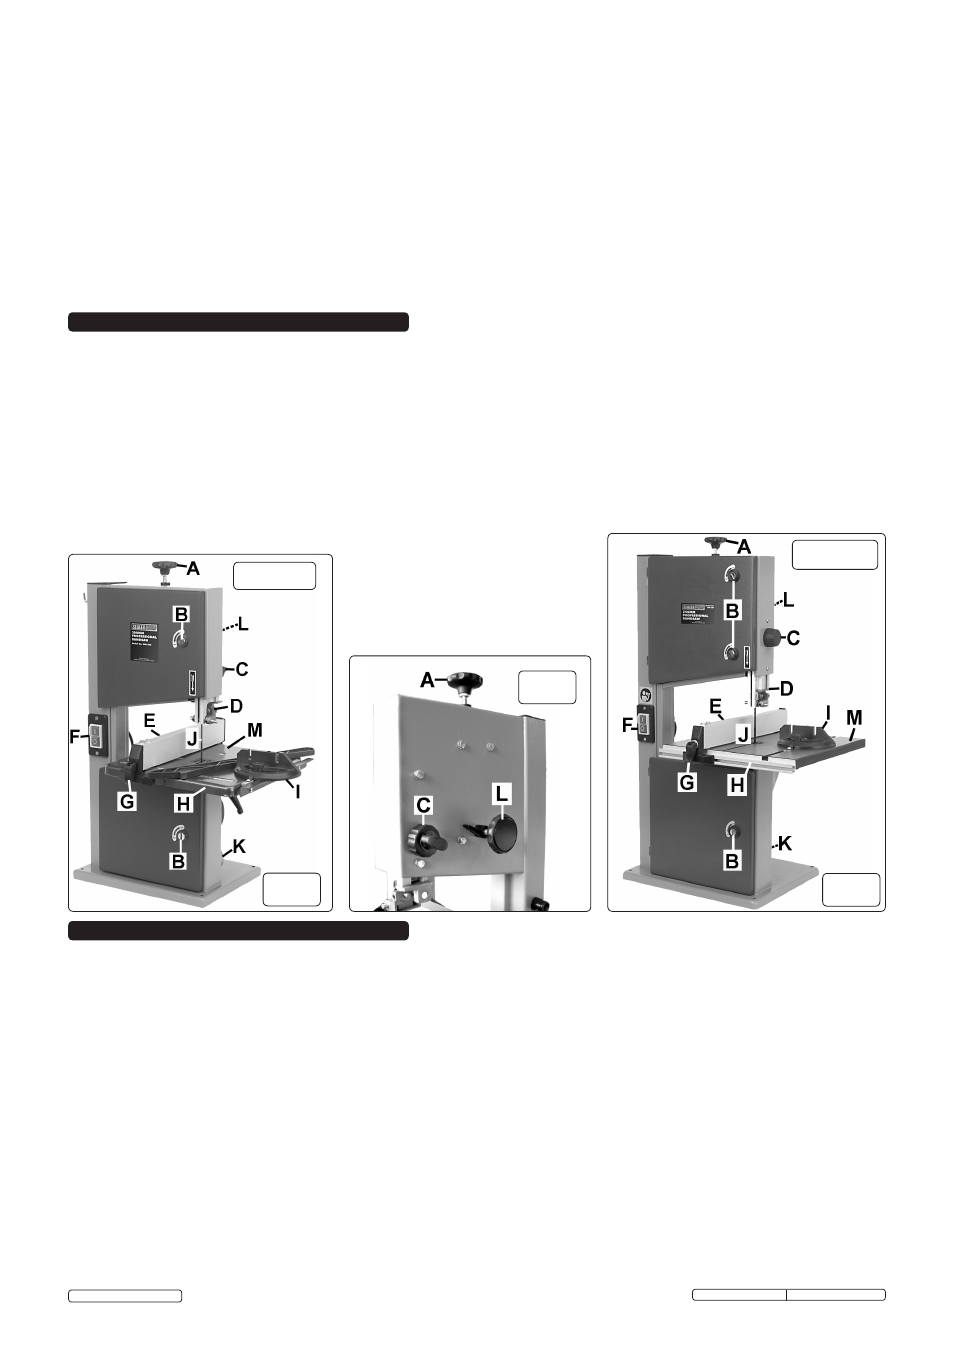
MAIN FEATURES
A
Blade tension adjustment knob
B
Blade cover lock
C
Blade guard height adjuster
D
Blade guard
E Fence
F
No Volt On/Off switch
G
Fence lock handle
H
Table side guide
I
Mitre guide
J
Saw Blade
K
Extraction outlet
L
Tracking adjustment knob
M
Worktable
SM1304
fig.1
fig.3
fig.2
SM1303
Original Language Version
SM1303, SM1304 Issue: 6(S) - 03/11/14
© Jack Sealey Limited