Introduction, Attachments 5. assembly – Sealey RE83/10 User Manual
Page 2
3. INTRODUCTION
Kit features snap-together pipe work for speed and threaded attachments for strength. Connecting parts are zinc or cad plated for long, rust-
free life. Components are manufactured from high quality steel and finished with red supergloss paint.
IMPORTANT:
Only fully trained and qualified persons should use this equipment. It is very important that the user understands the applications, limitations
and specific hazards of the product.
VEHICLE DAMAGE INTRODUCTION
Before using the repair kit, you must determine the extent of vehicle damage. The technician will check all parts and determine if there is any
broken, torn, crumpled, wrinkled, crushed, twisted or bent metallic parts. Measurements should be taken to see how far out of alignment the
vehicle may be. It is important to determine correct dimensions by referring to the manufacturer’s frame dimension charts and specifications.
Remember, do not commence pushing until you are sure when to stop. Take time to examine and determine damage correctly.
Comprehensive planning will save you time when you are actually using this equipment.
4.1
Hydraulic Ram
(Item 41) For use in large spaces and where a large amount of force is required. Comes with several attachments.
4.2
Extension Bars
(Items A2, A3, A4, A5) Plug into the hydraulic ram in different combinations in order to obtain the required length.
4.3
Serrated Saddle
(Item 7) Typically used on the pushing end in frame repair. Can be attached to either end of the hydraulic ram or extension bars.
4.4
Rubber Head
(Item 12) This is used for popping dents out of doors and/or body panels. Can be attached to either end of the hydraulic ram or
extension bars.
4.5
Flat Base
(Item13) This is used on the stationary side to spread the force of the hydraulic ram. Can be attached to either end of the hydraulic
ram or extension bars.
4.6
Spreader Ram Toe and Spreader Plunger Toe
(Items 14, 15) Typically used for straightening the edges of metal e.g. bumpers. Can be attached to either end of the hydraulic ram or
extension bars.
4.7
90º V Base
(Item 17) This is used to offset the force of the hydraulic ram when there is no straight line between the stationary and damaged sides.
Can be attached to either end of the hydraulic ram or extension bars.
4.8
Spreading Ram
(Item 11) This is used to repair minor dents and damage located in angles and tight spaces. Attaches directly to the pump unit.
4.9
Male Connector
(Item 8) This is used with the extension bars and other attachments that may be connected to the hydraulic ram. Plugs into the female
end of the hydraulic ram.
When positioning the hydraulic ram, it is necessary wherever possible to use a smaller attachment on the side that is to be bent/reshaped.
To further reduce the danger of the stationary side being damaged, place a block of wood or other suitable material (e.g. dense rubber)
behind the base plate, in order to cushion the stationary side and spread the pressure exerted by the hydraulic ram.
4. ATTACHMENTS
5. ASSEMBLY
5.1
Unscrew the end plugs from the hose and hydraulic ram. Retain end caps for use when storing the kit.
5.2
Screw the hose into the hydraulic ram. Ensure the hose is secure but DO NOT overtighten.
5.3
Fit the pump handle to the pump unit - DO NOT overtighten.
To provide maximum versatility a combination of pump accessories may be used.
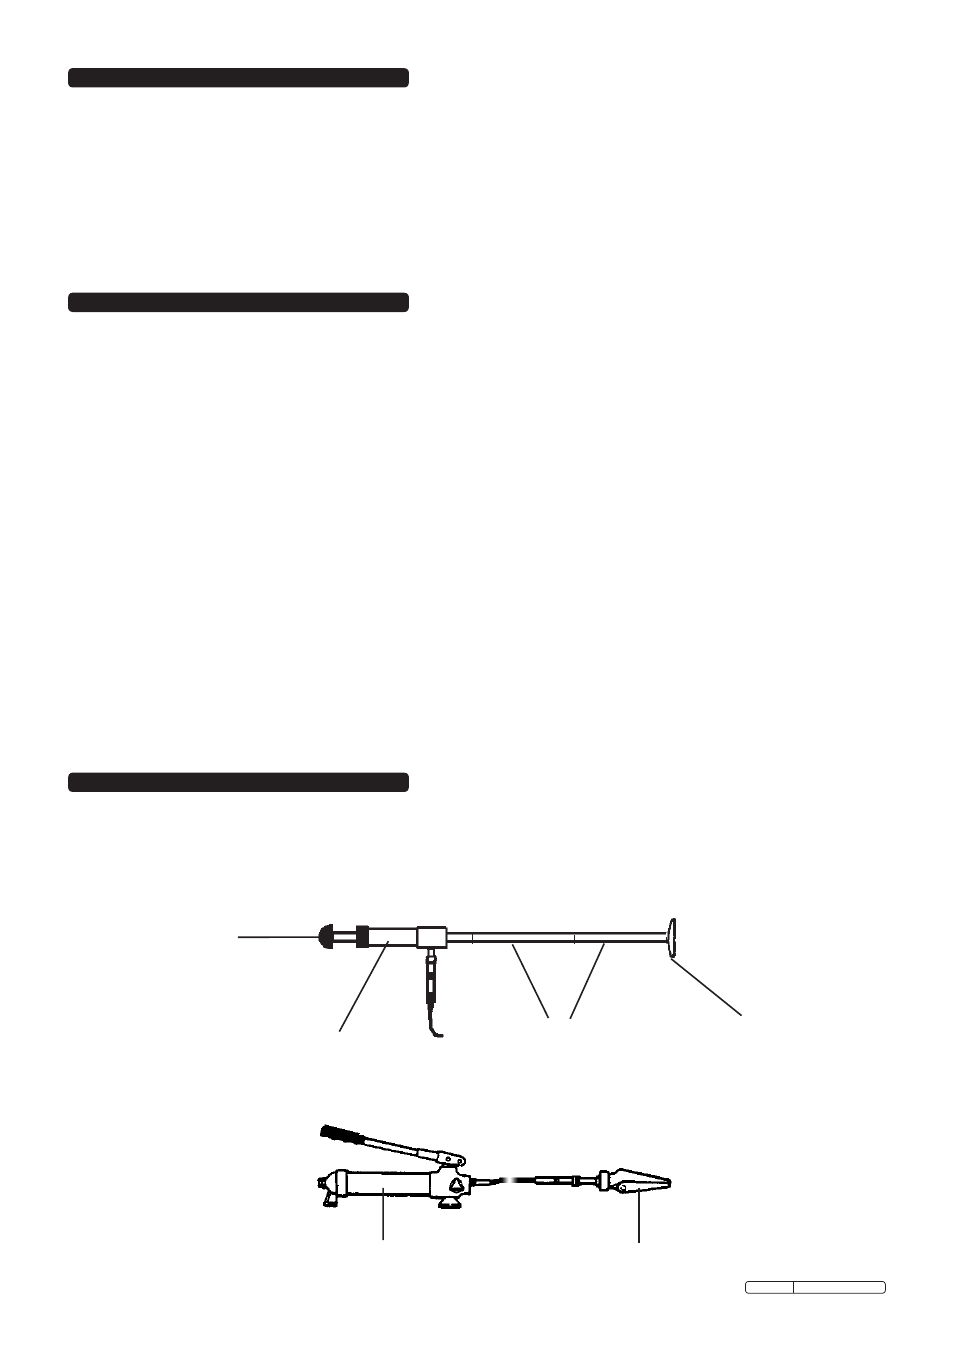
5.4
To use the rubber head, base plate and extension bars with the hydraulic ram, see fig 1.
Base plate
Extension bars
Hydraulic ram
Rubber head
fig 1
5.5
In order to attach the spreader ram, see fig 2.
Spreader ram
Pump unit
fig 2
Original Language Version
RE83/10 Issue: 6 - 02/02/10