Fig.1, Specification, Preparation – Sealey AB9001 User Manual
Page 2: Operation
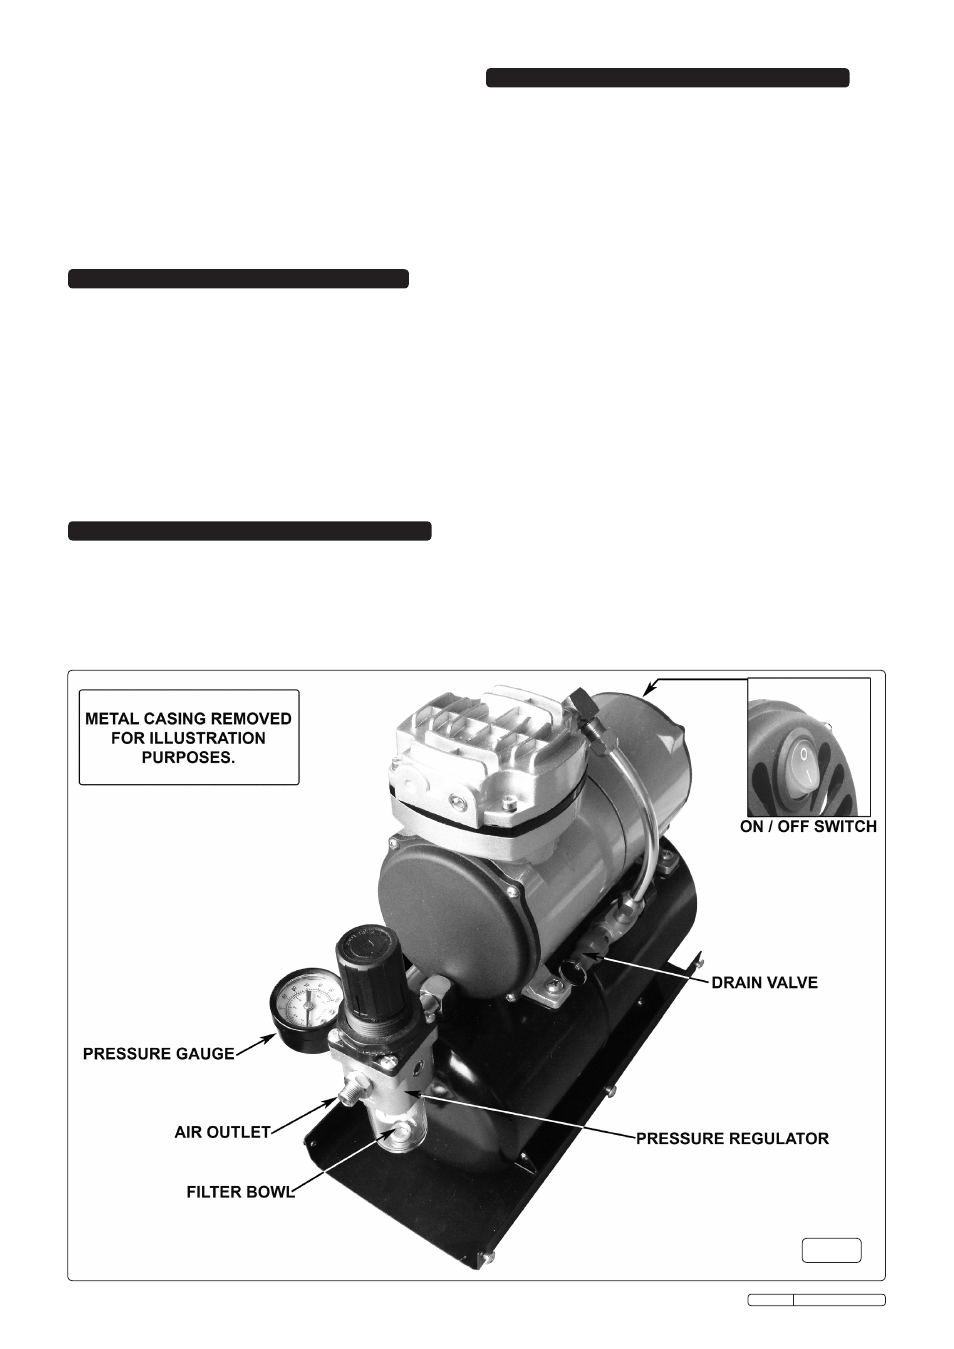
2. SPECIFICATION
Quiet running piston pump compressor, powered by a 125Watt
electric motor with an air filter regulator and pressure gauge.
Features a 3ltr reservoir for building up air prior to use.
Supplied in a metal casing for added protection. Fitted with
anti-vibration feet, two air brush holders and carry handle.
Requires no lubrication and the air supply from the unit is oil
free.
2.1. SPECIFICATION
MODEL NO. AB9001
Motor power .....................................................................125W
Input .......................................................................... 230V - 1A
Free Air Delivery: ........................................................... 0.8cfm
Air pressure .......................................................................50psi
Air outlet size ...............................................................1/8”BSP
3. PREPARATION
WARNING! If an electrical fuse blows, ensure it is
replaced with an identical fuse type and rating.
DO NOT eat or smoke whilst spraying.
DO NOT spray near naked flames.
DO NOT leave the compressor running unattended.
DO NOT operate the compressor whilst under the influence of
drugs, alcohol or other intoxicating medication.
DO NOT carry the compressor while operating the air brush.
DO NOT cover the compressor or restrict air flow around the
machine whilst operating.
DO NOT allow anyone to operate the compressor unless they
have received full instructions.
3.1. Remove compressor from packaging and inspect for any
damage. If anything is found to be missing or damaged
contact your supplier.
3.2. Confirm that the mains voltage corresponds with the voltage
shown on the compressor specification.
3.3. The compressor should be operated in a position that allows
good air circulation around the unit.
4. OPERATION
Original Language Version
AB9001 Issue: 1 - 14/07/11
WARNING! Ensure that you have read, understood and
apply Section 1 safety instructions.
4.1. Situate the compressor in a convenient position for the air
brush work to be undertaken. Ensure that it is resting on a
stable and level surface that will not be affected by the minor
vibration of the unit. Do not rest the compressor on sheets of
paper or card etc. Ensure the rubber feet are in direct contact
with the work surface.
4.2. Do not operate the compressor in an enclosed space and
ensure that there is adequate air space around the unit.
4.3. Attach the air brush hose to the 1/8" BSP air outlet.
4.4. Plug the mains lead into a convenient socket but do not
switch on until you have fully prepared the medium to be
sprayed, the air brush and the item/surface to be sprayed.
4.5. Switch on the unit. The compressor will provide a constant air
flow to the air brush. The compressor motor will cut-in and out
automatically to maintain the required pressure as determined
by the user setting on the regulator.
4.6. Refer to the air brush instructions for the correct operating
pressure. To adjust the pressure, first pull up the regulator
knob to unlock it. To increase the pressure, turn the knob
clockwise. To decrease the pressure, turn the knob
anti-clockwise. Monitor the result on the pressure gauge.
When correct pressure has been obtained, push down the
regulator knob to lock it.
4.7. Refer to the manufacturers instructions with your air brush for
the correct spraying technique. Do not leave the compressor
running for any length of time with the air brush attached but
not being used. If there is a pause in your work switch the
compressor off.
4.8. If the operating note of the compressor changes, there may
be a blockage within the air brush or the air hose may be
pinched. The unit should be switched off immediately and the
source of the blockage investigated and eliminated.
4.9. When the task is complete use the compressor to blow a
suitable cleaning solvent through your air brush.
4.10. Switch the unit off. Operate the air brush to relieve any
fig.1