Fig.1 fig.2 fig.3, Operation, Maintenance – Sealey SA316 User Manual
Page 2
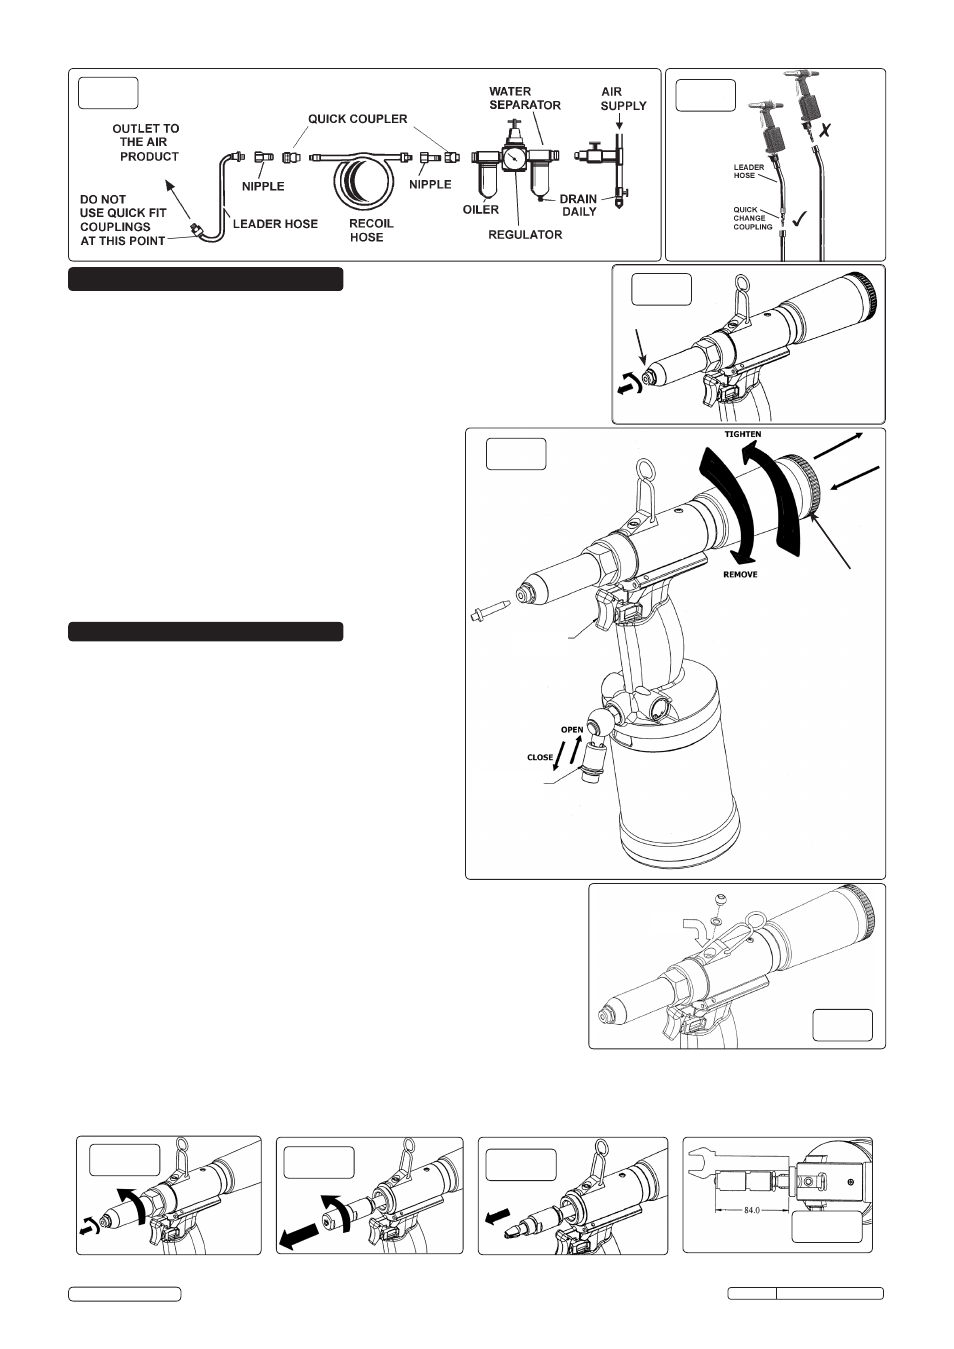
5. OPERATION
WARNING! Ensure that you have read, understood and apply the safety
instructions. This tool is designed for rivetting metal, primarily in
workshops and garages. We do not recommend any other use.
5.1.
Fitting the Desired Nozzle.
5.1.1. Fit the supplied spanner over the nozzle and turn it anti-clockwise to
remove it (Fig.3).
5.1.2. Fit the correct size nozzle for the rivet to be used and screw back into the
frame head and tighten with the spanner.
5.2. Operation.
5.2.1. Ensure the air valve is in the closed position (Fig.4) before
connecting the air supply.
5.2.2. Open the shut-off valve by sliding the knurled ring upwards
(Fig.4).
5.2.3. Place the desired size rivet into the nozzle, ensuring the
nozzle is the correct size for the rivet.
5.2.4. Insert the rivet into the workpiece as far as it will go and
squeeze the trigger. The rivet will be compressed and the
spent mandrel will be sucked into the spent mandrel bottle.
5.2.5. When the spent mandrel bottle is full, close the shut-off
valve, unscrew, empty and replace (Fig.4).
NOZZLE
6. MAINTENANCE
WARNING! Ensure you disconnect the tool from the air
supply system before attempting any service or
maintenance.
6.1.
Maintain the tool with care. Keep it oiled for optimum
performance.
6.2.
Lubricate the air tool daily with a high quality air tool oil,
(such as Sealey Part No. ATO/500 or ATO/1000).
6.3.
Add oil to the hydraulic systemo ccasionally.
6.3.1. Unscrew the oil tank plug (Fig.5) and fill with SAE 10 oil until
the oil level reaches the bottom of the plug hole. It is
recommended that the oil seal, part No: SA316.49 be
replaced during this procedure.
6.3.2. Re-fit the oil plug screw.
6.4.
Eventually the jaws will wear and require replacement.
6.4.1. Remove the nozzle and frame head (Fig.6) using the
supplied spanners.
6.4.2. Undo and remove the jaw housing from the jaw housing coupler (Fig.7).
6.4.3. Withdraw the jaws and replace with a new set. If the jaw pusher and
spring fall out, put the spring back first and then the jaw pusher
followed by the jaws. For a further reference consult the parts diagram
at the back of this manual for correct part orientation.
6.4.4. Fit the frame head and tighten.
6.4.5. When the jaws are replaced check that the jaw distance from the main
body is 84mm using the guide on the spanner as shown in Fig.9.
6.5.
Factors that may inhibit performance:
Loss of power or erratic action may be caused by reduced
Fig.1
Fig.2
Fig.3
compressor output, an excessive drain on the air line, moisture or restrictions in air pipes or the use of hose connections of improper
size. Grit or gum deposits in the tool may cut power and can be corrected by cleaning the air strainer and flushing out the tool with
gum solvent oil or an equivalent de-greaser. If all outside conditions are in order, disconnect the tool from the air supply, disassemble
and replace any worn or damaged parts with Sealey original parts. Clean all parts, reassemble the tool and lubricate.
6.6. Store the tool in a safe, dry, secure environment.
SPENT MANDREL
BOTTLE
TRIGGER
SHUT-OFF
VALVE
Original Language Version
SA316.V2 Issue:3(L) - 12/02/15
Oil
© Jack Sealey Limited
Fig.4
Fig.5
Fig.6
Fig.7
Fig.8
Fig.9