Lens replacement and installation procedure – Eiki LC-XT9 User Manual
Page 58
- 2 -
E
NOTE : The installation procedure and needed parts
for lens installation depend on the type of the
Projection Lens. Check the Model No. of the
Projection Lens and be sure to install or replace the
lens following procedure below.
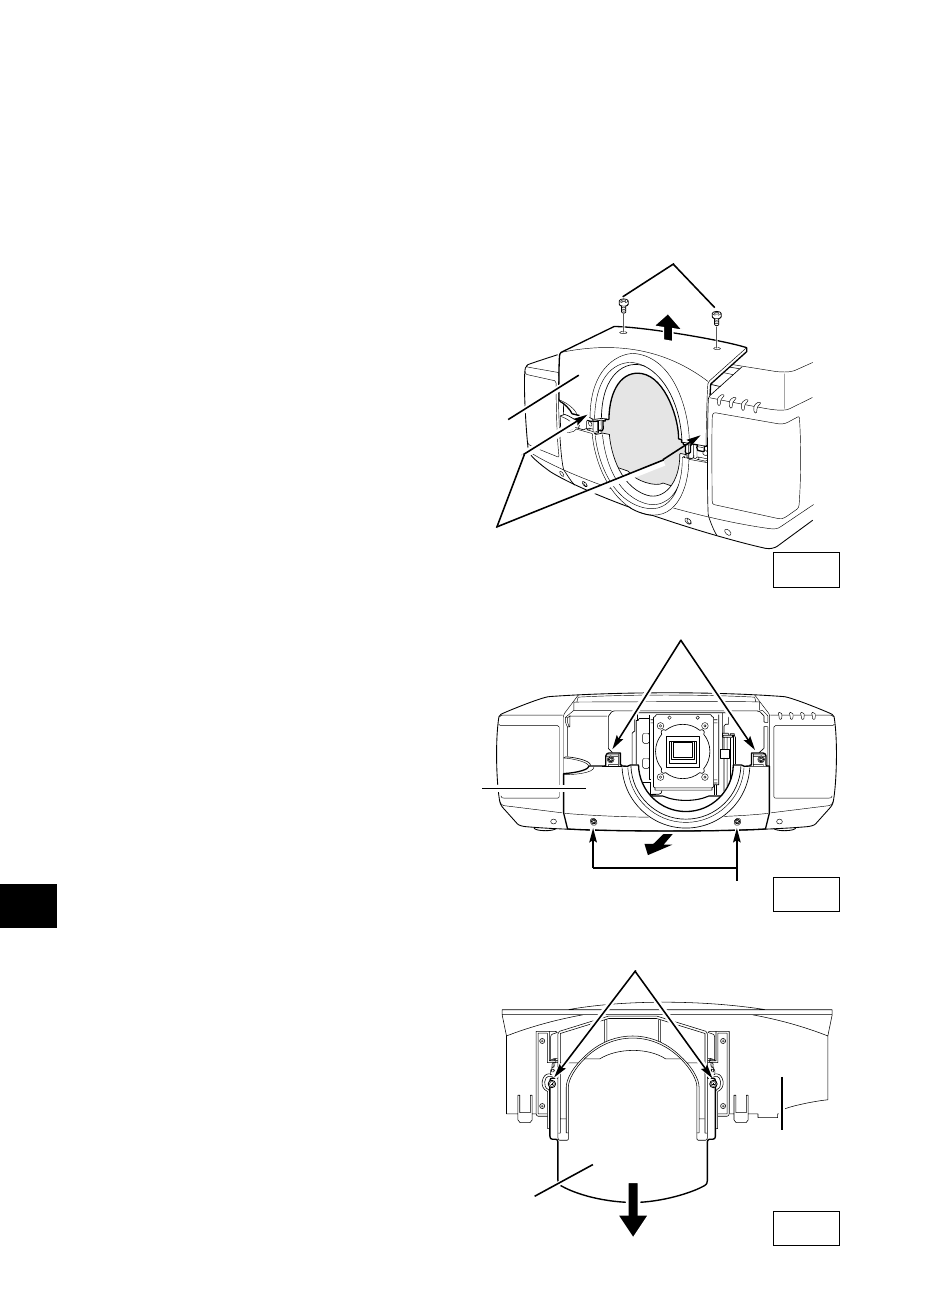
1
Remove Lens Cover. Remove 2 Screws A. Push
part B and pull Upper Lens Cover up.
(See Fig. 1.)
2
Remove 4 Screws C. Pull Lower Lens Cover
toward front and remove. (See Fig. 2.)
3
Remove 2 Screws D and Cover Plate on the
back of Upper Lens Cover. (See Fig. 3.)
LENS REPLACEMENT AND INSTALLATION PROCEDURE
Fig-1
UPPER LENS
COVER
A
Fig-2
LOWER LENS
COVER
C
COVER PLATE
UPPER LENS
COVER
D
Fig-3
C
B
See also other documents in the category Eiki Projectors:
- LC-SX1U (1 page)
- LC-XNB4M (1 page)
- LC-XNB5M (1 page)
- AH-55301 (2 pages)
- Portable Visual Presenters V5300 (1 page)
- LC-HDT10 (52 pages)
- LC-XB31 (1 page)
- AH-51401 (2 pages)
- LC-XT3 (2 pages)
- OHP-3000M (1 page)
- LC-XG250 (1 page)
- LC-SD10 (1 page)
- LC-XNB5MS (1 page)
- EIP-1600T (69 pages)
- LC-X1 (1 page)
- LC-XB10 (48 pages)
- EZ 250 (30 pages)
- LC-NB4 (48 pages)
- LC-X990 (54 pages)
- LC-XE10 (60 pages)
- LC-SVGA860 (1 page)
- LC-X1100 (1 page)
- LC-X71 LC-X71L (107 pages)
- LC-XM4 (1 page)
- EIP-3500 (2 pages)
- LC-XB20 (2 pages)
- LC-W3 (60 pages)
- EIP-X350 (35 pages)
- LC-X2U (58 pages)
- SXGA Powerhouse Two Series LC-SX2U (1 page)
- LC-NB3S (1 page)
- LC-XB25 (1 page)
- EIP-1000T (1 page)
- LC-XGA970UE (1 page)
- LC-X4LA (1 page)
- LC-SX4LA (1 page)
- 3850A (1 page)
- EIP-200 (68 pages)
- QXXAVC922---P (144 pages)
- LC-SM3 (44 pages)
- LC-SB22 (64 pages)
- EIP-1 (31 pages)
- LC-X2UL (1 page)
- AH-45601 (2 pages)