Crivit Bottom/Feeder Fishing Reel Combo 300-6 User Manual
Page 14
water and dirt from it. When pushing the
telescopic components together, do it in
reverse order, starting at the handle and
working towards the tip. Never use force.
Loosen the telescopic components from
ach other by twisting, and then telescope
them. Never bang them together. Now
carefully attach the ring protection cap.
b) Plug rods
Clean the water and dirt from the rod.
Never use force when disassembling the
rod. Loosen the components by simulta-
neously twisting them and pulling them
apart.
Surface of the rod ring inserts
If these surfaces are damaged, it is
absolutely necessary to replace them.
There is an increased risk of damaging or
breaking the line and of losing the catch.
Never expose the equipment to extreme
weather conditions (e.g. heat, cold, humid-
ity, etc) for a long period of time.
Reel assembly
All reels are supplied with an applied bail
arm and a closed knurled thumb screw
(transport lock). For fishing, loosen the
knurled thumb screw opposite the hous-
ing. Then open the crank arm and fasten it
on the spool axis using the knurled thumb
screw.
Conversion of the reel for left or
right handed people
Remove the knurled thumb screw at the
opposite side of the crank. Pull the crank
out of the reel and re-insert it from the
other side. Re-attach the knurled thumb
screw to the crank end.
Never use force to open or close the crank
arm. This will damage the reel and the reel
housing.
Note:
Reels with an automatic folding hinged
crank will lock in place automatically when
opening or closing them.
Reel attachment at the rod
Please observe the following diagrams.
Ensure that the reel moves freely.
Safety Notes & Legal
Information
Using fishing rods, especially graphite
rods, during a thunderstorm increases
the risk of being struck by lightning.
As a rule of thumb, the longer the rod,
the greater the danger.
When handling the rod, and particular-
ly when casting the bait, watch out for
power lines. Touching or coming close
to a power line increases the risk of an
accident. Wet fishing lines may conduct
electricity!
Before casting, ensure that you will not
injure anyone who might be behind
you. Ensure that you have enough
space.
Keep hooks and small parts out of the
reach of children and animals. Danger
of swallowing.
For your own safety, always wear a fis-
hing hat and eye protection when fis-
hing.
Avoid chemicals, e.g. sun cream or
insect repellent, coming into contact
with your fishing equipment, as they
could damage the rod and the line.
Observe the current fishing regulations.
Always take all the necessary docu-
ments (fishing licence, fishing permit,
etc).
Observe the closed seasons, size limits
and other restrictions regarding envi-
ronmental and species protection.
TIP
The day before you go fishing, check
your fishing equipment and accesso-
ries.
Thank you for reading these instruc-
tions.
Happy fishing!
FANTASTIC FOR FISHING
Schöne Aussicht 5c
D-51381 Leverkusen
Hotline:
Mail: [email protected]
© by HOSPO – Hobby-Sport-Verlag
D-51674 Wiehl
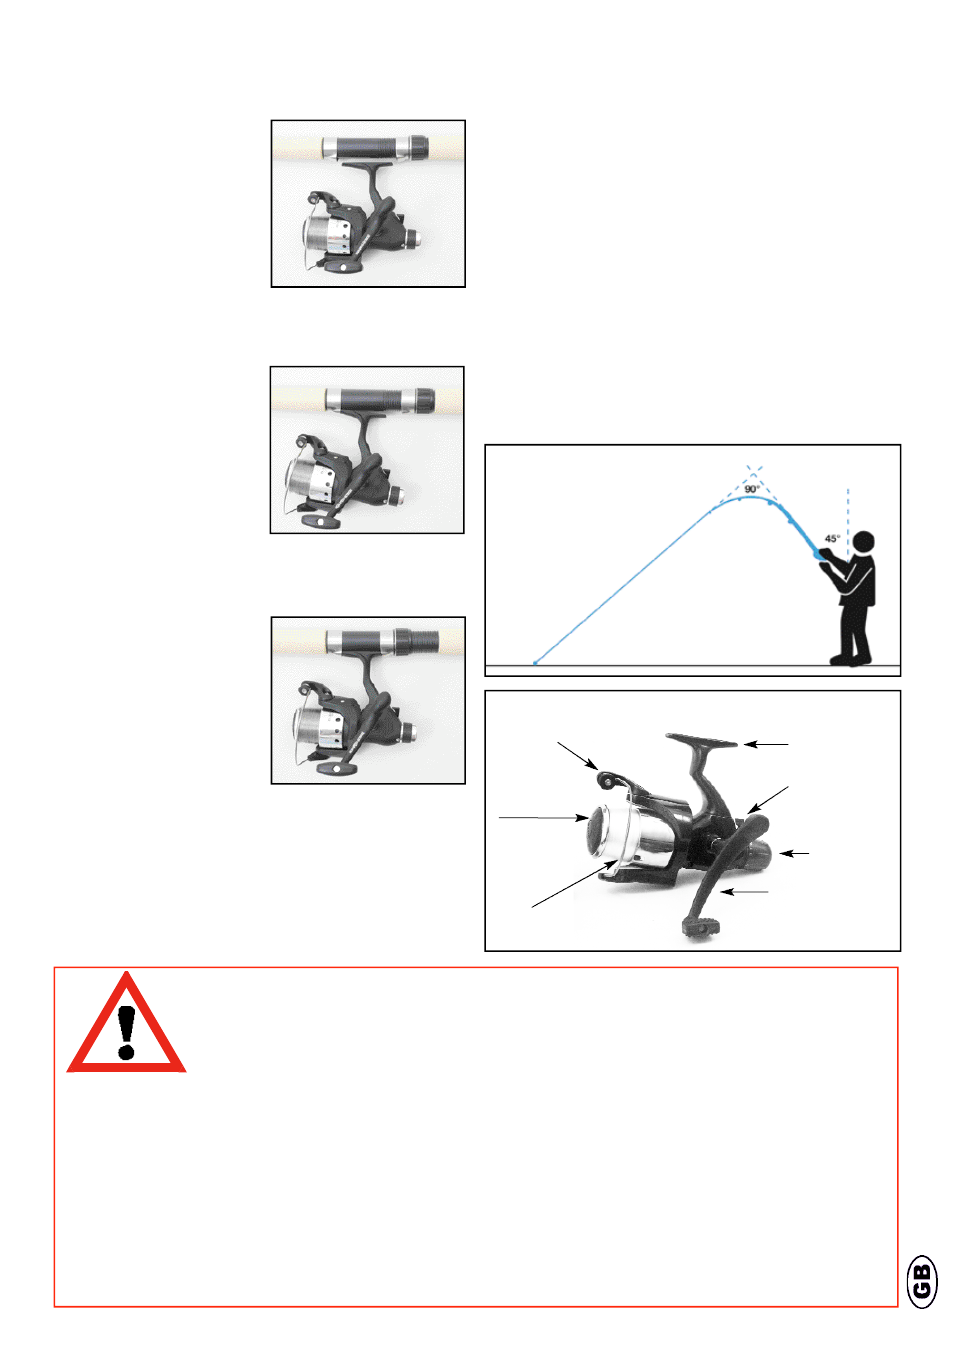
1. Open the reel holder so that there is
enough space for the reel foot.
Setting the reel drake
Stationary reels have either a head drake
or a rear drake.
If set correctly, the brake stops the line or
the rod breaking. The drake setting should
be about half the line force or the rod’s
holding force. Thread the line through all
the rings and fasten it behind them. Hold
the rod at a 45º angle to your upright body.
Reel the line in until it is taut and the rod
bends up to 90º. Only when in this position
should the bending of the rod slowly
release the line from the drake. Set the
drake by fastening or loosening it until this
is achieved (Fig. 2).
Checks
Check your rods regularly for correct posi-
tioning of the connections. Damage to the
connections or incorrect positioning may
cause breakage. The assembly of the reel
at the reel holder must also be checked. If
it is too loose, the reel foot may break or
the reel holder be damaged.
Clean the reel after each use with clean
water. Use lubricant to maintain the mov-
ing parts, but ensure that the lubricant or
moving parts do not touch the line, as this
reduces the line’s load bearing capacity.
2. Insert the front reel foot inot the fixed
reel seat, up to the stop.
Fig.: 2
Reel foot
Back drake
Anti-reversing device
Crank
Line roller
Spool interlock
(+ front drake –
in reels without
back drake)
Bail arm
3. To connect the reel to the rod, screw in
the locking nut of the variable reel seat.
To loosen the rod and the reel, follow the
steps in reverse order.