Mi-rods/reels-gb, Rod and reel assembly / handling – Crivit Bottom/Feeder Fishing Reel Combo 300-6 User Manual
Page 13
Equipment
All telescopic rods are provided with ring
protection caps. After use, this cap must
be re-assembled for transport.
Preparation and assembly of the
rod
a) Telescopic rods
Always pull apart telescopic rods starting
at the tip. Never let the rod components
‘shoot’ into one another. When assem-
bling the rod, always observe the exact
ring alignment. The components must be
pulled far enough apart that the rod does-
n’t clatter when swinging. Some telescop-
ic rods are provided with extra sliding
rings that must be slid on and fixed in the
ring alignment particularly carefully.
b) Plug rods
Plug rods must be fitted together firmly
enough that the rod doesn’t clatter when
swinging (observe ring alignment).
Warning: Incorrect assembly may cause
breakage!
Threading the line
Starting at the reel, lead the line through
all rod rings.
Casting weight / CW
Casting weight is always the maximum
value. These maximum values should
only be used by very experienced fisher-
men, using a slower casting procedure.
The perfect casting weight depends on
the kind of fishing, the line strength, the
rod’s action, the casting method and the
casting distance. If these characteristics
differ much from each other, the rod may
be damaged very quickly.
Casting
During casting, the hand grasps the rod at
the level of the reel foot. When doing so,
the reel foot is between the middle and the
ring finger. The index finger takes the line
from the reel and holds it while the line is
still held by the bail arm. The bail arm is
then thrown. For casting, position yourself
in front of the place you are aiming for and
hold the rod backwards, over the head.
When it has stopped oscillating, cast the
rod forwards with a strong motion. If the
rod tip points at the place you are aiming
for, release the line, and the bait flies
towards its destination.
When casting, always move smoothly.
Casting jerkily may damage the rod.
After casting, the bail arm can be closed
manually or by turning the crank once
anticlockwise.
Continue turning the crank to reel the line
in again.
Loosening the hook or line
While fishing, it is inevitable that the hook
or line will get stuck at some point. Don’t
try to free it by pulling on the rod.
Warning: Serious danger of break-
age!
Free the stuck hook/line using the protect-
ed hand. To increase your chances of suc-
cess, try changing location.
Setting the lift
SELECTION rods allow a quick and con-
trolled setting of the lift. The force of the lift
will depend on the size of the bait, the
strength and type of the leader/line, and
the distance to the fish. As a guideline: for
small baits, thin lines/leaders, and a short
distance – you will need a weak, light,
short lift. For large baits, strong lines/lead-
ers, and a long distance – you will need a
stronger, longer, more vigorous lift.
A t t e n t i o n : When using special
i n e s, s u ch as Dyneema, c o at
l i n e s, soft monofil lines, e t c,
please observe the manufactur-
er’s instructions in order to min-
imise the risk of breakage.
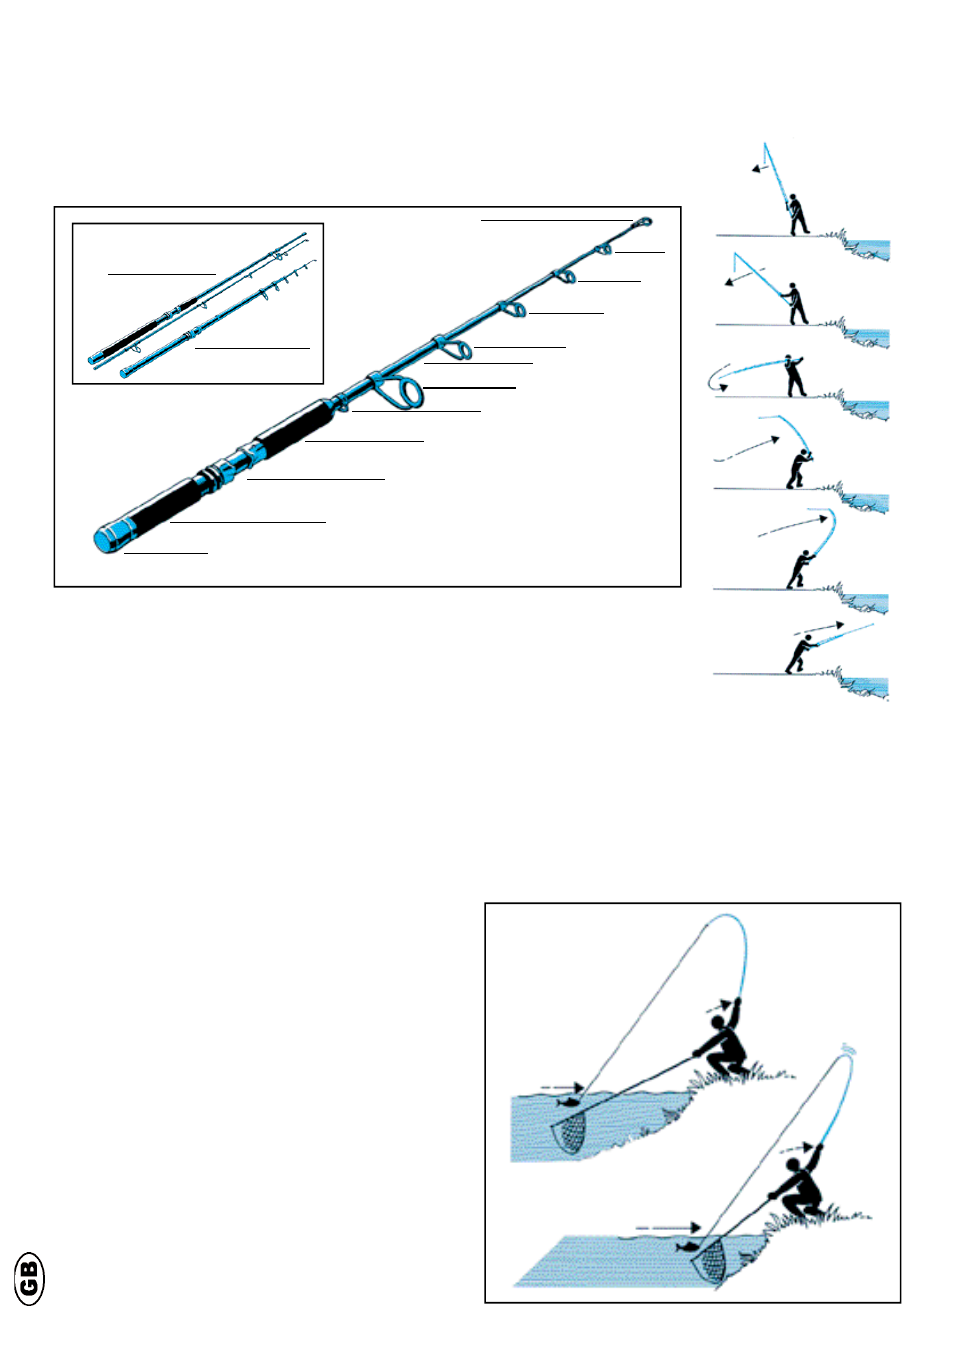
Landing
The greatest load on the rod and the line
occurs when landing the fish. If the rod is
pulled too far upwards and backwards, it
will break (Fig. 1).
This is also the most common cause of
breakages in the tip area, down to the sec-
ond and third ring. These breakages are
not covered by the guarantee. T h i s
includes all breakages between the tip
ring and the next fixed ring.
Rod disassembly
a) Telescopic rods
Before telescoping the rod, clean the
End cap
Reel holder
Hook holder
Leading ring
Rod blank
Guide ring
Handle
Handle
Tip / end ring
Guide ring
Guide ring
Guide ring
Rod and reel assembly / Handling
CORRECT
WRONG
Fig.: 1
Plug rod
Telescopic rod