Installation instructions. read me – Airaid 300-728 User Manual
Page 2
Installation Instructions. Read Me!
I
DISCONNECT NEGATIVE (-) BATTERY CABLE
Fig#3
Fig#4
II
Remove Factory Intake Assembly
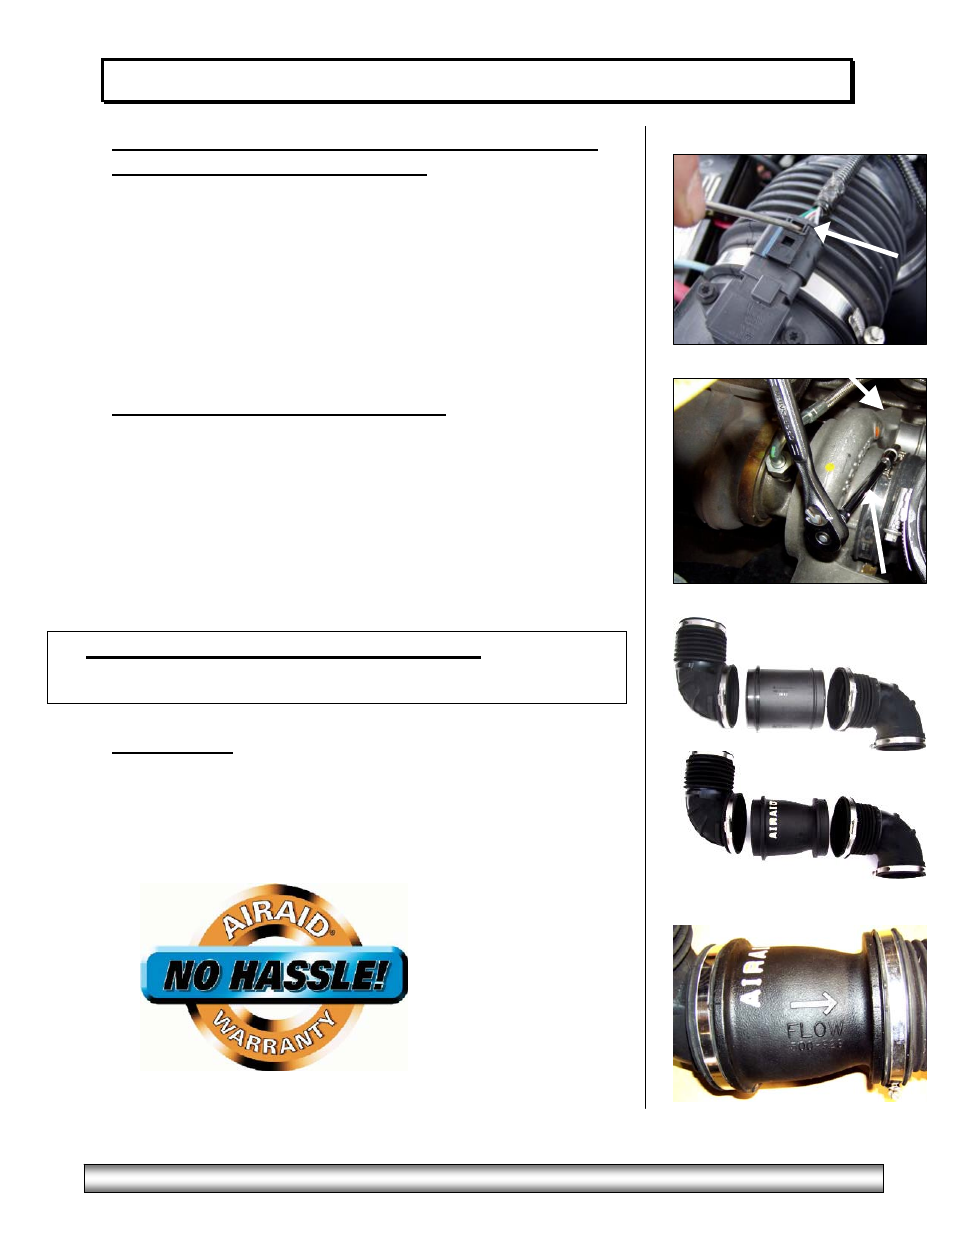
a) Remove the electrical connector by using a flat head screwdriver to
carefully push the retaining clip away from the intake sensor. See
Fig#1
b) Loosen the hose clamp on the bottom of the factory intake tube that
connects to the turbo housing. See Fig#2
c) Unclip the factory air box lid and remove entire filter/intake
assembly from vehicle. Refer to Fig#3
d) Loosen hose clamps on the factory intake assembly above and
below the factory silencer tube. Refer to Fig#3
III
Install Airaid Modular Intake Tube
a) Replace the factory silencer tube in the removed intake assembly
with the Airaid MIT using the stock hose clamps. See Fig#3 (Note:
on each side of the MIT tube are notches that must be aligned with
the notches on the stock connector tubes. Also, the flow arrow
must point down toward the turbo housing). See Fig#4
b) Install complete intake assembly onto turbo charger using the stock
hose clamps.
c) Replace the air filter box lid and re-clamp.
d) Re-connect intake sensor to the harness on the air filter box lid.
IV Airaid Jr. P/N 300-724 Replacement Filter
a
) If you purchased the Airaid Jr. kit P/N 300-724, replace the factory
air filter with the Airaid Premium Filter included in the Airaid Jr. kit.
IV
Finishing Up
a) Inspect overall work and be sure all clamps are securely fastened.
b) Check hood clearance.
c) Ensure that no foreign objects are in the intake path!
d) Re-connect negative battery cable.
Fig#1
Fig#2
Airaid Filter Co. 2688 E Rose Garden Ln. Phoenix AZ 85050 (800) 498-6951
www.airaid.com