Installation instructions. read me, Fig#1 fig#2, Fig#8 – Airaid 300-724 User Manual
Page 2
Installation Instructions. Read Me!
I
DISCONNECT NEGATIVE (-) BATTERY CABLE
II
Remove Factory Intake Assembly
a)
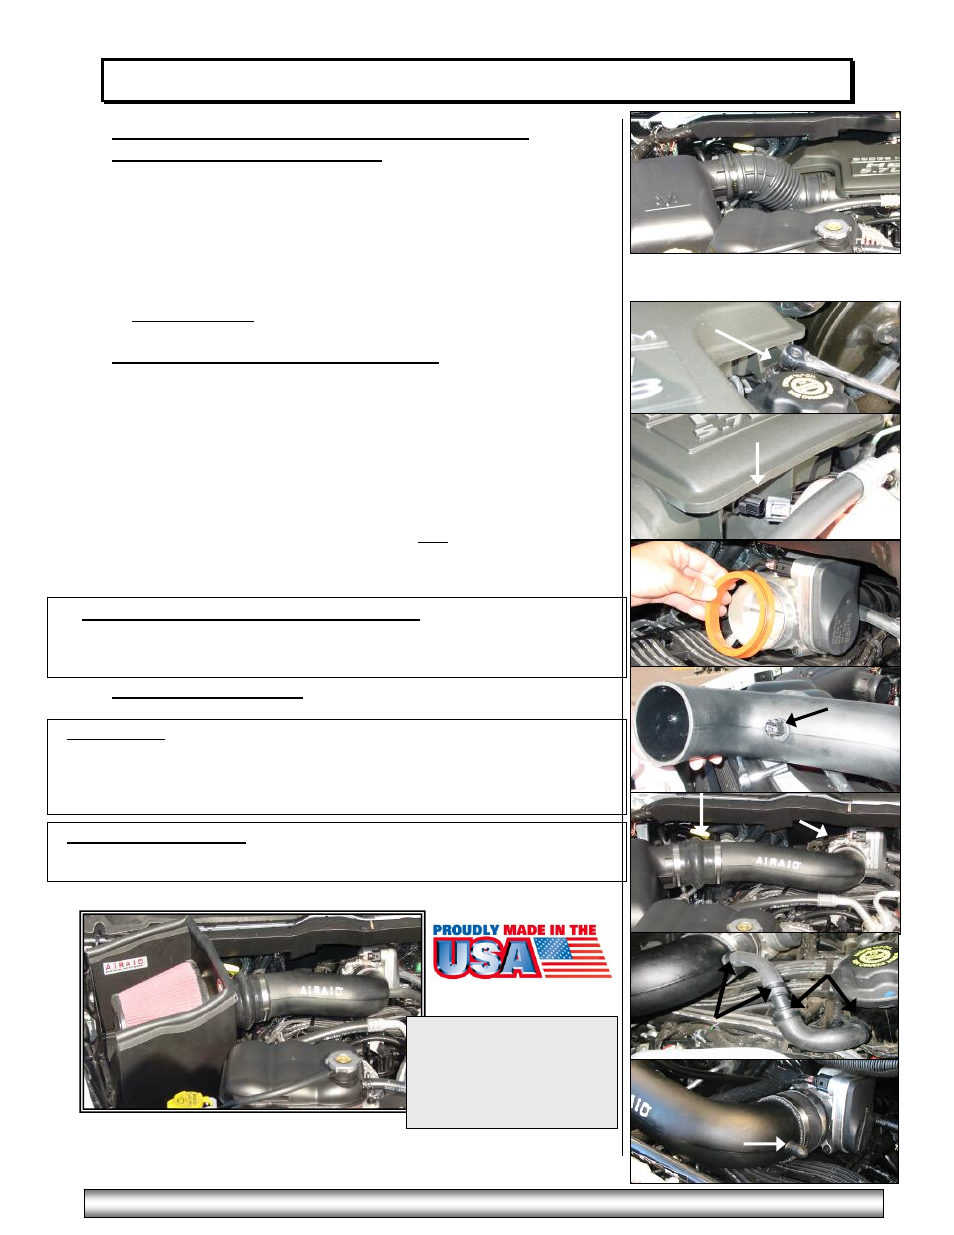
Remove the factory “accordion” style intake hose by loosening the two factory
clamps. See Fig#1
b)
Loosen the two 10mm bolts securing the factory air box to the intake manifold.
See Fig#2
c)
Disconnect the air temperature sensor wire on the front of the factory air box.
d)
Remove air temperature sensor from air box by rotating counter clockwise. See
FIG#3
e)
Disconnect & remove the crankcase vent hose from the front of the factory air
box. (2003 models only)
f)
Remove the factory air box and rubber seal from throttle body. See FIG#
4
III
Airaid Modular Intake Tube Installation
a)
Install the rubber grommet into the hole on the front side of the Airaid tube &
insert the factory air temp sensor into grommet. See FIG#5
b)
Install the black hump hose on the long end of the Airaid tube and secure using
two of the # 60 hose clamps provided. Refer to FIG#6
c)
Slide the black coupler onto the throttle body and secure using the #60 hose clamp
provided. Refer to FIG#6
d)
Install the second #60 hose clamp on throttle body coupler. Leave clamp loose
until final assembly.
e)
Slide the Airaid tube with hump hose into the factory air filter assembly first, then
slide the other and into the throttle body coupler. (Note: The Airaid tube should
be flush against throttle body with a gap between the tube and air filter assembly
for engine movement.) Refer to FIG#6
f)
Adjust the Airaid tube, coupler, and hump hose and tighten all hose clamps.
IV Airaid Jr. P/N 300-724 Replacement Filter
a) If you purchased the Airaid Jr. kit P/N 300-724, replace the
factory air filter with the Airaid Premium Filter included in the
Airaid Jr. kit.
V
Re-Connect Accessories
a)
Re-connect air temperature sensor wire
.
2003 Models:
b)
Using the plastic barbed fitting and ½” hose provided, connect factory crankcase
vent hose to Airaid intake tube. See FIG#7
c)
Secure the ½” hose with (2) #16 black speed clamps provided. Secure factory
vent hose with (2) #22 black speed clamps provided. See FIG#7
2004 And Later Models:
d)
Slide the black rubber cap over the nipple near the throttle body end of the Airaid
MIT. See Fig#8
e)
Re-connect negative battery cable
.
FIG#1
FIG#2
FIG#4
FIG#3
FIG#5
FIG#6
FIG#7
FIG#7
An Airaid Cool Air Dam 300-
125-1 is also available for this
application up to 2005. 300-
190 2006 and later. Please see
your local dealer for details.
FIG#8
Airaid Filter Co. 2688 E Rose Garden Ln. Phoenix AZ 85050 (800) 498-6951
www.airaid.com
Rev. 05/07/08