Thinklogical Touch Panel Manual User Manual
Page 18
Revision B
JULY 2010
12
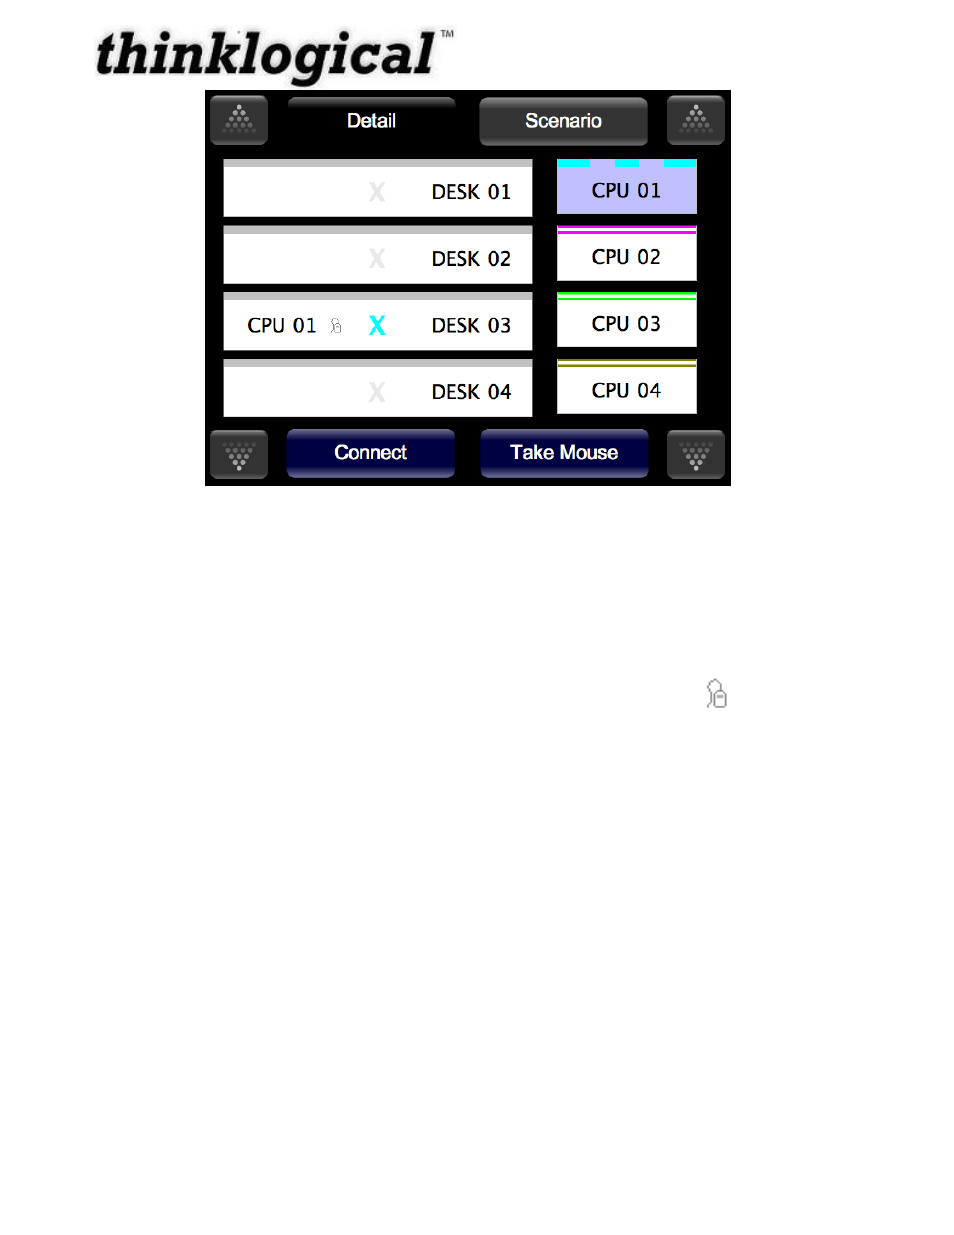
Figure 9: How to Break a Connection, Step 1.
Showing the Active backchannel on the Touch Panel
Unlike video connections, data connections are bidirectional, to and from a source computer.
Although there can be many connections from a source computer, there can only be one
connection to a source computer. This connection back to the source computer, called the
backchannel, allows a keyboard, mouse, and other devices to communicate with the source
computer. The GUI interface marks the backchannel by showing a Mouse icon to the right of
the source.
How to Move a Backchannel from a Data Port (Take the Mouse)
From the Detail screen, you can move the backchannel to another destination, also known as
„Take the Mouse‟. Figure 9 shows a source (CPU 01) connected to 2 destinations (DESK 03 and
DESK 04). DESK 03 has the backchannel to CPU 01. The backchannel is represented by the
mouse icon.
1. Click on a destination that already is connected but does not have the mouse (ex: DESK
04). The destination (DESK 04) will highlight.
- Camera Fiber-Link 5000 Quick Start Guide (1 page)
- Camera Fiber-Link 5000 Quick Start Guide (1 page)
- Camera Fiber-Link 6000 Quick Start Guide (1 page)
- DVI Splitter/Distribution Amp Single Link 1:2 Quick Start Guide (1 page)
- DVI Splitter/Distribution Amp Single Link 1:4 Quick Start Guide (1 page)
- DVI Splitter/Distribution Amp Dual Link 1:2 Quick Start Guide (1 page)
- VX320 Quick Start Guide (1 page)
- VX320 Velocitykvm-24 Velocitykvm-28 Quick Start Guide (1 page)
- VX320 Velocitykvm-24 Velocityrgb System-12 Quick Start Guide (1 page)
- Remote Power Distribution Unit Quick Start Guide (1 page)
- OriginKVM 8250 Quick Start Guide (1 page)
- RS232-422 Q-Series Extender Quick Start Guide (1 page)
- RX Display Text Overlay Quick Start Guide (1 page)
- SDIXtreme 3G Quick Start Guide (1 page)
- SDIXtreme 3G+ Single Model Quick Start Guide (1 page)
- SDIXtreme 3G+ Dual Model Quick Start Guide (1 page)
- Velocitydvi System-6 Quick Start Guide (1 page)
- Velocitydvi System-6 Quick Start Guide (1 page)
- Velocitydvi System-6 Quick Start Guide (1 page)
- SDIXtreme 3G+ Rack Model Quick Start Guide (1 page)
- Secure Console Server Quick Start Guide (1 page)
- USB 2.0 Extender Quick Start Guide (1 page)
- TRANSplex Quick Start Guide (1 page)
- Velocitydvi System-6 A/V+ Quick Start Guide (1 page)
- Velocitydvi System-6 A/V+ Quick Start Guide (1 page)
- Velocitydvi System-6 A/N+ Quick Start Guide (1 page)
- Velocitykvm-8 Quick Start Guide (1 page)
- Velocitykvm-8 Quick Start Guide (1 page)
- Velocitykvm-8 Quick Start Guide (2 pages)
- Velocitykvm-5 Single-mode Quick Start Guide (1 page)
- Velocitykvm-24 Quick Start Guide (1 page)
- Velocitykvm-28 Quick Start Guide (1 page)
- Velocitykvm-34 Quick Start Guide (1 page)
- Velocitykvm-35 Quick Start Guide (1 page)
- Velocitykvm-38 Quick Start Guide (1 page)
- Velocityrgb System-9 Quick Start Guide (1 page)
- Velocitykvm T-4200 Chassis Quick Start Guide (1 page)
- VX160 Velocitykvm-24 Velocityrgb System-9 Quick Start Guide (1 page)
- VX160 Velocitykvm-24 Velocityrgb System-9 Quick Start Guide (1 page)
- VX40 Velocitykvm-24 Velocitykvm-28 Quick Start Guide (1 page)
- VX40 Velocitydvi System-3 A/V+ Velocityrgb-9 Quick Start Guide (1 page)
- VX80 Velocitykvm-24 Separate Data Path Quick Start Guide (1 page)
- VX160 Velocitykvm-24 Velocityrgb System-9 Quick Start Guide (1 page)
- VX160 Velocitydvi System-3 A/V+ Velocityrgb System-9 Velocitykvm-34 Quick Start Guide (1 page)
- VX160 Router Used With the Q-4300 Quick Start Guide (1 page)