Using the touch panel, Detail screen – Thinklogical Touch Panel Manual User Manual
Page 14
Revision B
JULY 2010
8
The Touch Panel will blank its screen and reboot with new values.
If you are using the Remote Configuration method on multiple Touch Panels, watch to see which
panel blanks and reboots so you can tell which one
you‟ve just configured and label it with the
proper IP address.
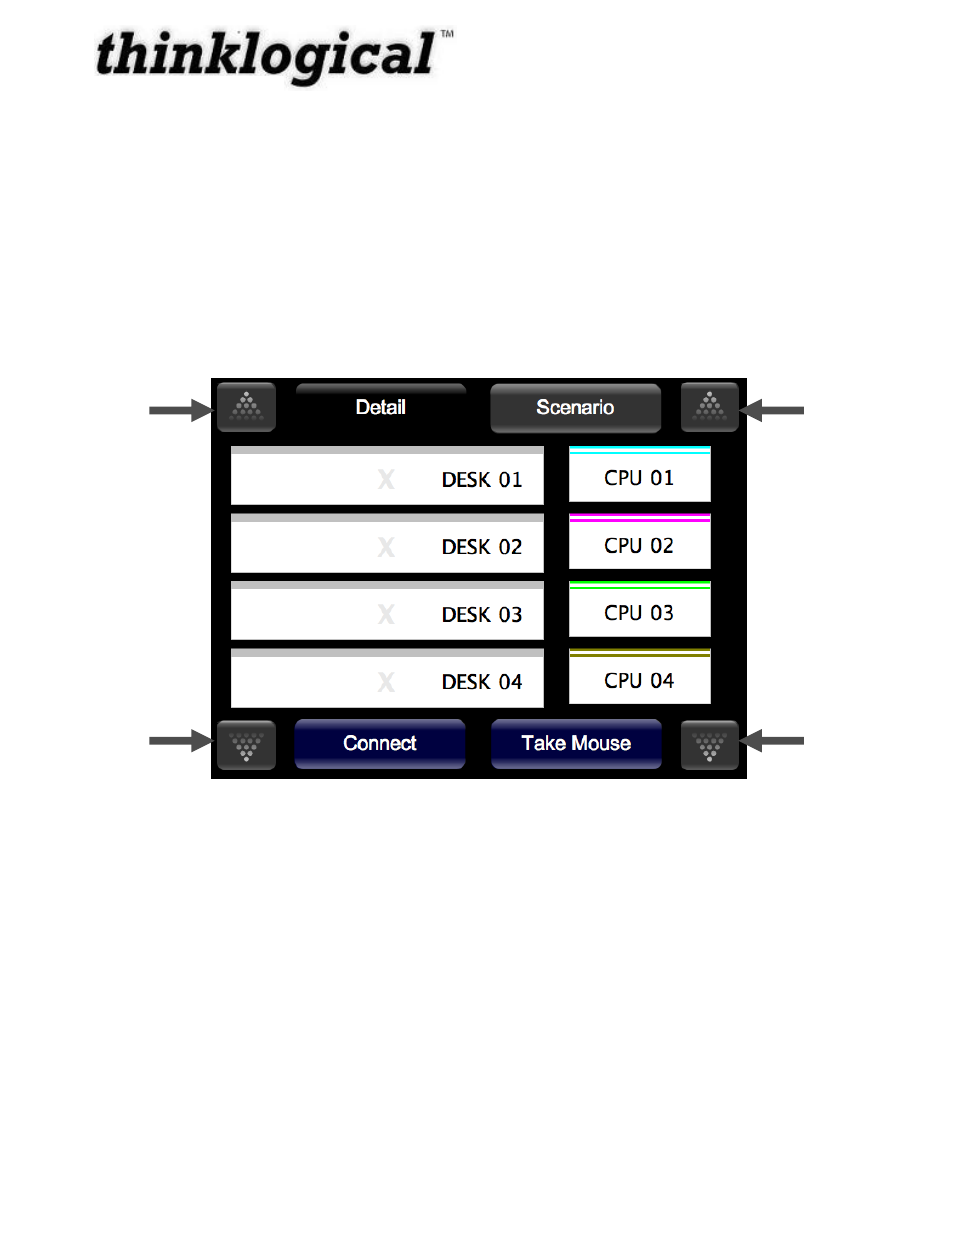
Using the Touch Panel
Detail Screen
The Touch Panel will load the operating system, start the GUI, and get the updates from the
server. The following screen should display the GUI:
Figure 4: Touch Panel displaying the GUI
The Touch Panel
starts up in “Detail” mode by default.
SOURCES are listed on the right (ex: CPU 01, CPU 02, CPU 03, CPU 04).
DESTINATIONS are listed on the left (ex: DESK 01, DESK 02, DESK 03, DESK 04).
The buttons shown at the bottom of the screen are command buttons which perform a task.
Connect will connect your destination to a source by pressing, where Take
Mouse will „take the
mouse‟ from all other connections and give it to the source/destination combination the user has
selected. You can also run Macros by clicking on the Macros button and then run the selected
Macro.
Page
Up
Page
Down
Page
Up
Page
Down
- Camera Fiber-Link 5000 Quick Start Guide (1 page)
- Camera Fiber-Link 5000 Quick Start Guide (1 page)
- Camera Fiber-Link 6000 Quick Start Guide (1 page)
- DVI Splitter/Distribution Amp Single Link 1:2 Quick Start Guide (1 page)
- DVI Splitter/Distribution Amp Single Link 1:4 Quick Start Guide (1 page)
- DVI Splitter/Distribution Amp Dual Link 1:2 Quick Start Guide (1 page)
- VX320 Quick Start Guide (1 page)
- VX320 Velocitykvm-24 Velocitykvm-28 Quick Start Guide (1 page)
- VX320 Velocitykvm-24 Velocityrgb System-12 Quick Start Guide (1 page)
- Remote Power Distribution Unit Quick Start Guide (1 page)
- OriginKVM 8250 Quick Start Guide (1 page)
- RS232-422 Q-Series Extender Quick Start Guide (1 page)
- RX Display Text Overlay Quick Start Guide (1 page)
- SDIXtreme 3G Quick Start Guide (1 page)
- SDIXtreme 3G+ Single Model Quick Start Guide (1 page)
- SDIXtreme 3G+ Dual Model Quick Start Guide (1 page)
- Velocitydvi System-6 Quick Start Guide (1 page)
- Velocitydvi System-6 Quick Start Guide (1 page)
- Velocitydvi System-6 Quick Start Guide (1 page)
- SDIXtreme 3G+ Rack Model Quick Start Guide (1 page)
- Secure Console Server Quick Start Guide (1 page)
- USB 2.0 Extender Quick Start Guide (1 page)
- TRANSplex Quick Start Guide (1 page)
- Velocitydvi System-6 A/V+ Quick Start Guide (1 page)
- Velocitydvi System-6 A/V+ Quick Start Guide (1 page)
- Velocitydvi System-6 A/N+ Quick Start Guide (1 page)
- Velocitykvm-8 Quick Start Guide (1 page)
- Velocitykvm-8 Quick Start Guide (1 page)
- Velocitykvm-8 Quick Start Guide (2 pages)
- Velocitykvm-5 Single-mode Quick Start Guide (1 page)
- Velocitykvm-24 Quick Start Guide (1 page)
- Velocitykvm-28 Quick Start Guide (1 page)
- Velocitykvm-34 Quick Start Guide (1 page)
- Velocitykvm-35 Quick Start Guide (1 page)
- Velocitykvm-38 Quick Start Guide (1 page)
- Velocityrgb System-9 Quick Start Guide (1 page)
- Velocitykvm T-4200 Chassis Quick Start Guide (1 page)
- VX160 Velocitykvm-24 Velocityrgb System-9 Quick Start Guide (1 page)
- VX160 Velocitykvm-24 Velocityrgb System-9 Quick Start Guide (1 page)
- VX40 Velocitykvm-24 Velocitykvm-28 Quick Start Guide (1 page)
- VX40 Velocitydvi System-3 A/V+ Velocityrgb-9 Quick Start Guide (1 page)
- VX80 Velocitykvm-24 Separate Data Path Quick Start Guide (1 page)
- VX160 Velocitykvm-24 Velocityrgb System-9 Quick Start Guide (1 page)
- VX160 Velocitydvi System-3 A/V+ Velocityrgb System-9 Velocitykvm-34 Quick Start Guide (1 page)
- VX160 Router Used With the Q-4300 Quick Start Guide (1 page)