Greenheck Vektor-MH, Vektor-MD, and Vektor-MS (464652) User Manual
Page 6
Bypass Air Plenum - Rigging,
Lifting and Installation
Prior to lifting any components, verify the weights on
the project submittal drawings for each component
or contact factory. Do not lift weights beyond the
capacities of the on-site lifting equipment. Proper
handling of the equipment is critical to avoid damage to
the unit.
Prior to setting the bypass air plenum (BAP), secure
1/4-inch thick by 3/4-inch wide EPDM gasket (provided)
around the perimeter of the roof curb top edge, if
mounting on a roof curb.
Bypass Air Plenum - Rigging and Lifting
Each section
will have four
(4) lifting points.
All lifting points
must be used
when lifting.
Spreader bars
of sufficient
length need to be used to
prevent damage to BAP walls and
components mounted to the BAP.
1. Always use all lifting lugs provided by
manufacturer. Lifting lugs are located around the
perimeter of each section.
2. A spreader bar must be used when lifting each
section to distribute the weight evenly and to
prevent the unit from being over-torqued. Avoid
unnecessary jarring or rough handling.
3. Care must be taken to keep the unit in the upright
position during rigging.
4. Care must be taken to not damage the watertight
seams in the unit casing.
5. Avoid damage to the curb and curb gasketing when
rigging onto a curb.
6. Only use trained professional riggers when moving
equipment.
Bypass Air Plenum Installation
Bypass air plenums (BAP) are delivered fully assembled
unless shipping restrictions require multiple sections.
If delivered in sections, all materials required to join
plenum sections together are provided.
Bypass air plenums are modular in construction and can
be disassembled to provide allowances for lower on-site
lifting capacities. Plenum sections are joined using
stainless steel fasteners. These are removed to separate
sections for lifting purposes. Save hardware as these
will be required to join the BAP sections together again.
If moving separate sections onto a roof curb or support
structure, each section should be joined to its mating
section after moving into position and before lifting any
additional section(s) into position.
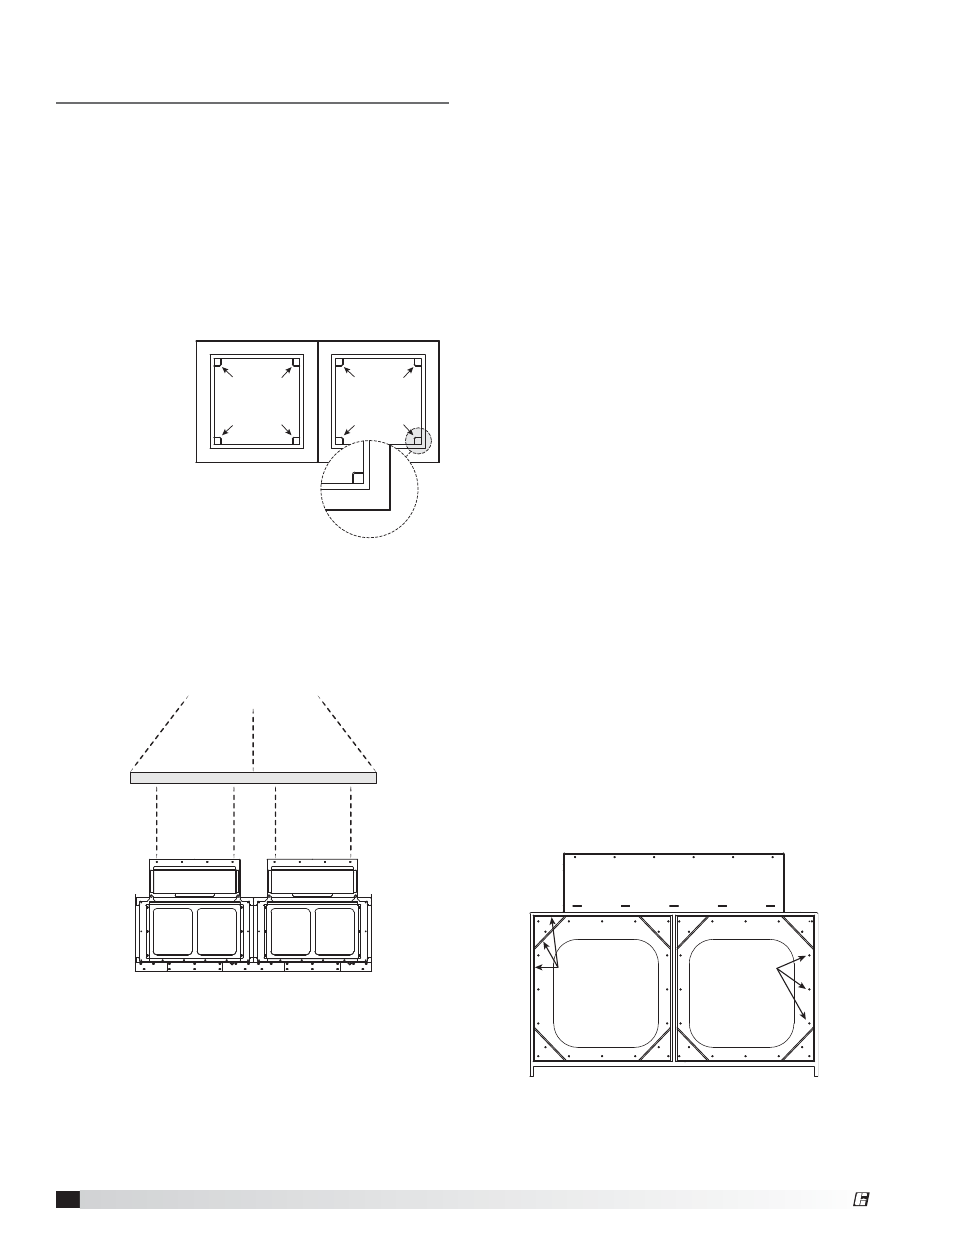
Steps for joining multiple BAP sections together:
1. Lift / place first BAP section making sure that
mounting holes are positioned with curb mounting
holes or to structure BAP will be secured.
2. Attached provided gasket to plenum section using
the pattern shown in the image.
3. Ensure bolts are removed from both mating
sections to being joined together. Plenum will ship
with hardware in one section’s bolt holes or were
removed to disassemble BAP to reduce lifting load.
4. Lift / place next section into position using similar
lifting procedure.
5. Align holes between two mating sections.
6. Use fasteners (provided) to join the two sections
together, this will involve utilizing the nutserts in
each section on the inside perimeter. The fasteners
are tightened until the sections are pulled together
and the gasket material is compressed.
7. Caulk joint (provided) on the top and two sides
between sections for enhanced water protection.
8. Repeat steps 1 – 7 until all plenum sections are
lifted and joined together.
Any side panels removed to gain access to the interior
of the plenum should be reattached.
Gasket Material
each plenum section
Bolt Holes
Plenum Section
Lifting Points
Lifting Points
Spreader Bar
Chains
Two fan bypass air plenum shown.
Plenums may be single sections or up to six in length
6
Laboratory Exhaust Systems
®